Good morning and
thanks for tuning in:)
We are into week seven
of our sew along!
If you are just getting started...
remember that there is
a link to each and every blog post
of this sew along...
right here on my blog.
Simply look on the right side bar
and scroll down to find the
Bee Happy Sew Along...
and click on the post
that you would like to read:)
If you need a kit...
check with your
favorite quilt shop
or do a google search online
by typing in
"Bee Happy Quilt Kit"
to see what online quilt shops
may have a kit left.
Today let's get started
by baking some cupcakes!
You will need just two
Sew Simple Shapes
D-8 and D-12
After sewing you will need to
clip the cleavage areas
in the cupcake tops.
Trim...turn...shape and press:)
Pin baste your cupcakes
using this placement guide.
Ready for appliqué!
I used a red button
for the cherries on top...
But I trimmed up my blocks
to 4 1/2" square first:)
Applique...embroidery and
buttons are complete.
YuM!
Those cupcakes made me thirsty
so let's make a nice tall
glass of lemonade to go with!
You need D-1 and D-18
Sew Simple Shapes
Just easy sewing...no clipping needed:)
Run the bias strip through the
1/4" bias tape maker for a cute straw!
After turning and pressing...
prepare your block for appliqué like this.
Trace on the embroidery lines
by using a light box
and the pattern in the sew along guide.
Press the ends of the
bias strip under and glue baste.
***Remember***
Just like I told you in the
video tutorial at the beginning
of the sew along...
that when you press under these ends...
don't worry if they stick out
of the sides a little
because you can fix that
during appliqué.
If you are machine appliquéing...
simple push them in with a
tailors awl or use the end
of your seam ripper
and then the stitches
will cover them nicely.
If you are doing hand appliqué...
use your needle to "sweep"
those pieces that are
sticking out back under the strip:)
All ready for appliqué!
Do the embroidery as well.
Your block should measure
4 1/2" x 8 1/2" ...
And is ready to sew into your quilt!
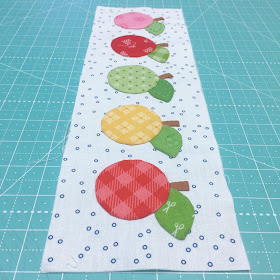
Now let's have some fruit!
It's apple season so
let's pick a nice variety:)
You will need D-15 and D-2
Sew Simple Shapes
Run the stem strips through the
1/4" bias tape maker.
Sew and trim...
no clipping needed on these:)
Turn...shape and press!
Let's begin laying out the block.
Use this photo as a guide
for measurements
on placing your
apples and leaves.
Last to do are the stems.
I embroidered my leaves
before I pinned them.
Ready for appliqué...
let's do this!!
Your block should measure
4 1/2" x 14 1/2"
and is ready to sew into the quilt.
After appliqué you can
sew the buttons on now...
Or wait until after quilting:)
Let's make a picnic basket
to carry our goodies!
Grab your block pieces and the
D-28 Sew Simple Shape
Run the red strip through the
3/4" bias tape maker
Run the handles strips through the
1/2" bias tape maker
Run the Vivid Solid through the
1/4" bias tape maker
for the top trim of the basket.
Measure up 2 1/2" from the bottom
of the basket rectangle and
glue baste the red strip.
Pin the interfacing on and
sew the strip
into the sides at the same time
that you are sewing the basket...
easy peasy!!
Trim and turn as usual.
You can appliqué the strip edges
down at the same time
you appliqué the rest of the block.
Ready to prepare the block!
Basket is placed 3/4" up from
the bottom
and the handles are 1" down
from the top.
Ready for appliqué:)
Trim your block to 8 1/2" square.
I used red floss instead of white
to sew on the buttons
because I think it looks super cute!
We have a few more weeks of tutorials
before we can sew row four together...
and I am so excited with the
progress that you are making!
You are doing great
no matter which row you are
working/playing with right now.
Keep those blocks coming
and keep posting them!
Don't forget the hashtag
#BeeHappySewAlong
Stay tuned for next week and
Bee Happy!
xx
Lori


Lori, although I am not participating in the QAL, I always read them with great interest! Your designs and fabrics are the so clever. I have a question. Your applique pieces always look so perfect when you turn them and I was wondering if you use a shorter stitch length than when just doing piecing?
ReplyDelete