
 Well hello again...here I am for part 2 of my tutorial....making a hexagon flower.
 I like to join the sides (petals) of the hexagons together first.
 Again...I DO NOT stitch into the paper at any time while joining the hexies.
I only take a small bite out of the fabric that is on the edge of each one that I am joining together.
I first join 2 with right sides together...then 2 more and then the remaining 2.
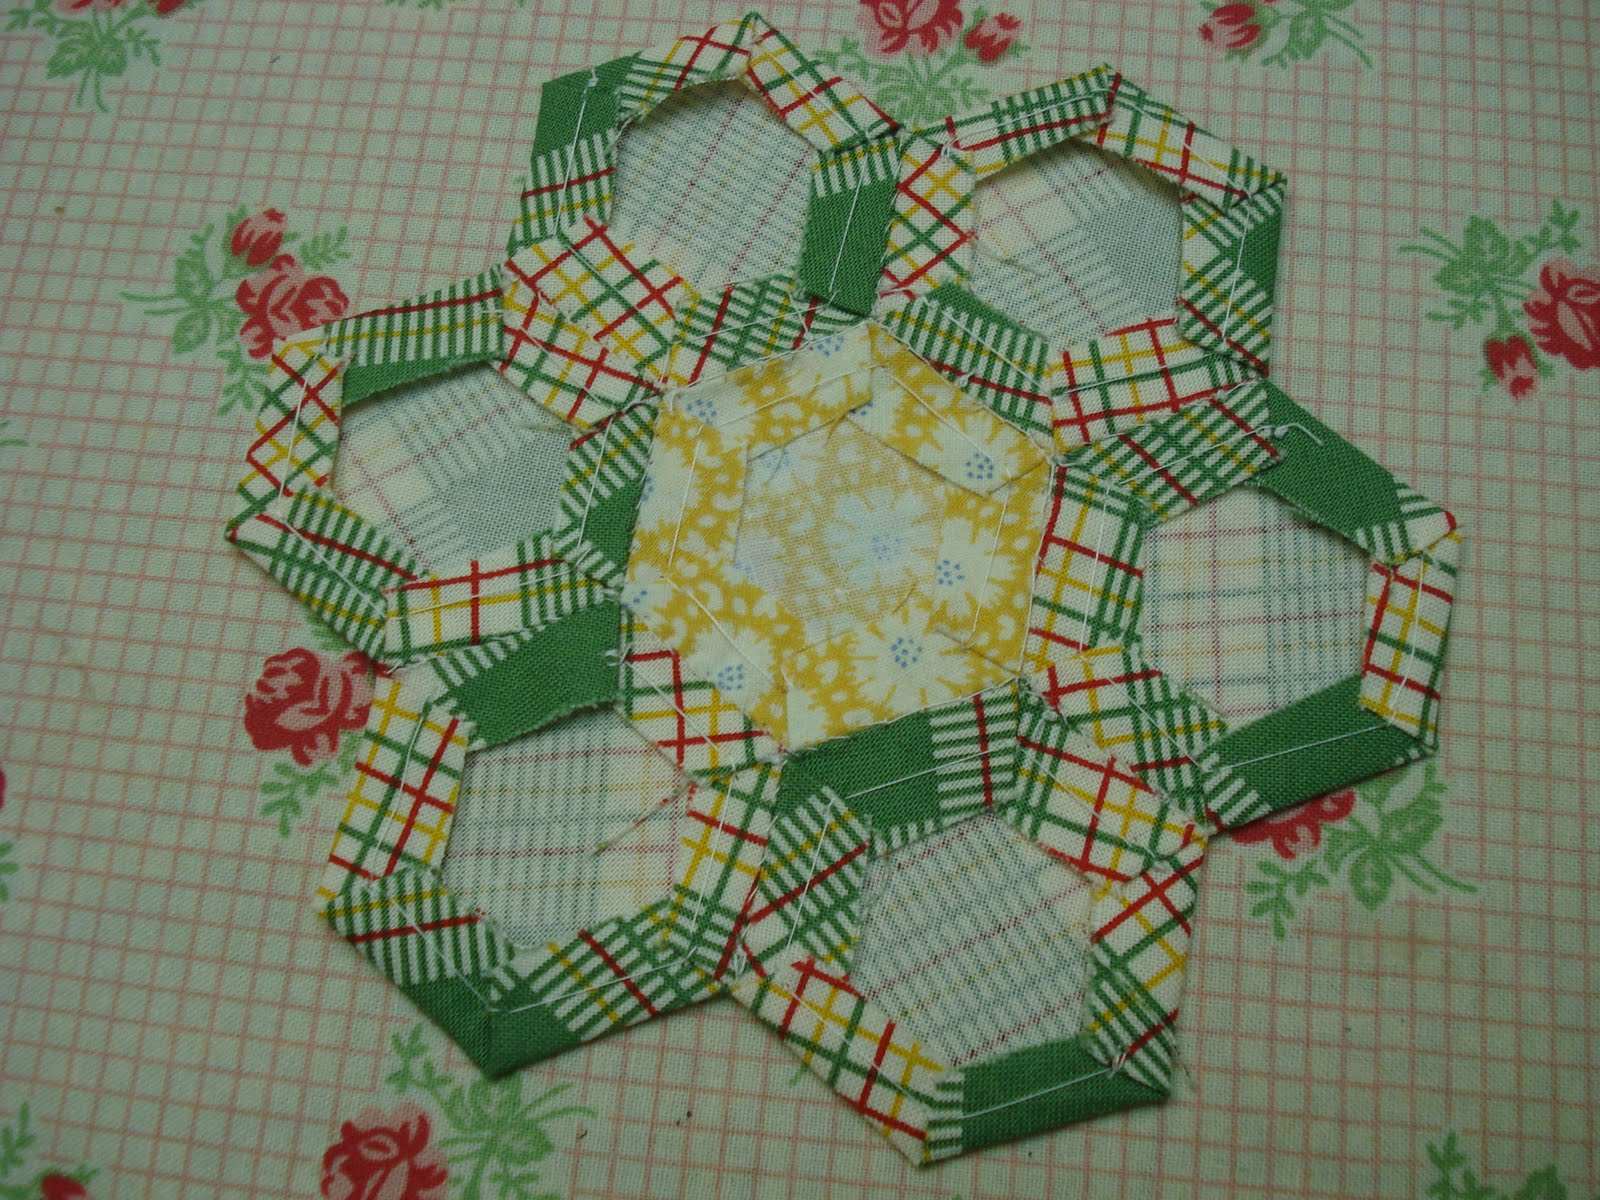
Then I join those segments together to form a ring.
I always knot off after joining one hexie to another.
 Joining the petals first just works out better for me...and I can "audition" several hexie prints for the center...to see which one I like the best.
I leave my papers in when forming the rings.
 However...I like to take the paper out of the center hexie, making it more pliable and a little bit "stretchy" if needed for allowing me to stitch the corners together perfectly.


After I have completely stitched the center hexie in...I knot off my thread and carefully pull out the papers. (see part 1 for paper removal)
If I am making a larger flower, at this point I would add another row of hexies before removing my papers....but I am using small flowers for this project.
By the way...I press the papers to use again just like I explained in part 1.

Then I press...and I mean PRESS...( I do not move my iron back and forth)...I just set it on my flower for a few seconds on the backside...

...and then I spritz it a little on the front with Mary Ellen's Best Press...and press the front.

I let it cool completely before picking it up. I like how the best press gives my flower a crisp new feeling ...and it smells good too! I used the Lavender Fields scent on this one:)
 I used a regular whip stitch on the green and yellow flower above....which works just fine....however....I normally do a little something extra with my whip stitch that I want to show you.
Below is a close up of my variation of the whip stitch.
I feel that stitching this way secures my stitches better and helps to hide the stitches from the front.
 I do a regular whip stitch but before I pull my thread up all the way...I insert my needle through the loop and then finish pulling the thread snuggly but not too tight as to break it ...or distort my seam so that it won't lay flat when I open my hexie flower.
 This is what my stitching looks like from the top view of the seam.
 I have a good start on my flowers now....
 I am making them very scrappy and all with a vintage look.
 I do a regular whip stitch but before I pull my thread up all the way...I insert my needle through the loop and then finish pulling the thread snuggly but not too tight as to break it ...or distort my seam so that it won't lay flat when I open my hexie flower.
 This is what my stitching looks like from the top view of the seam.
This stitch is also how I knot off my thread...so I guess you could say that each stitch is a single knot
.
However when I knot off, I do the stitch two or three times in the same spot as needed for securing properly.....I also leave a small tail when cutting my thread after knotting.
I feel that by doing this, it's harder for the knot to come undone when pulled while stitching into a quilt.
I don't worry about the tails showing...I just make sure that they stay tucked in the back of my flower.
 I have a good start on my flowers now....
 I am making them very scrappy and all with a vintage look.
I am trying to make the centers of my hexie flowers matchy while not being too matchy (if that makes sense to any one but me)...lol!
 I hope that you have enjoyed my tutorial on how I do my english paper piecing.
 I hope that you have enjoyed my tutorial on how I do my english paper piecing.
It works for me...and I hope it works for you too.
I would love to hear what you think!
Wow, those are gorgeous.
ReplyDeleteAwesome tutorial and I like your tip for making a knot while whip stitching. BTW, I get the matchy thing - just matchy not matchy/matchy. I really do get it. LOL
ReplyDeleteWow these are awesome! I do love the colors! Please stop by my blog and vote for my friend. Have a great weekend!
ReplyDeleteJocelyn
Your photos are excellent and you've done a great job achieving a vintage look with your hexies. Thanks for the tutorial.
ReplyDeleteAwesome! I've learned so much. So now how will you use them? Do you applique them to a background piece or just keep hooking them together to make a giant bunch of flowers? Jenn
ReplyDeleteLori,
ReplyDeleteThis is a great tutorial! I have been wanting to make hexagons for a long time but haven't had the courage.. you totally inspire me! Thanks so much for sharing!
I have read quite a few tutorials on hexagons. I like how you knot each stitch. Thanks for the insight.
ReplyDeleteBUT what I am in desperate need of is a tutorial on how to applique. I have you-tubed it and everyone is trying to sell a product. I just need to know what stitch to use to stitch down my design. I think I will use dissolvable backing to help keep my piece in place but do I attach my pieces with a whip stitch?
I just found out I am to become a grandmother and I really want to get this quilt made and into my daughters hands. If you can help I would appreciate it.
Excellent instructions...I keep reading what a great teacher you are...it shows!! Love all your cute "stuff" too. Kristy in Ohio
ReplyDeleteOkay Lori ~ I am simply over here drooling all of the floor. I am in love with these hexagons and this is an absolutely WONDERFUL tutorial!
ReplyDeleteIt was so fun to be able to talk to you this morning! Miss you!
ReplyDeleteI like your technique and will have to try that way. When I made mine, I always started from the center Hexegon and worked out. Did a regular slip stitch. I like the idea where you knot off as you go.
Great tutorial! Thanks for all the tips and tricks. Can't wait to try!
ReplyDeleteYou always give the best tips. This is getting bookmarked for me. I want to try how you do it. I am sure I'll like it better than my way.
ReplyDeleteHi Lori, Still waiting for my paper hexies to come in the mail. I have plenty of work to do in the meantime...By the way, do you coordinate your scents of Mary Ellen's starch with the color fabric you use? hahaha! Just kidding!!!
ReplyDeleteThanks for the info Lori -- your stitches are beautiful. I haven't tried this block yet, but I always get a kick out of them because so many people stitch them to within an inch of their life. Your way is MUCH more reasonable! ;-)
ReplyDeleteThanks Lori - both Part 1 and Part 2 were great. Easy to follow and wonderful photos.
ReplyDeleteFantastic tutorial. I love the idea of knotting each stitch as you go..brilliant idea..I will have to try that.
ReplyDeleteP.S. I love your nails...gorgeous French manicure!!
çok teşekkür ederim ...
ReplyDeleteI love hand projects. I should do one of these hexie flower quilts. (ANOTHER thing for my "someday" list....LOL)
ReplyDeleteThese look wonderful and I love your step by step directions! Wonderful!
ReplyDeleteAnn
Well I'm swooning and drooling over ALL the quilty/vintage goodies over at your place. I especially appreciate the hexie tutorial. I have been working on some this last year and now I may try some of your tips!!
ReplyDeleteYou are so creative and inspiring!!
Thanks for the tip on knotting the hexies. I learned to EPP a while ago and saw a lady using the papers on a bus trip on 2006. She showed me the way you do it. I take my Hexies on road trips in my little tin vintage looking Singer can.
ReplyDeleteLori, I had to tell you I finished my "eat CAKE" project and it turned out so cute. Only could have done it with your professional teaching. Thanks so much for sharing your talents with me and my sister Polly. You are such a sweet and cute woman. Thanks a ton. Also am looking forward to starting the darling quilt pattern you so generously gave me (which I still can't believe) You are one of my favorites. Thanks, Michelle (Nanette's sister)
ReplyDeletethanks for this tutorial. the knot as you sew is a great tip. Thanks for sharing.
ReplyDeleteyou have a wonderful blog, and i am really enjoying it! thank you for sharing all of your techniques and ideas with the rest of us. you are so inspiring!
ReplyDeleterita
I've been wandering around the net reading about hexagons. Your pictures are wonderful. I really like how you stitch them together -- I'm going to have to try that. Did you know that if you use a small, single hole punch and punch a hole in your paper, you can use a chopstick to pop it out much easier? They get bent or beat up on the edges.....
ReplyDeleteWhat a great tutorial. Thanks so much. Quick question, do you leave your basting stitches in or do you take them out? Thanks.
ReplyDeleteThank you very, very much for your tutorials (part 1 and 2). All I would like to know: what kind of paper do you use? I printed on regular printing paper, but I think that's not thick enough. Or is it? Your flowers look great!
ReplyDeleteyou have a wonderful blog, and i am really enjoying it!!!!!
ReplyDeleteflowers to china
florist china
send flowers china
awesome blog and great tutorial... I'm gonna give hexies a go and found this while looking for tutorials.
ReplyDeleteLovely flowers too!
Thanks so much!
¡Fantástico tutorial!.
ReplyDeleteMuchas gracias ppor compartirlo.
Lo pondré en práctica.
Gracias, y un abrazo.
Hi Lori!
ReplyDeleteWhat a great tutorial. Not sowing through the paper was a great tip. I started on my first hexi flower yesterday...it's so much fun.
Thanks for putting this wonderful tutorial on the web, you really helped me.
Many greetings from a snowy Stockholm (Sweden)
Pamela
Btw: Looooooooooove your bloog. Both the look of it and all you write!
Well I am enjoying the old music... (Dean, Bing,Louie...) so much I just keep looking at your blog to keep listening......its my first visit and oh my goodness look at all I've been missing!
ReplyDeleteGreat tut.....I taught this to school children once and they just loved the method of sewing fabric to paper...even the boys! Now I see how effective the technique is of not stitching to the paper...just using it as a guide. I certainly will try this method.
thanks so much and
Happy sewing
Great Blog..... wonderful instructions.....been wanting to make a Grandmothers Flower Garden for years. Want to make a memory quilt with fabrics that I have purchased on my travels.... can't wait to start.... thanks again.
ReplyDeleteThanks Lori!
ReplyDeleteI love your hexagon tutorials! I love that you don't sew through the paper. duh. =) I've already started cutting all of my little scraps to make a hexagon scrap quilt.
Thanks again!
~Andrea
I love your tutorial.. i will sew the hexies based on the tutorial..Thanks for sharing it..Loves the paper clip idea and also the paper can be recycle again idea.
ReplyDeleteLori, You have inspired me AGAIN to get sewing! Your methods for hexies are much easier & faster than the ones I have been doing. Thanks for a great tip & for the shot in the arm!!!
ReplyDeleteThank you so much!! Tremendously helpful!! I am starting my hexi project Jan 1st! I truly appreciate the time you have take to share this :)
ReplyDeleteI love this tute. Thank you so much for sharing it. Im new to fabric craft and am already an addict. I have tried, with projects with some success,using Hand applique and embroidery as well as crazy quilting. This tute has made the frighteningly scary not so intimidating. I feel confident enough to give this a whirl too now. Thanks again. Happy crafting. La la Lisa.xxx
ReplyDeleteI love this tute, Thank you so much for sharing. I am new to fabric crafts and am already addicted to hand applique, embroidery and crazy quilting. After watching this, i feel confident enough to give this a go too. Thanks again and happy crafting
ReplyDeleteGreat tutorial! Thanks so much for taking the time to make this. I haven't sewn hexies in years, so it was nice to have a tutorial to refresh my memory.
ReplyDeleteI love your hexie flowers. They are beautiful. Thank you for your tutorials. They are so well written and photographed. I appreciate you providing these for us.
ReplyDeleteNice tutorial!
ReplyDeleteI loveeeeee love loveeeeeee your craft room. soooooooo homey. I bet you could spend all day in there! as for the hexies I was excited to know that you love your sizzix machine as I just purchased one and haven't had a chance to get any dies for it yet. looking forward too it after seeing your hexie tutorial. when I do hexies I used to do them just like you do but now I have come up with a way that I like even better. I draw the center out of freezer paper and simply iron them to my hexies no pins no paper clips nothing. the paper is just enough to give you the fold for each one and when you are finished you can simply tear them out. of course it does involve drawing the first page of them and then you can print out the others from there. love your blog! take care Linda
ReplyDeleteI love your hexie flowers. They are beautiful. Thank you for your tutorials. They are so well written and photographed. I appreciate Göğüs Estetiği
ReplyDeleteThanks for the tips; the paper clip and the knotted stitch are new to me, and from now on part of my EPP routine.
ReplyDeletehere it is 2015 and I just found you-thank you for these excellent photos and tutorials I am just getting started making my first ever hexie quilt with 1800s fabrics and after making a few rosettes I searched for a better way-I am going to try yours especially not sewing into the papers-I like that and I hadn't thought of knotting I like that too-what kind of thread are you using? I bought 50wt yli silk thinking that would be strong and hide my stitches to the front well
ReplyDeleteThank you so much, now I know how to do it ♡
ReplyDeleteWonderful instructions. My granddaughter requested a hexie flower to applique on the back of a flannel shirt (a new fad with the young people). I had never sewed hexies but was able to follow your instructions with ease. Thanks so much!
ReplyDeleteI have always wanted to try a hexie quilt and I love your details and explanations of the process, they look great! Thanks for sharing
ReplyDeleteI have taken the plunge into the world of epp! You make it seem so easy, so I don't have a huge fear to start. Question: do you ever remove your basting threads?
ReplyDeleteI am a new English PP and self taught. I had no idea if I was supposed to sew the fabric to the paper or not. The first ones I did, I attached the fabric to the paper. That was really tough going. Anyway, you method is so nice and easy compared to what I have been doing. I have enough hexes made to get about 70 flowers. i don't know exactly what I'm going to do with all of these, but I keep on making them. Thanks for your wonderful tutorial. I loved it.
ReplyDeleteNancy in PA
How fun to read this today! If not mistaken Kass now has a child of her own and in this blog she is 10!! What a great legacy you have been leaving not only for your daughter, but also showing us how we can do the same!! I can’t wait to get started on my hexies!!
ReplyDeleteDiane Comeau