Wednesday, December 19, 2012

Bake SaLe...


We interrupt this 
regularly scheduled row along program for Christmas!
YaY!
Christmas is almost here...
 and with all of the hustle and bustle of the season...
 I had only yesterday to sew a new row 
and to get it posted for this morning.


But alas my friends...
 I was happily interrupted by a 
fun package that arrived from across the ocean.
The first strike off's from my next line...


Aren't the cute little batter bowls 
on the selvedge adorable?

I heart them :-)


They look pretty good as far as first strike off's go...
a few coloring issues to fix and such is all.

I went through each print carefully so that they could be sent back ASAP!!
Which did not leave me enough time for the new row...:-(


It's okay though because it's Christmas!!!
I know you all have a lot to do too.
So I hope you will forgive me.
Pretty please?
(with a cherry on top ...of course)


I will post the next row on...
 Wednesday, January 9th 
and the next one two weeks later...
 and "sew on" and "sew forth"

Good news is...
this gives those who are behind a few weeks to catch up!!!
YaY!

 And for those of you who aren't behind...
you can start another quilt!!!
YaY!

And for those of you who hav'nt joined...
now you can!!!

YaY again!
It's a win/win...
You're welcome and Merry Christmas!


Anywooo...
back to fabric:-)
Here are the prints in my Bake Sale line.
First...
 we have the 
Main flower prints...


The Mixing Bowls... 


 The Tablecloth prints...


 The Cherries...


The Recipes...


And the Polka Dots :-)


I'm excited to share these next 3 prints with you...
there are 3 panels that come with the line.
Each panel is a yard of fabric and...
 on each yard is 4 fat quarters!
YaY!
That means 12 different fat quarters of coordinating prints
 to add into the Bake Sale line...:-)


Do you likey???
I hope so...
because I have all kinds of cute little cottage kitchen 
projects all completely planned and ready to sew...
lots still in the drawing stage...
and even more dancing around in my head....
(like a bee in my bonnet)


"Bake Sale"
by
Lori Holt
of 
Bee in my Bonnet
for Riley Blake Designs

Bake Sale will be available May 2013

As always...
the hardest part for me is waiting for my yardage!
Have a quilty kind of Christmas my friends :-)
xx
Lori

Monday, December 17, 2012

A Pillow and Pillowcase Tutorial...for Dolly!...


After finishing up the Dolly quilt...
I decided to make a cute little pillow and pillowcase to match:)

Here's how I did it...


 I started with two layer cake squares.
(Sew Cherry and Polka Dot Stitches)
Out of one...I cut a 7" x 8" for the pillow...
Out of the other...I cut an 8" x 9" for the case.
I used a 10" long leftover jelly roll strip for the trim. 


I folded the pillow in half and stitched around the 3 open sides...
and left an opening for turning.


I turned right side out and pressed the opening edges 
under 1/4" for ease when sewing it closed.


I stuffed my pillow...
then matched up my stripes and 
pinned to whip stitch the opening closed.


YaY!
Easy peasy ... fast and breezy:)


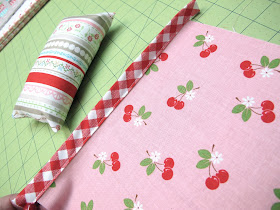
I pressed my 2 1/2" strip in half with wrong sides together...


And pressed each side to the center.


I laid the edge of my pillowcase on top like this...


And folded my trim over the raw edge and pinned it into place...


Like this.


I top stitched across the top catching both
 the back and front trim at the same time.


Then I folded in half and sewed the 2 sides closed. 
I also ran a zig-zag stitch around the edges
 to stop from fraying and the cut the 
leftover ends of the gingham trim off.


I turned my cute little 
pink Sew Cherry pillowcase right side out ...
and gave it a nice press with a bit of starch.


I placed it over my pillow and smiled...:-)


Dolly quilt and pillow...all ready for her nap.
A fun little addition that took me all of 20 minutes to make.
Have a quilty kind of day my friends!
xx
Lori

Wednesday, December 12, 2012

How to Bind a Quilt and Other Quilty Projects...


Recently I've had several people ask me how I bind my quilts.
So I thought that this would be a perfect time to show you how I do it:)


Yesterday I made a quilt for Dolly and I took pics of my machine quilting and binding process.
It's the same way that I bind every quilt or project...no matter the size.

I'm no stranger to hand quilting...
I grew up around the quilting frames.
But because of my design schedule...
I usually send my quilts out to be machine quilted.
That seems to be the norm now a days and
 I do love me a beautiful machine quilted quilt!


When I have smaller projects such as my new Dolly quilt...
I simply quilt them on my Bernina.
I cut my backing fabric a few inches larger than my quilt top...
around all 4 sides.
 I cut my batting the same size as my backing fabric.


I ALWAYS use a walking foot when I am machine quilting. 
A walking foot allows the top, middle and bottom layer of the quilt
 to feed through the machine at the same speed...
so that means no shifting... gathering or puckers when quilting.
Nice!!! 


After I have finished my quilting...


I quilt 1/8" from the edge to hold it down nice and flat for binding...
then I trim the excess batting and backing fabric away.


Sometimes I like to add trim in my bindings.
For the Dolly quilt...I sewed 1/2" pink ric-rac on the edge.
I fold the rid-rac like this on each corner and if there is any 
ric-rac sticking out past the edges of the quilt...
I simply trim it off. 
Don't worry about those trimmed off edges fraying...
they will be within the binding:)


When I take my 1/4" seam allowance with the binding..it will look like this.


I cut two 2 1/2" x Width of Fabric strips for the binding.
For this quilt I will need about 80" of binding.

My formula for determining how many inches I need for a quilt goes like this.
1. Measure the length of all 4 sides of your quilt top.
2. Add them together.
3. Add 10"...
4. That is how many inches you will need!

*NOTE - if you are binding anything that has a curve at all to it...
you will need to cut your strips on the bias!!!


I cut the selvedge off of each strip....


And join them together on the diagonal...


like this.


I trim off the excess...


And press the seams open for less bulk around the edge of the quilt.


Then I press the whole strip in half with WRONG SIDES together.


I unfold one end and fold it down like this...


And then fold it back to wrong sides together.


I place the raw unfolded edges even with the edges of the quilt....
the fold goes towards the inside of the quilt top.
I start by sewing the end I have folded like this....
 and I leave a tail by stitching about 2" down from my fold.


I use a 1/4" seam allowance and 
I always use my walking foot when sewing on binding to keep the layers even.
I keep sewing until I am 1/4" from the first corner.
I lift the foot up ...leaving the needle down and pivot the quilt on an angle like this.


Then I sew at an angle off the edge of the corner and clip my threads.
I DO NOT CUT MY BINDING STRIP AT ANYTIME.


Then I lift the binding straight up...


And fold it back down like this.


The raw edges are even with the side of the quilt again
 and I'm ready to sew the binding on the next side of the quilt.


When starting on a new side...
I simply start at the top...
sewing through the folded corner and backstitch at the beginning to secure.


I continue sewing all 4 sides of the quilt and do each corner exactly the same as the first one.


When I get back to the side where I started...
I trim the end on the diagonal ...


Making sure that I leave it long enough so that I can 
unfold the folded tail at the beginning and tuck it inside...


like this.


Then I simply continue sewing until I reach my first stitches...


Then I sew on top of them about 1/2" and backstitch.
By tucking the raw edge inside the folded end that I started with...
I have a completely finished seam!


Then I fold the binding to the back of the quilt and whip stitch it into place.


I always start my hand stitching where I started my machine stitching.


I do a blind whip stitch...


and I fold the binding just past the 1/4" seam line on the back.


When I get to the corners I fold them over to the back and sew just to the machine stitching.


Then I fold the other side in just past the stitching and
 stitch them together with 2-3 stitches...like this.
I continue in the same way all the way around...


Until I get to my first fold in the binding. I also do a blind whip stitch to hold it down and the I knot off.
I hide my tail between the layers and trim...just like when hand quilting.


And my Dolly quilt is completely bound.


And ready to give to Dolly:)
Have a quilty kind of day my friends!!!
xx
Lori