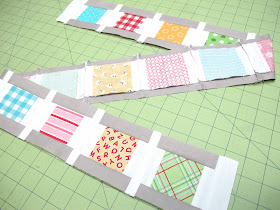
Good morning cute row along people!!!
YaY!!!
We are up to row 11 already ...
can you believe it?
For today's lesson we will be making a row of
sweet little sewing spools!
Of course we need to add spools to represent all of us
rowing and sewing together:)
The spools are a great opportunity to use up
a few bits and bobs that you might
have leftover from the previous rows.
The sewing and cutting is
easy peasy fast and breezy:)
You will be finished in no time at all!
Okay girls...
Plug in your irons...
Wind up your bobbins...
and let's do a speedy little row!
GO!!!
Cut your spools and background.
This is what you need to sew one spool...
Sew a strip to each side of the thread.
Press towards the thread like this.
Now add the top and bottom...
press away from the thread.
And just like that...your first spool is complete!
Didn't I tell you they were fast?
(I know that the gray pieces look a little large right now)
So I laid background strips around the block overlapping by 1/4"
so that you can see what each spool will look like
when sewn together into the quilt....
I didn't want you to think that I made the gray pieces too large...
you can see that the proportion will be better
when the rows are all together:)
Now that you have made one spool...
pick up the speed and chain piece the remaining spools.
Remember...
side strips on first...
And spool top and bottoms on last:)
WOW!
You are already nearing the finish line!
Sew them into a row with a sashing strip between each spool...
press towards the sashing:)
Remember to cut the background strips for each end
a little wider than needed so that you can trim down
your spool row to measure
just like all of the other rows.
Now smile because your Row 11 is complete and you didn't even break a sweat:)
How fast can you sew your sweet little row of spools???
The race is on!!!
Have a quilty kind of day my friends:)
xx
Lori
***EDIT
The instructions for the Row Along Quilt will now be in my new book
"Quilty Fun"
to reserve your copy!


I love the spool row!!! How cute :)
ReplyDeleteThese cute little spools look easy and should be done in no time! thanks for another fun row Lori!
ReplyDeleteThank you Lori. This is the cutest quilt along - really enjoying it!
ReplyDeleteLove it! You do such a good job on everything Lori!
ReplyDeleteThe little spools are adorable!!! I have loved every single row so far. I have a little secret to share with you. I cut out my squares for row #1 yesterday. I'm going totally scrappy!! Every bit will come from my scrap drawers, if I can swing it. I already know that I need to cut something from my stash for the apple stems, but I think I might be good on everything else :)
ReplyDeleteThank you so much for this row. I'm totally in love with this project, and don't know what to do when it's finished. You might start another one soon, at least I hope so. This row was done in an hours time, and now I have the red and black one left. Thanks again!
ReplyDeleteThey were so much fun to make!
ReplyDeleteLove this. But I have a question. Are there measurements for the strip between the little blocks? Looks like they might be l.5" x 4.5". I probably just can't find that...
ReplyDeleteI love this little quilt! How many more rows?
Cheery wave from
Bev
Cute! I just decided to start last Tuesday and Im only on row nine, but maybe Ill catch up! These looks simple ;)
ReplyDeleteThank you so much for taking the time to design and teach this Row Along! I am totally loving it and you are so generous to do it! I cannot wait for the next post! Thanks again for your kindness and generosity.
ReplyDeleteAnother great tutorial! Thanks so much :)
ReplyDeleteOooooh...I'm so behind!
ReplyDeletelove this row!! And like Sweet Pea said, just above my comment, "Ooooh...I'm so behind!!! :-P
ReplyDelete