Tuesday, April 30, 2013

Keeping in Touch!!!...


My blog has been a little quiet lately because as you know...
I'm getting ready for spring quilt market.


But I do try to take a few minutes to
 keep in touch with you via my iPhone:)


One of those ways??
The top 3 photos are a few things that I shared on Instagram.
Some of my quilt market sewing.
It's a fun way to keep in touch.
A quick snap and share!
Perfect:)

If you want to see what I'm working on every day...
I'm @beelori1
on Instagram:)


Another way I like to keep in touch is through


As you can see...I love to pin!!!
 I usually do for a few minutes every morning...
while doing carpool in the afternoons...
and for a few minutes before going to bed.
But some days get away from me and I don't get a free minute to pin:) 


I have alot of do it yourself pinboards ...
and alot of vintagey pinboards...
and alot of just for fun pinboards:)


Here are a few pics of some 
of my boards taken from
 my iPhone to show you.


You can find all kinds of great things
from home decor to collecting...


Gorgeous photos ...
or helpful links.


I have found and used so many good recipes there...


The inspiration is never ending!


And of course you just know 
that I have all kinds of 
quilty pin boards 
with many links to the tutorials.

If you would like to keep 
in touch with me through Pinterest...
you can find me 

I'm hoping to keep in touch with you
 on Instagram and Pinterest...
have a quilty kind of day!!!
xx
Lori

Wednesday, April 24, 2013

The Quilty Barn Along Youtube Tutorial...Barn 5...Maple Leaf block!!!...


Rise and Shine cute people...
It's Quilty Barn Along day!!!

This is barn #5...


A cute 6" Scrappy Maple Leaf!!!

This is a really fun block to make and 
it looks so cute on the side of a barn:)

Sew...
let's get started!


Cut all of your squares for the maple leaf block 2 1/2" x 2 1/2"...

***EXCEPT....
Cut 2 of your background squares 2 1/4".
(they go on each side of your brown square for the stem)

to go to the maple leaf block tutorial that I 
have already done when I did my Farmers Wife quilt.


After your block is sewn...
 Build a barn around it!
(my sashings will be added later...
 when I get an extra minute...
 after spring market is over:)


If you can't remember how to build a barn...
 for the tutorial
or else...


to see me doing the tutorial in person!

Yep...
that's me in my studio along with Kimberly from 

A few weeks back...
Kimberly and Chelsey flew all the way from Texas to Utah... 
to film me doing several quilty things
 in my little studio...
 in my little cottage!

We filmed for 3 days and one of the segments 
that Kimberly requested was a Quilty Barn Along block.
So click over and visit me in my studio:)

Have a quilty kind of barn buildin' day!!!
xx
Lori

P.S. I'm looking forward to seeing your blocks posted
 on the Quilty Barn Along page!


Monday, April 22, 2013

Just Checking In...


It's been a little while since I've posted...


I just thought I would check in to let you know why I have been
"SEW BUSY"


I have my pre-yardage for my newest fabric collection...


And I've been cutting up some of the yardage into
 all of the pre cut sizes
for designing new patterns.


I'm really excited because 
Bake Sale 
comes with additional pre cut sizes:)

YaY!!!

 In addition to 2 1/2" x width of fabric strips...
 and the 10" and 5" squares...


Bake Sale precuts will also be available in
 7" squares...
 3 1/2" squares...
and 3 1/2" width of fabric strips!!!


And of course it will also be available in fat quarter bundles:)
SEVEN
 pre cut sizes in all...
BIG SMILE!!!


I'm having alot of fun designing with this line...


I have used all of my happy colors...


And it fit's right in with my previous fabric collections...
YaY again!!!

Bake Sale
 will be available in just a few short weeks!


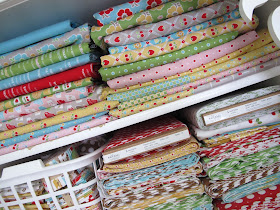
I have it all stacked and sorted 
in my IKEA
rolling cart so 
I can have them at the ready:)


A total of 30 
different fat quarters of
 Bake Sale to play with!


I have been planning and drawing...


And stitching and sewing...
both day and night to get ready for 
spring market which is just around the corner:)
I can't wait until I can show you all
 of the new 
"kitschy" 
things I have been
doing with Bake Sale...


I have used the
in several of my new projects...
in a new and creative way that I'm excited to share.

But before then...
I will be posting block #5 in the 
Quilty Barn Along 
on Wednesday...
so stay tuned and have a quilty kind of day!!!
xx
Lori

Monday, April 15, 2013

Vintage Monday...Vintage Dresses...


It's seems like forever since I did a Vintage Monday post...
so I thought today that I would!
Today I'm going to share a link to vintage style dresses...
if you happen to have a crush on vintage like me...
you will appreciate it:)


A few weeks ago when I showed you my finished row along quilt...
I had several emails asking me about the dress in my front room.

I have a dress form that I like to keep vintage dresses
 on and change them out from time to time.


This one is my current choice.
It's made from my Millie's Closet fabric collection...
and yes it is made from a vintage vogue pattern:)


I have been collecting vintage patterns for a long time....


I can never pass these beauties up
 when I see them in the thrift shops...
so I have quite a few that
 I've picked up over time...
and these are just a few!


Of course you know that I love everything vintage ...
and I love all of the colors and the 
feminine details of vintage clothing too.
It seems those kind of things 
are left out of modern styles somehow.


My daughter Kassidy loves vintage too.
She has such a hard time finding dresses and skirts
 because the styles are all way too short for her long legs.

But there is one place that she can always count on...
it's a favorite of ours... 
LOVE IT!!!
They sell all kinds of vintage style clothing.
YaY!

Just look at the white tulle skirt above.
 Kassidy loves this one...
she is a dancer and want's it in her closet ASAP!


Along with this vintage green gingham skirt...
so perfect for summer.


 We love this dark plum dress too.
It would be perfect to show off some vintage jewelry ...
don't you think?


And look at this polka dotty one..
it would be sooo cute for school!


Kassidy has this mint green one in her closet.
There are so many other vintage styles to choose from ...
I just showed you a few of them.
Here is a link to the 
 if you want to look for yourself:)

I am so happy there is a place 
that produces clothing in 
the vintage style that we both love so much...
 pretty...feminine and modest:)

How about you?
Do you love vintage dresses and skirts like I do?
Did you already know about Shabby Apple?
And do you have a hard time passing up old patterns like me?
I'd love to know:)
xx
Lori


Wednesday, April 10, 2013

The Quilty Barn Along...Block 4...Churndash...and the Sashing Tutorial!!!


YaY!
This is block #4...
with sashings added!
But before we talk about the sashings...
let's construct the block and build the barn.


The block is a traditional six inch 
"Churndash" block...
it also goes by the name 
"Monkey Wrench"
I have already done a tutorial for the block.

to go to the tutorial and make your own churn dash block!

I'll wait:)


Back so soon?...
Good job:)
Now add your barn strips...


and 


Don't forget to add the background borders like


Now all about the sashing:)
This is a simple but effective way to finish off your barn blocks...
Scrappy 2 1/2" strips!
You might recognize this finish from 
the bumble bee block from my row along quilt:)


Cut 2 - 2 1/2" x 16 1/2" strips and sew them to the top and the bottom.
Press towards the outside strips.
 Cut 2 - 2 1/2" x 20 1/2" strips and sew to the sides.
Now you have a 20 1/2" x 20 1/2" block that will finish at 20" square.
The best part is that you will be adding the sashing to each block as we go...
and won't have to do it all at once:)
YaY!


****Important...
Now pay attention because there is a method to the sashing
 that you will need to know about.
When adding the sashings to your barns...
you will add them to the top and bottom first and sides last...
ON EVERY OTHER BLOCK.


On the OTHER blocks...
 you will add the shorter strips to the sides first 
and 
then add the longer strips to the
 top and bottom last....


Like this.


That way...when you sew your barns together...
the intersections of the sashing strips form a basket weave kind of look.
Cute huh???


I love the way that the strips add color in-between the barns
 but do not take away from the 6" blocks.

 I went ahead and joined my 4 barns together.
I will sew barn #5 and #6 together and sew to one side of these 4.


I am making 12 barns total...
4 barns down and 3 across.

When they are all sewn together...
the quilt will measure 60" wide x 80" tall.
I will wait and see what that looks like and then decide 
if it needs more strips around the 
outside of the quilt for a final border or not.


I hope this gives you a good visual on what
 my quilt with the red barns will look like.

As I have said in the beginning of the
I will be making another quilt where
 the barns will be different colors...
and I'll be changing up the block
  a bit...
so stay tuned to my Quilty Barn Along 
and get to buildin!!!
xx
Lori