Today I'm going to
show you how I make the
stems to go with my
happy patchwork flowers:)
I made all of my flowers using the
to get a set of your own:)
Before I made the stems...
I whipped up a few more leaves
using the A-14 and A-16
in the set.
Then I chose
3 different greens
from my scrappy stash
to make my stems:)
I used the Clover 1/4" bias tape maker.
I cut my fabric strips
5/8" x width of fabric.
***NOTE- these stems will be
straight and not curvy
so I did not cut
them on the bias.
I like to clip off the
corners and make a point
to thread through
the bias tape maker.
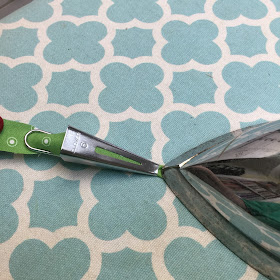
I insert the fabric
like this and use whatever
is handy next to me
with a sharp point
to help pull it
through the tip.
You can use
small embroidery scissors...
a tailors awl
or a pin:)
This is what it looks like
on the other side
where the fabric
comes out folded.
To press...
turn it back over
to the side where
its not folded.
I like to thread it
thru the metal loop
on the end to keep
my fabric straight.
Place your iron
on the fabric
without touching the
bias tape maker....it's metal so you
will make it too
hot to touch!
Pull backwards
(to the left)
on the metal loop and
iron the fabric strip
nice and flat
as it comes out.
I like to let mine cool
and then wind it around
vintage wooden spools ...
making sure the folds
of the stems underneath
are nice and flat
as I wind it.
I use these tiny
little appliqué pins by Clover
to secure the ends.
Now my stem strips
are ready for appliqué...
I just have to cut off
the length needed for a flower:)
Before I appliqué
the flowers
onto a background...
I like to appliqué
the centers onto
each flower first.
I use matching
50 weight 100% cotton
Aurifil thread
and a tiny zigzag stitch.
I also keep a
small ruler handy for
measuring so that
I'm sure the center
is right in the middle
before pinning
and appliquéing.
I am doing machine appliqué
for this project and
I love the way it looks!
This is what
it looks like
from the back.
I change my top thread
to match each piece
that I am appliquéing...
but leave white
Aurifil in my bobbin.
This is a close up
of the top:)
Now that all of my flowers,
leaves and stems are ready...
I'll show you
what I'm making
on my next post.
I can't wait!
xx
Lori


Just love these scrappy flowers and leaves and the way you make the stems and have them ready just to cut to length. I won a lovely box of your 'happy color' threads a while ago, and have been using them sparingly. They have always been the perfect colors for my projects so far. Looking forward to your next post. Merry Christmas Lori, to you and your family!
ReplyDeleteHello Lori, I was happy you showed how to use the clover bias maker. I bought one, but no instructions with it. I worked out how to use it, but I had wondered what the loop was for!
ReplyDeleteHave a happy Christmas.
I can't wait to see what you're making with your cute flowers, Lori! I'm actually going to brave the crowds today to go buy some sew in Pellon interfacing at Joann's because I can't wait another day to make some flowers with your shapes! And btw, it has never occurred to me to turn the bias tape maker over, but it makes perfect sense!
ReplyDeleteThank you for the great tutorial! Merry Christmas!!
ReplyDeleteGenious! I am getting ready to do some applique flowers and it would be so handy to have the stems all done and coming off a spool! Thanks for sharing your great ideas!
ReplyDeleteLove it!!! I just got my plastic pattern shapes for Christmas and can't wait to get started!!!
ReplyDeleteThe last several post are sew fun Lori! I could have a basket full of these and stare at them all day and maybe someday use them! Your talents are endless! Thanks for making sewing/quilting sew much fun! Happy New Year! xox
ReplyDeleteI have been playing with my blooms shapes and I love them and can't stop making fun flowers. Thanks for all the great inspiration you always give. I can't wait for you to show us what to make with all the flowers we have made. I bet I have enough for a bunch of projects.
ReplyDeleteI love the idea of making yards of stems to have available! Thanks for the tutorial.
ReplyDeleteI just can't get enough of these gorgeous fabrics and shapes! To be honest these fabrics really make me happy! Thanks for sharing your awesome stuff :o) I'm looking forward to follow your work, and I am looking forward to a new great and creative year.
ReplyDeleteWish you a Happy New Year :oD
Big hugs from Norway
Hello Lori! Happy New year to you! I have had fun going through lots of your blog posts and enjoying every minute of it! Your fabrics, and quilt designs are so ADORABLE! I bought a jelly roll of one of my favorite fabrics of yours and going to make a jelly roll quilt out of it. Your retreats look like sew much fun too! Well, just checking in to say hello and I have admire you for years! Hugs, Maryjane xox
ReplyDelete