Wednesday, December 23, 2015

Sew Simple Shapes - How to make Stems!!!


Today I'm going to
 show you how I make the 
stems to go with my
 happy patchwork flowers:)


I made all of my flowers using the
to get a set of your own:)


Before I made the stems...
I whipped up a few more leaves
 using the A-14 and A-16 
in the set.


Then I chose 
3 different greens
 from my scrappy stash
 to make my stems:)


I used the Clover 1/4" bias tape maker.


I cut my fabric strips 
5/8" x width of fabric.
***NOTE- these stems will be
 straight and not curvy 
so I did not cut
 them on the bias.


I like to clip off the
 corners and make a point
 to thread through 
the bias tape maker.


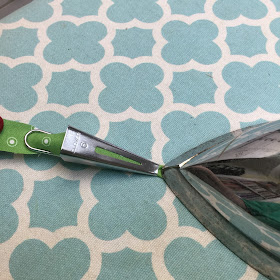
I insert the fabric 
like this and use whatever
 is handy next to me 
with a sharp point 
to help pull it 
through the tip.

You can use 
small embroidery scissors...
a tailors awl
 or a pin:)


This is what it looks like
 on the other side 
where the fabric 
comes out folded.


To press...
turn it back over
 to the side where 
its not folded. 

I like to thread it
 thru the metal loop 
on the end to keep
 my fabric straight.

Place your iron 
on the fabric 
without touching the
 bias tape maker....it's metal so you
 will make it too 
hot to touch!

Pull backwards 
(to the left) 
on the metal loop and
iron the fabric strip 
nice and flat 
as it comes out.


I like to let mine cool
 and then wind it around
vintage wooden spools ...
making sure the folds
 of the stems underneath
 are nice and flat 
as I wind it.

I use these tiny 
little appliqué pins by Clover
 to secure the ends.

Now my stem strips 
are ready for appliqué...
I just have to cut off 
the length needed for a flower:)


Before I appliqué 
the flowers 
onto a background...
I like to appliqué 
the centers onto
 each flower first.


I use matching 
50 weight 100% cotton 
Aurifil thread
and a tiny zigzag stitch.


I also keep a 
small ruler handy for 
measuring so that 
I'm sure the center 
is right in the middle
 before pinning 
and appliquéing.


I am doing machine appliqué
 for this project and 
I love the way it looks!


This is what 
it looks like
 from the back.
I change my top thread
 to match each piece
 that I am appliquéing...
but leave white 
Aurifil in my bobbin.


This is a close up
 of the top:)


Now that all of my flowers,
 leaves and stems are ready...
I'll show you
 what I'm making 
on my next post.
I can't wait!
xx
Lori

Monday, December 21, 2015

Sew Simple Shapes - Another Scrappy Happy Flower Tutorial!!!


Today's tutorial is a 
few additional 
scrappy happy flowers 
for easy appliqué:)


As I've said before...
here are 24 different shapes
 in the BLOOM set and today
 I'm working with 5 of them.
to get your own set of 


Here is the cutting for each shape;
A-18 - 2 1/2" square
A-19 - 2 1/2" square
A-21 - 3 1/2" square
A-1 - 2" square
A-5 = 2" x 2 1/2" rectangle

You will need to cut a piece of
 Sew-In Pellon 
the same size as each 
fabric piece as well.


Trace around each
 Sew Simple Shape
 by placing it in
 the center of the Pellon.
I always use a 
.05 mechanical pencil 
for a nice thin accurate line.

Pin to the right side of the fabric.


Stitch directly onto each traced line...
securing your stitch when you stop and start.


Trim an approximate 
1/4" seam allowance
 around each piece.


Use a small sharp pair of
 embroidery scissors 
and cut an "X" 
in the Pellon ONLY.


There is one "cleavage" area
 in the heart Sew Simple Shape
 that you will need to clip
 right to the thread...
 but not into it or past it.

Clipping will allow the heart
 to lie flat after
 it's been turned right side out.


I like to use the
 Clover turning tool 
to GENTLY push out the
 corners and curves
 after turning.

Press each appliqué piece
 flat from the fabric side.


I think that the oval
 and the circle look cute
 "tucked under"
 these two little flowers...
 don't you?

The heart is cute on it's own 
but a small circle
 tucked under it 
would be cute as well.


I could go on and on
 making even more flowers 
to appliqué
from my
 but I think that I
 probably already have
 too many for 
what I'm making...
but it's so hard to stop!
They really are 
fun and addicting:)

My next post 
I'll do a few more leaves
 with some of the shapes
 we haven't played with yet
 and then for the stems!
See you then...
xx
Lori

Friday, December 18, 2015

Sew Simple Shapes - Patchwork Tulip Tutorial with More Leaves and Flowers!!!


Good morning cute people!
Today I'm continuing 
my tutorials
 on making flowers with my 


First up is shape A-24...
and I'm going to show you
 how I make a 
cute patchwork tulip:)
First I cut 4 strips of
 scrappy fabric 
1 1/2" x 4"


Then I sewed them together
 with a
 scant 1/4" seam 
and pressed them open.

I placed the A-24 shape
 onto the wrong side
 and lined up the seams 
with the marks
 on the template 
and traced my stitching line...


Like this.
I cut a piece of 
Sew-In Lightweight Pellon
the same size and pinned
with right sides together.


I stitched directly 
onto my stitching line...
securing when I 
stop and start by backstitching.


I trimmed an approximate
 1/4" seam allowance
 and clipped a 
little bit 
off the top
of the points.


***Important! -
 You will need to clip 
the two "cleavage" areas 
in between the tulip points.

Use a small pair of 
sharp embroidery scissors 
and make a clip 
to your stitching line...
being careful not to 
clip past it...
 or into it.


Clip an "X" into
 the Pellon and 
turn right side out.


I use this 
Clover turning tool 
to GENTLY push out the points.
Press your tulip flat 
from the front:)


I quickly stitched 
up an A-24 Tulip 
without the patchwork
 to show you
 how cute and easy 
it is as well!


Now for a new leaf shape.
You can use the ovals
 in BLOOM for 
leaves as well!

For this set...
I am using the A-7 
and making patchwork Leaves.
I cut 2 pieces of green fabric 
3 1/2" wide x 4" tall...
then I cut them in half
 so that they measure 
1 3/4" x 4"


 to see how I make 
these oval leaves...
because the method
 is exactly the same
 as my other 
two sided leaf tutorial.

I think the ovals
 make cute leaves too!
 I like to be creative 
with the leaf shapes 
as well as the flowers:)
(still need stems...
but i promise they are coming!)


There are 4 oval shapes
 in the BLOOM set 
and they are
A-5  A-6  A-7  A-8
I cut some Pellon and
 a bunch of fabric 
from my scrappy stash
 for all four sizes...


And made some oval flowers 
to add to my 
growing collection of 
scrappy happy flowers:)


I also made another
 set of oval leaves!
This time I used 
one fabric instead of two:)


I'm having so much
 fun playing with my
and I hope you are too!

I'll be growing my 
garden of patchwork flowers
 over the week-end...
 and I'll show you
 even more on Monday:)
xx
Lori