Thursday, March 28, 2013

Polka Dot Stitches Fat Quarter Bundle Winners!!!...


Well I usually say good morning but somehow it 
got away from me before I could get this up and posted:)
So anyhoo...
Good afternoon cute people!


My rotary cutter and me have been busy
 cutting lots of fat quarters of Polka Dot Stitches...
and when I say me...
I mean Kassidy Grace.
After all...
she is my daughter and live in stunt double!


I have been occupied with some secret stuff
(announcement to come later)
and she has been my life saver:)
She has 3 bundles all stacked and cut...


Each tied up with a generous yard of my 
Polka Dot Stitches ribbon.
Did you know that I get to design a ribbon to 
match each of my fabric lines?
Riley Blake is so awesome:)

This weekend I'll be sending
 one of these fabric bundles
 to 
Carol, Kris and Sasha
because they are the winners of my


giveaway.

YaY!!!

I have emailed all 3 winners
 and they have responded and sent me their addy's.
Thanks sew much girls...
and a big
THANK YOU!!!
to all of you for stitching along
 with me and 
sending so much bloggy love my way:)


I loved doing the row along so much and
 I'm equally excited about the
 Saddle Up and
 join me!!!

Have a quilty kind of day...
xx
Lori


Wednesday, March 27, 2013

The Quilty Barn Along...Barn Number 3 and Postage Stamp Block Tutorial!!!...


Good morning cute people!!!
Are the cows milked and the chickens fed?
Good.
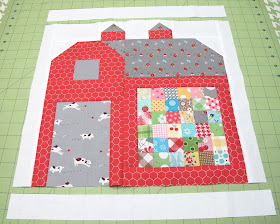
Because now it's time to build barn number three in the 


For this barn I decided to make a postage stamp block.
I was in the mood for some happy scrappy time!
This block goes together fast and is pretty self explanatory...
but here is a short tuto anyway:)

Cut 36 - 1 1/2" squares 
from your scrap stash:)

Get out your 
mini design board 
and arrange them in 
the order you would like...


Sew them into 6 rows of 6.
Don't press until all
 of the rows are sewn...


Then press the seams 
in each row going 
opposite directions...
 like this.


Sew the rows together 
and you have an adorable
Postage Stamp Block
  to go on the side of your barn:)

Your block should measure
 6 1/2" square at this point.


Add your barn fabric strips 
around your block...


And build your barn around it!
remember...
 the barn buildin' tutorial is 


Looks like barn #3 has some 
cute new puppies inside
 to play with:)


There is a new addition 
to our barns...
from now on...
 we are adding white strips 
around the outsides. 

Cut 2 - 1 1/2" x 14 1/2" 
and sew to the sides.
Cut 2 - 1 1/2" x 16 1/2" strips 
and sew to the top and bottom.


Now your barn block should
 measure 16 1/2" square
 at this point:)


I will be adding white strips around
 my barns one and two so that they all 
measure 16 1/2" square....
you will need to do the same.

I will let you know how
 we will be joining all 
of the 12 barns together when 
we are about halfway there.

I'll be posting barn #4 two weeks from today:)


But in the meantime...
I'll be planting


Do you have your peas in?
Have a barn raisin' kind of day...
xx
Lori

P.S. Don't forget to show me your barns on the flickr group.
If you are new and want to join in...
to saddle up!

Tuesday, March 26, 2013

S is for Stitch...and another giveaway!!!...


My 13 year old daughter Kassidy and I 
just recently re did her room and ever since...
she has been busy making projects to decorate it:)
When I received this beautiful new book
by my friend
Kristyne of (Pretty by Hand) fame...
Kassidy just had to get her stitchin fingers going right away!

This is Kristyne's first book and I must say that
 she has done a wonderful job!
It's beautifully written and is perfect for both beginners
 and seasoned stitchers alike.
Inside you will find 52 darling little embroidery designs
 to add a stitchy touch to your quilty projects.


They say that the apple doesn't fall far from the tree...
  Kassidy loves making hexies as much as I do
so naturally she decided they would be
 the perfect base for some stitching.
She used the 2" hexagon papers that fit perfectly
 with Kristynes design size in her book.
(2" refers to how long each hexie side measures)


To embroider on...
she chose 5" squares from this pack of 
They are perfect for this!
As you can see...
they are basic solids with a bit of textured shade.


She traced the pattern onto the squares  straight from the book...


And she used a cute little 3" wood embroidery hoop when stitching:)


Aren't these designs so cute?


She used a charm pac of It's a Hoot to make a bunch of hexie's.
The 2" paper hexie fits perfectly on a 5" square...
don't you love that?


She didn't even trim it into a hexie shape...
just folded it as she went.
Don't you just love that too?


Done in a jiffy!
Of course she used the
 method that I always use...
the one I did
 on way back.
As you can see there is no stitching
 into the paper...
making it fast and so easy.


So far she has marked... 


and stitched...


four of Kristyne's designs and several hexie's.
Aren't they cute?
I'm sure she will do more but here they are laid out so 
you could see what it's looking like so far.
She thinks she is probably making something for her dresser...
or maybe a large pillow.

She has been having fun with it and I'm so glad
 that Kristyne's book came along when it did.
It's perfect!!!
Thank you Kristyne for letting me ...
(and Kassidy)...
 be a part of your book tour!!!


If you would like a copy of your own...
and believe me...you do:)...
leave me a comment and I'll pick a name! 
Deadline is April 4th.
And guess what?
You have several more chances to win your very own copy of 
S is for Stitch
 by visiting all of the book tour stops:)
YaY!!!
Here is the list...

Allison Rosen @ stashbooksblog.com
Allison Harris @ cluckclucksew.com
Amanda Jean Nyberg @ crazymomquilts.blogspot.ca
Amy Sinibaldi @ nanacompany.typepad.com
Anne Sutton @ bunnyhillblog.com 
Me! @ beeinmybonnetco.blogspot.com
Sherri McConnell @ aquiltinglife.com March 27
Kristyne @ prettybyhand.com March 28

Have a stitchy kind of day...
xx
Lori

Friday, March 22, 2013

The Bee in my Bonnet Row Along - The Big Finish!...


You're invited to my
YaY!!!
my 
is finished 
photo shoot!


I just can't believe that the little
 row along  
that I started last August is over!
As I have said before...
all of the measurements in my row along tutorials will remain on my blog until this summer.
(July 1st)
After that...
I will be making it into a book...
so hurry up and finish!
You have 3 more months!

***(edit)
 Yay!!!
My book is now available for pre-order!
to reserve your copy:)

It's been so fun rowing along with all of you.
A big thank you to everyone who
 joined in the fun and played along with me:)

You have all been so sweet and 
all of you are A+ students!!!


To celebrate the end of the 
I am having a giveaway!

YaY!

I will be giving away 
3 Fat Quarter Bundles of my current collection...
Polka Dot Stitches
Please leave me a comment 
on this post 
and tell me
 what your favorite 
things were/are about the row along.

I will have my stunt double
 Kassidy Grace 
draw 3 names on March 28th
from your comments and 
I will notify the winners by email.
I will announce the winners  
Friday March 29.

I'm looking forward to hearing your thoughts
 about the row along and I really hope
 that you will continue the fun and are playing 
with me too!
xx
Lori


Thursday, March 21, 2013

Preparing Your Quilt Backing and Scrappy Binding Tutorial ...


Good morning...
did you get your borders on???
Good Job:)
Because now it's time to prepare the backing.
This is how I did mine...


First I finished off the edges of my bumblebee label by
 laying it face down on a square of
 white fabric about 1" larger all the way around.


I sewed around the block 1/4" in from the edge...
leaving an opening in the bottom for turning.
Then I trimmed off the excess white even with the
 block edges and turned the block right side out...
 like this.


I pressed the opening edges under 1/4".
You will sew it closed when you stitch it onto the backing.
 Set it aside for now.


Cut the backing to be a
 generous 5" larger  all the way around the quilt...
or in other words...
10 - 12 inches longer and wider
 than the quilt top. 


Place right sides together and sew one long seam down the center.
I don't cut my selvedge off of my backing 
so I use a wider seam allowance for this ...
just enough to go past the selvedge.


Give it a nice pressing.
Now wasn't that easy?
It's all ready except for the label:)


Pin your  label onto the backing wherever you want it.
I pinned mine on the bottom left corner.


I used a ruler when pinning just so that I would pin it straight.
I also pinned it about 10 - 12 inches from the side and the bottom
 leaving plenty of room for the quilter to
 put it on the frame without bothering the label.


I used a whip stitch and sewed it to the quilt back.


 I didn't worry about taking tiny stitches...
just nice and neat and secure.
Remember that it will be quilted also and
 it won't be coming off...
 so don't stress too much over the stitching:)


All ready for quilting!


Press the block...
fold the backing and set it aside until the quilting!


I've already done a tutorial on how to bind a quilt.
and read my tutorial which shows you every step 
of binding a quilt from start to finish.
I'll wait.

Okay...
now I'll show you how to make your scrappy binding!


I used some of the fabrics that I used in my rows and
  2 1/2" strips.


Join them together just like I have showed you before!


The strips are just different fabric
 and shorter than normal:)


When you trim the triangles off...


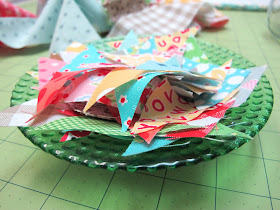
Put them in a pretty candy dish that you keep in your studio...
 because when your cutie pie granddaughter comes over
this is just the thing she likes to play with while you are sewing:)


Press all of the seams open and then press the strip
 in half with wrong sides together just like I showed you in 


Then to keep it from getting wrinkled and distorted...
wrap it around one of your mini design boards...


And pin it with a cute little bee pin for safe keeping
until your quilt is off of the frames!

My quilt is all quilted...
 bound...
photographed...
 and hanging on my wall:)

Tomorrow I will show it to you
and announce the end of my 
 Bee in my Bonnet Row Along
give away!

See you then...
xx
Lori

***(edit)
YaY!!!
The row along quilt pattern is now in a book!
to reserve your copy.
My book is called Quilty Fun and includes 
new blocks and 10 "spin off" projects
 from the row along!