Monday, February 29, 2016

BLOOM Sew Along = Week Seven - Block Seven!!


Welcome to the 
If you are just tuning in...
no worries...
it's not too late to begin:)


This is the BLOOM quilt 
that we are making together.
to download my free pattern.


I designed this pattern to go with 
my latest fabric collection called


And my first set of 
Sew Simple Shapes 
called BLOOM

to get them and let's get sewing!


Today we are doing Block Seven.


These are my fabric choices for the appliqué shapes in this block.
There are a few different ones from the pattern
because I felt like doing a yellow flower:)

Of course you can follow the same fabric selections as in the pattern...
it will all work out!


Here is the cutting for this week.
Cut from BOTH Pellon and fabric:
1 - 5" square for flower
1 - 3" square for circle
2 - 2 1/2" x 3" for leaves

From fabric only:
1 - 9" background square
1 - 5/8" x 5" for stem
(this was before I trimmed mine down) 


Trace around the shapes
onto the Pellon...
easy peasy!!


Then sew and trim.
You will need to clip the
 four "cleavage"  areas
 in the A-23 flower shape so that it will
 lie flat after turning right side out.

Make one clip just barely short of your stitching lines like this.


Then cut an "X" in the Pellon only 
and turn right side out.


Press them flat from the front only.
Use the point on your Clover turning tool to 
push and smooth out along the edges at the same time.
This is one thing that helps to get your edges smooth...
the other thing is practice.

Just remember...
you are striving for progress...not perfection.
Most important is to enjoy the process of learning 
and making something fun at the same time!


I pressed my background fabric in half for  reference of center placement.
I prepared my stem just like I showed you in the 
Then I basted my stem right on the center crease.


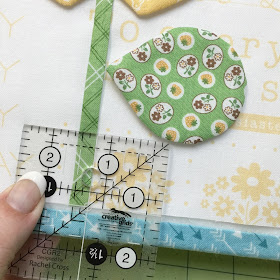
I measured 1 3/4" down from the top
 of my fabric and placed mmy flower like this.


I placed my leaves 1 1/4" up from the bottom edge like this.


My circle goes in the center of the flower...
and now for the applique:)


After appliqué...
trim your block to 8 1/2" square.
Cut your border strips and squares...


And sew your BLOOM block seven together.

Remember to use the hashtag
#BloomBlockSeven
when you post yours on social media:)

We all want to see them!

See you next week for block eight and until then
"BLOOM" 
Where you're Planted:)
xx
Lori

Monday, February 22, 2016

BLOOM Sew Along - Week 6 - Block Six!!


YaY!
It's week six of our 
BLOOM
Sew Along:)


I am sew excited about how our quilt is coming along!
If you are just getting started...
to download my free pattern for the BLOOM quilt:)


If you still need my BLOOM
Sew Simple Shapes
I'm happy to say that the backorder has come in...YaY!
to purchase a set to make the quilt.


Today is block 6...
a sweet pink daisy:)


Choose your prints...
(I'm using Calico Days fabric)
We will be using
A-2   A-16   A-17
BLOOM Sew Simple Shapes


Cut the following from
 BOTH your fabric and Pellon:

7 - 1 1/2" x 2 1/2" for the petals
1 - 3" square for the center
2 - 2" x 3" for the leaves

From fabric only:

Cut 1 - 5/8" x 7" strip for the stem
Cut 1 - 9" square for the background


Trace onto the Pellon around
 each shape as usual...
except for A-17...
leave the bottom untraced. 


And when you sew these petal shapes...
Sew all the way down to the edges 
like this
 and backstitch when 
starting and stopping to secure.
The circle and leaves are sewn as usual.


Trim off extra on all pieces...
leaving an approximate 1/4" seam allowance.


Cut an "X" in the Pellon only 
on the circle and the leaves...
we are going to do something different
 with the petals.


Make a small cut at the bottom center
 of the Pellon only to make them easier to turn.


Turn them right side out and use the tip of your turning tool
to push out the top curve.
Remember to push ONLY on the fabric and
 not the Pellon so that you don't poke through.


Because the raw edges are being tucked under the circle they will never show!
Prepare your stem strip for basting:)


Press your background square in half...
and glue baste or pin the stem on the center fold...
  and even with the bottom edge as usual.

 Line up the first petal on the
 center crease and on top of the stem 
measuring 1" down from the top edge 
of background square like this.
Pin or glue baste into place.


Baste the two side petals next...
measuring 1 3/4" from the edge...
using the lines on the background fabric
 to make sure that they are straight.


Your block should look like this so far:)


This is how I layed out
 the remaining four petals.
I didn't measure in 
from the edges but placed them
like this until I was happy.

There is no right or wrong...
just try to make them
 symmetrical on both sides.
Pin or glue baste into place.


When I placed my circle on...
I measured 1 1/2" in from the petals.
Your measurement may be different 
according to how you placed your petals
 but just make sure to measure the same
 on both sides so that your circle is centered.


When I placed my leaves I measured 1 1/2" up from the bottom edge.


After your shapes are all basted...
appliqué using your chosen method.
I am doing hand appliqué for this quilt.


Cut your border strips and squares and sew your block together.
Don't forget to trim your block to 8 1/2" square after applique.
(this is before I trimmed mine)


YaY!
Block six is complete:)

When yours is finished post it on
Instagram
and use the hashtag 
#BloomBlockSix

It's so fun to sew everyones progress on our sew along!

If you are just joining us...
 and want to see each sew along post from the beginning
I have added these links below
for your convenience.
Just click on each title
 to take you to that post:


Saturday, February 20, 2016

Sew Simple Shapes - How I keep them Organized!!


Hello cute people! 
I thought I would do a quick post 
to show you how I keep my
organized.

As you know...
they come in a bag like this.


But there are 24 shapes 
in all different sizes...
and I want to be able to
 get to the one that I want quickly.
So here's how I did it!


So...a while ago I was at JoAnn's and 
bought this cute little
 pink with gold polka dots binder by DCWV.

I bought it for Kassidy 
to make a little scrapbook
 using her Instax photos 

I bought the little photo pages
 that go with the binder there as well.
I liked the different divided sizes
 for the photos 
 and thought she could have fun with them.

It was about the same time 
that we started the 
and as I was looking at
 the little photo pages...
 I just knew that they 
would be perfect 
to keep my 
Sew Simple Shapes organized!


I discovered that they fit perfectly:)
YaY!
So this is how I keep my 
Sew Simple Shapes.
I put them in the little photo pages according to size 
like this...


 I can see them clearly
and easily remove the ones needed
for each block.


I also kept the package header
 and put it in one of the pages.


I purchased this set of rings
 to hold the pages together.
I like how small they are.
I also got these at JoAnn's
in the scrapbooking section
 with the Tim Holtz stuff.


You could use bigger ones as well...
I'm sure you can find them 
at any craft store.
Just make sure they are
 the kind that open like these.


 These are the 3 different style pages.

Each photo page measure 4 3/4" x 5 1/2".
They have some that measure 4"x 4"
but they are not large enough to hold the large templates.

If you don't have a JoAnn's near you...
No worries.
You would not need to use 
the exact same ones that I have.

You can buy many photo pages and matching binders in the scrapbooking
 section of your local craft store.
You will just need to take or measure your largest template
 to make sure that it fits.  


These are by DCWV just like the little binder that I bought for Kass.


I purchased 2 packages of each style
 because I'm planning to use them for my
 up-coming set of 
Sew Simple Shapes called Cozy Christmas:)
Here is a sneak peek!


I suppose you are wondering why
 I bought those little rings to hold the pages together
 and not a little binder like the one I bought for Kassidy?

Well...that would work but I wanted a standard size binder 
so that I could hold the
 BLOOM pattern and other things
 for the sew along as well.

This is a Martha Stewart binder
 that I've had and used for a few years.
I love it and I'm sad that
 they are not available anymore.

But there are cute binders everywhere
 so I'm sure that you won't have a hard time
 finding one if you want to organize 
your templates and pattern like I did.


If your binder has inside pockets 
you could easily store 
the BLOOM templates there...


But I'm keeping mine in a 
binder pocket that zips closed.


I keep my pattern in sheet protectors
 for easy access ...


just turn the pages to
 the block you are working on:)


I also added lined paper for notes.


It's so easy to 
grab my shapes from the pocket 
when I'm working on each block and
 I know they are protected 
and best of all...
I won't lose any!!!


You could even keep your turning tool and
 bias tape maker in the zip pocket as well.


And your fabric and Pellon pieces 
for each block in the sheet protectors.


I love to be organized and
have fun at the same!
  
It makes each block for the
 BLOOM quilt easy peasy to make:) 


I hope you like how I organized my 
BLOOM Sew Along project and
 Sew Simple Shapes...
I shared it with you 
because it's working out so well 
and I thought you just 
might want to do the same thing!

xx
Lori