

Welcome to the
first week of the
BLOOM Sew Along!
Isn't this banner cute?
Feel free to use it when you are
posting your blocks!

Here's a smaller version
for you to add onto
the sidebar of your blog
like I did:)
Because this is the first week there is
a lot of information.
Bee prepared to click on a few links
to my recent blog posts
that I did earlier
in preparation for today!

I'm super excited to be sewing my
BLOOM QUILT with you:)
If you are
sewing with us too...
YaY!
All you need to do is grab your supplies and
tune in here every Monday.
I will be doing a step by step tutorial
for each block right here on my blog:)

A few weeks ago...
I posted about the supplies needed to make the quilt. If you missed that...
CLICK HERE to catch up!
You will find all of the fabric requirements
and of course cutting instructions
for the quilt block and borders in the pattern.
Basically we will be using a fat eighth of all of the prints as well as all 3 of the fat eighth panels for lots of variety...plus yardage for background and borders.
to download the free pattern
if you are just getting started:)

I will be using my
latest fabric collection
(check with your favorite quilt shops
to see who has kits for the BLOOM QUILT)

And for all of the flowers and leaves
we will be using my new
BLOOM
Sew Simple Shapes
If you don't have them yet...
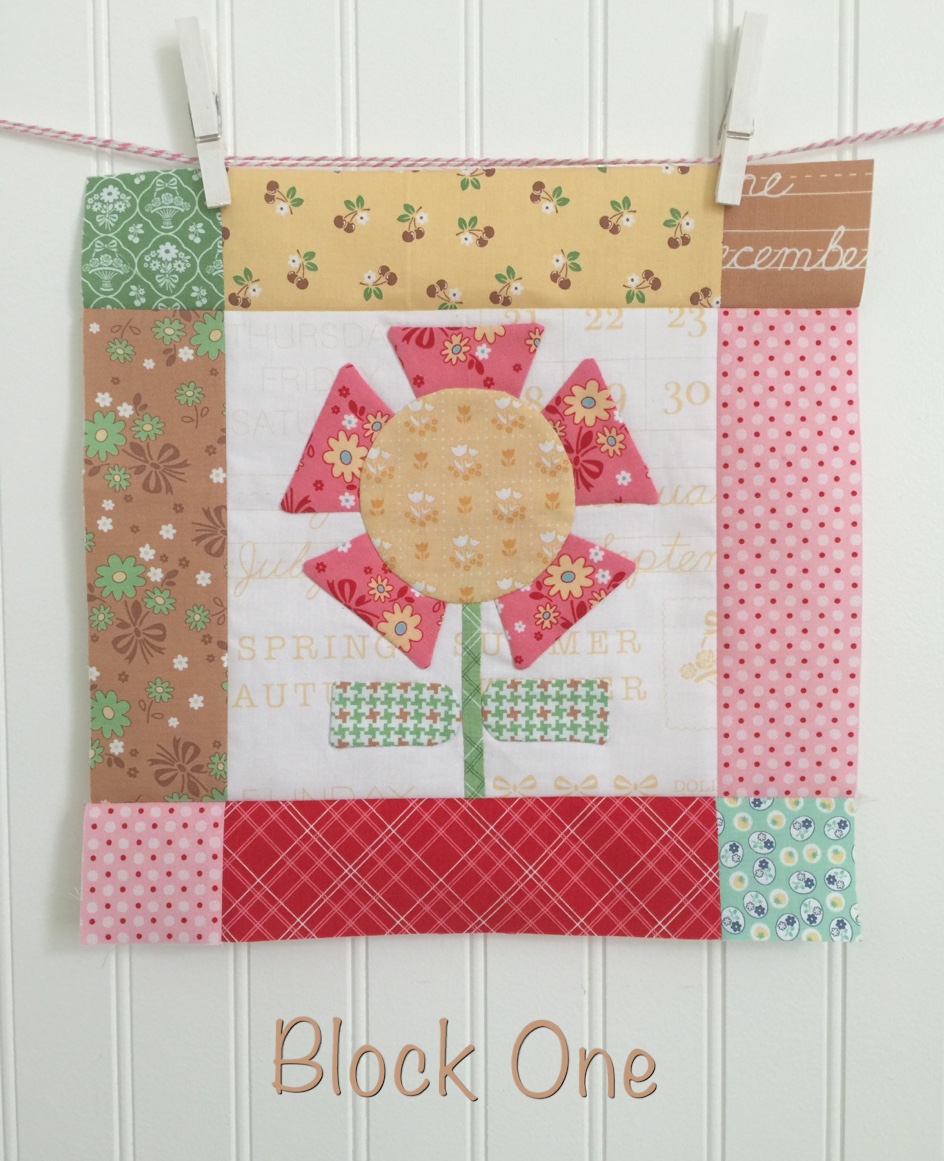
Today we are doing block one!
All of the blocks are numbered
in the pattern so that you will
always know which block
we will be doing
each and every week.

Grab your fabric...your pattern and
your templates
and let's get started!
You will need to cut a 9" square
from the background fabric
for every block in this quilt:)

Today we will be using
Sew Simple Shapes
A-3 A-17 A-21
to make the appliqué pieces for block one.
You will need to cut from
*BOTH fabric and Pellon;
1- 4" square for circle
2- 2" x 2 1/2" for leaves
5- 3" squares for petals
Also cut 1- 5/8" x 5" strip
just from the fabric for the stem.

So guess what?
I did a video tutorial for block one!
Cindy invited me to join her at
to talk about the sew along
and to show how I use my Sew Simple Shapes
to prepare the pieces for appliqué.
Isn't Cindy adorable?
She will be posting her finished blocks
on the
today and every Monday as well.
to see the video tutorial:)
Follow my instructions on the video
to prepare your pieces and then baste them
onto your background.
You can use pins or basting glue or even
baste by hand with needle and thread.
to see my blog post about basting
appliqué pieces.

This is mine...
right before appliqué:)
When your pieces are
ready for appliqué...it's your choice
on whether to machine appliqué
or to hand appliqué.
Check out my blog post
about both appliqué methods
by clicking HERE

After your appliqué is complete
and you have pressed your block...
(from the back only)
It's time to square up your block
with an 8 1/2" square ruler.
Find the center markings
on the ruler.
On this one you can sew the orange lines
in the center both ways.

Lay the center line
across the middle
of your stem like this.

Make sure that there is about
1/4" of the block outside all four
edges of the ruler.
***TIP***
Make sure that your rotary blade is sharp!
When trimming a block...
you don't want to
"saw back and forth" for uneven edges...
you want to make one nice clean cut:)
I like to trim the right side and the
top edge first...

Then turn my block upside down
and trim the remaining
two edges in the same way.
Of course if you are
left handed you will do the opposite:)

Now for the
outside borders on the block.
Again...
cutting measurements are in your pattern.
Lay your pieces out
on your design board and take it to your
machine for stitching.

Your seam allowances need
to be an accurate 1/4".
I like to use my
To see my
blog post about it...

First stitch the pieces together
into 3 sections like this ...

And then join the
top and bottom sections
to the center section.
It should measure 12 1/2" square
at this point:)

I like to press my seams open
on these blocks to
keep them nice and flat.
Press from the back.
In all of the years that
I have been doing appliqué
I have found that my
appliqué pieces look nicer
if can avoid pressing directly
on top of them.

***TIP***
I like to use fork pins
(by CLOVER)
to help my seams line up exactly.
They are thin and you
can sew right over them!

They are awesome because
each side of the seam is
secured with a pin and
that means no shifting
when its under the feed dogs
of your sewing machine.

See?
Nice and flat:)

YaY!
Block one is complete:)
I hung mine on the wall in my bedroom
to take this photo and I love the way
that it looks there so...
I might just have to
keep there for a while:)
I can't wait to
see your block one!
When you post it...be sure to use
#BloomBlockOne
so that we all can see it!

I'll be posting mine on my
and I hope you do the same!
It's always so fun and inspiring
to see what other members
of our sew along are doing.

My guest blogger
for today is Kimberly...
to visit her and see
what she has done!
Tune in next week for block two.
Until then...
"BLOOM"
Where You're Planted!
xx
Lori

15 comments:
This Sew Along is exciting. Great Video! Thank you for all the clear instructions on your blog and I love seeing the blocks from all the others sewing along!
Hi, Lori. Thanks for all you do for us quilters. I follow you here and on Instagram and enjoy all your work. I haven't made anything yet but have read Farm Girl Vintage cover to cover.
A while back, there was a photo of your sewing table that included a glimpse of a pincushion, made of pentagons (paper pieced?) in an individual tin jelly ,old. I have just been given my mom's jelly tins. Could you tell me the measurement of the pentagon shape and any helpful hints you might have?
Christine from Ontario
My heart skipped a beat when I finally saw that we were beginning. It's so pretty. I can't wait to get started. I treated myself to lots of your fabric and I'm going to mix them all up in the quilt because the colors all blend beautifully. Thank you for all your work!
Carol
This quilt is gong to be so much fun my friend..Thank you again for keeping us busy with all your super cute designs..
Happy Sewing to you..
Oh I love how detailed you are in your post.. thank you for that. It makes following along such a joy. Your block is beautiful!!
Www.hoosierstitcher.blogspot.com
Love the video tutorial! Excellent and I am so excites to get started!! I use those Clover fork pins to block my knitting but that is a genius way to use them for quilting - to separate seam allowances while sewing!!
You are always full of great tips!
As always, thank you for your hard work and creative happiness! You make the world a better, happier place! :)
I am ready to get started. This pattern makes me Happy just to look at it. Yeah!!
I am so excited to try your appliqué method and LOVE your Bloom blocks. I am trying to picture the completed quilt and can not imagine how a quilt with so much appliqué would be quilted. Do you quilt over the appliqués...around the border of them, what?
I can't imagine not having some kind of idea of how to quilt it once you spend so much time making those gorgeous appliqué blocks. Please, can you tell us a rough idea of how a quilt like this can be quilted? I think that is the only hesitation I had when I considered making one. Thank you for so much wonderful weekly inspiration.
I am mad about this quilt and love the process. But I am having a little trouble getting my corners and point sharp....any suggestions?
This looks so much fun and the tutorial was excellent!
Really impressed with your iron too, love that it rises and means it can be left on like that : )
Wonder if they are available in the UK?
Love the video! Thanks for all the helpful tips. My bias maker hasn't arrived yet but I have all my shapes ready to go!
THANK THANK for the complete lessons. You directions are sooo easy to follow and it's exciting to have my garden started!! Can you believe this is the very first time I used a bias maker for stems....LOVED IT!!!! See ya next week!
Worked on my first ever applique and I can tell I'm really liking this. My petals came out pretty good but I was wondering if you have any tips on how to get my points pointy. They look pretty good for my first try but I can see your petals have sharp points. Maybe I need to cut the corners sharper? Not real sure. Any tips would be great. Thanks for the sew along its making me get out of my comfort zone and trying something new.
Thanks for this! I've been looking for a something I can make for my grandmother's birthday. This is gonna knock her socks off.
Finally bloom blocks are together. Side pieces going on today. I love this pattern!
Post a Comment