

Hello and welcome back to my blog
for the big finish post
of the

We have been sewing from my
Grandma's pattern basket for one
lovely amazing vintage year!!
We started on January 1, 2019
and today is the last post
December 31, 2019


I have loved using my
Farm Girl Vintage fabric
for this quilt throughout the year.
I have also used my Bee Backgrounds
as well for a super fun
vintage scrappy look.

So this is where we left off at the last post...
all of my sections were sewn together
and I just needed to put the borders on.
All of those instructions are of course still here on my blog and the links to each
and every post can be found down at the bottom of this one:)

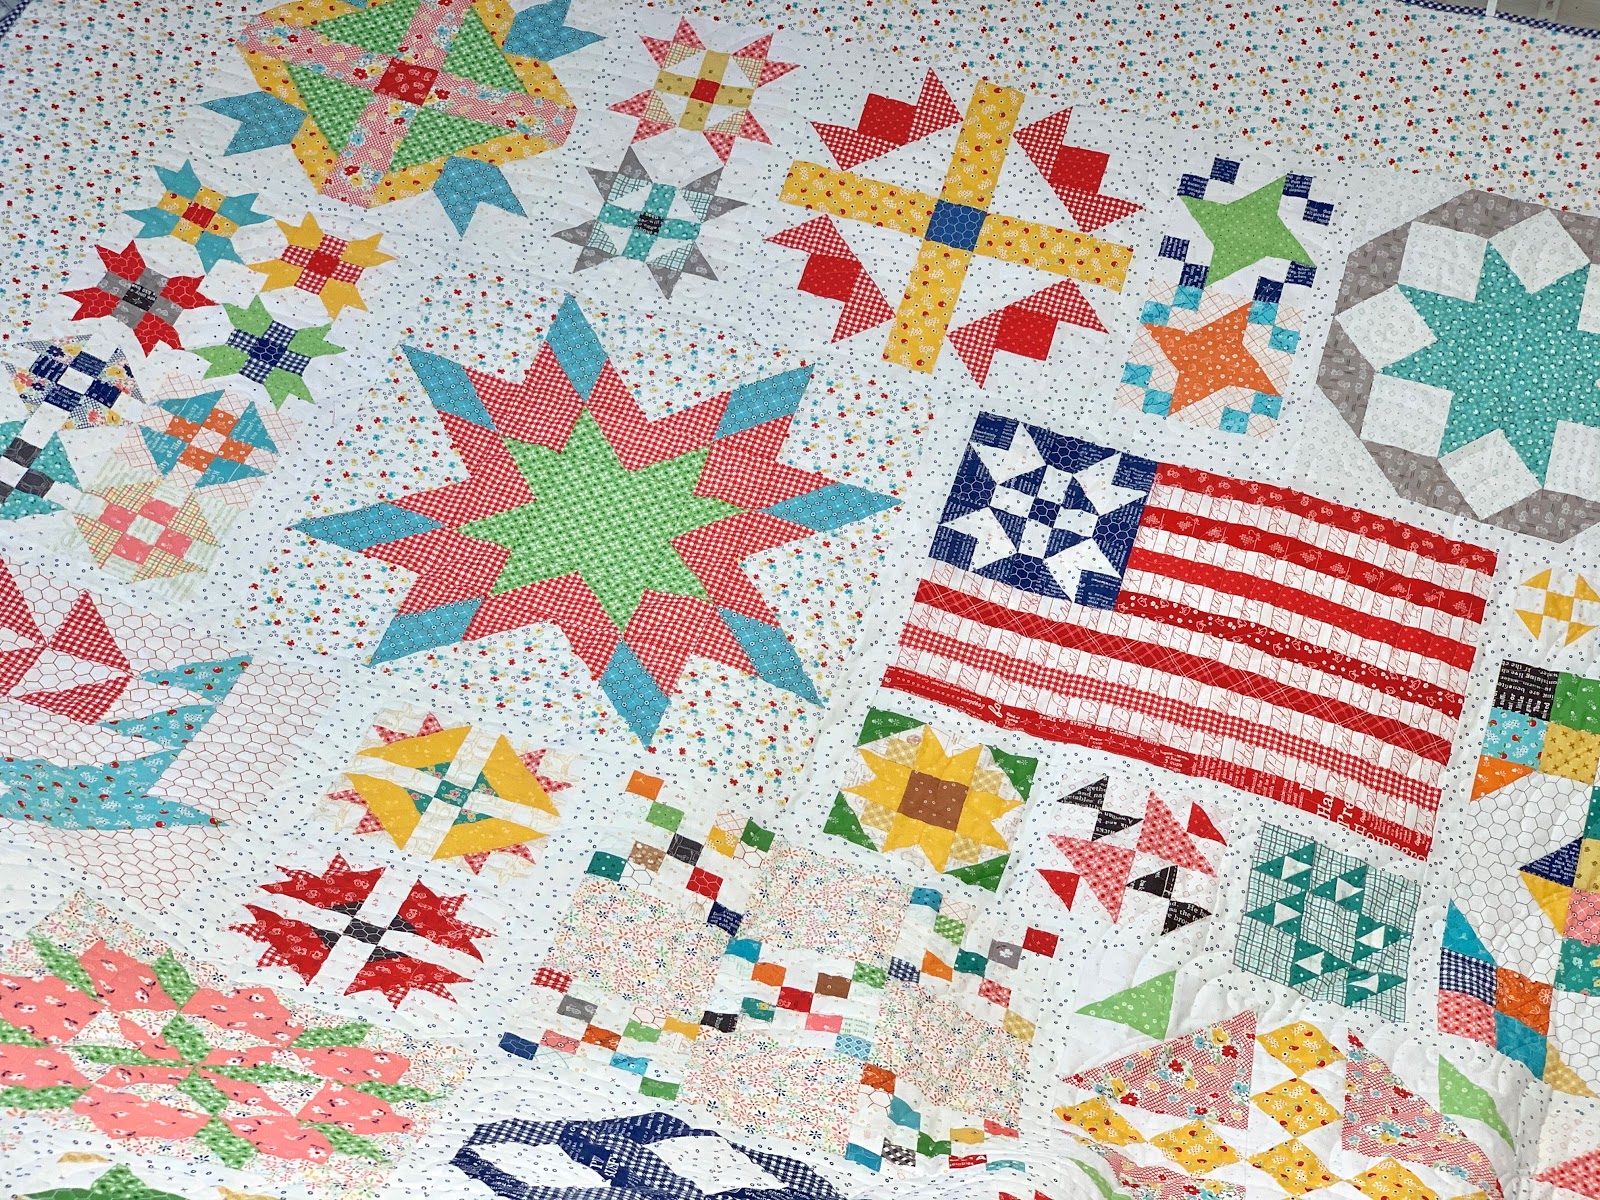
I just got my quilt back from
my quilter (Juli Stubbs)
and I am completely in love!
As you know this is a BIG quilt
so it was super hard to
photo the entire quilt...
especially since my go to place
for pictures (which is my backyard)
is freezing cold right now and full of snow!!
Mr.Honey and Sterling held it up for me
and I stood at the top of the stairs
to get this photo LOL
I love how the part that the window
is behind makes those blocks look like stained glass:)

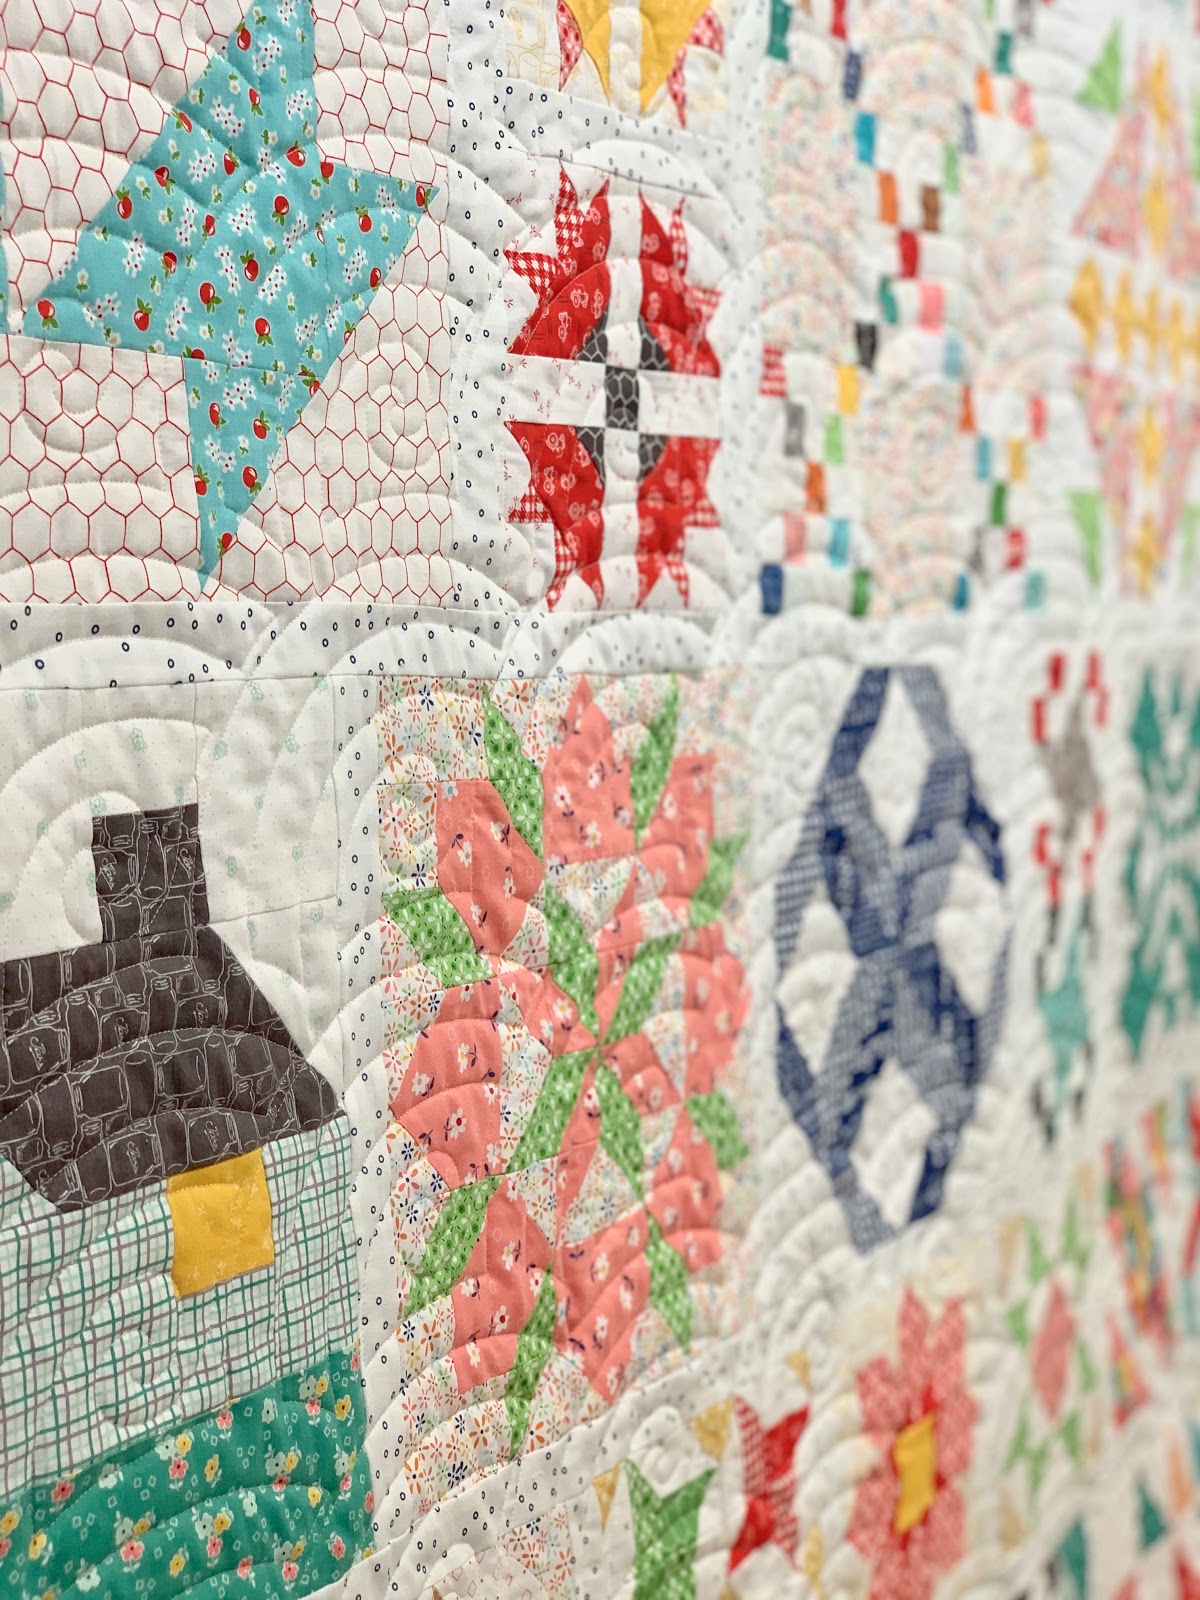
Next Mr. Honey hung the quilt in my
quilty studio so that I could get
some close up pictures for you.
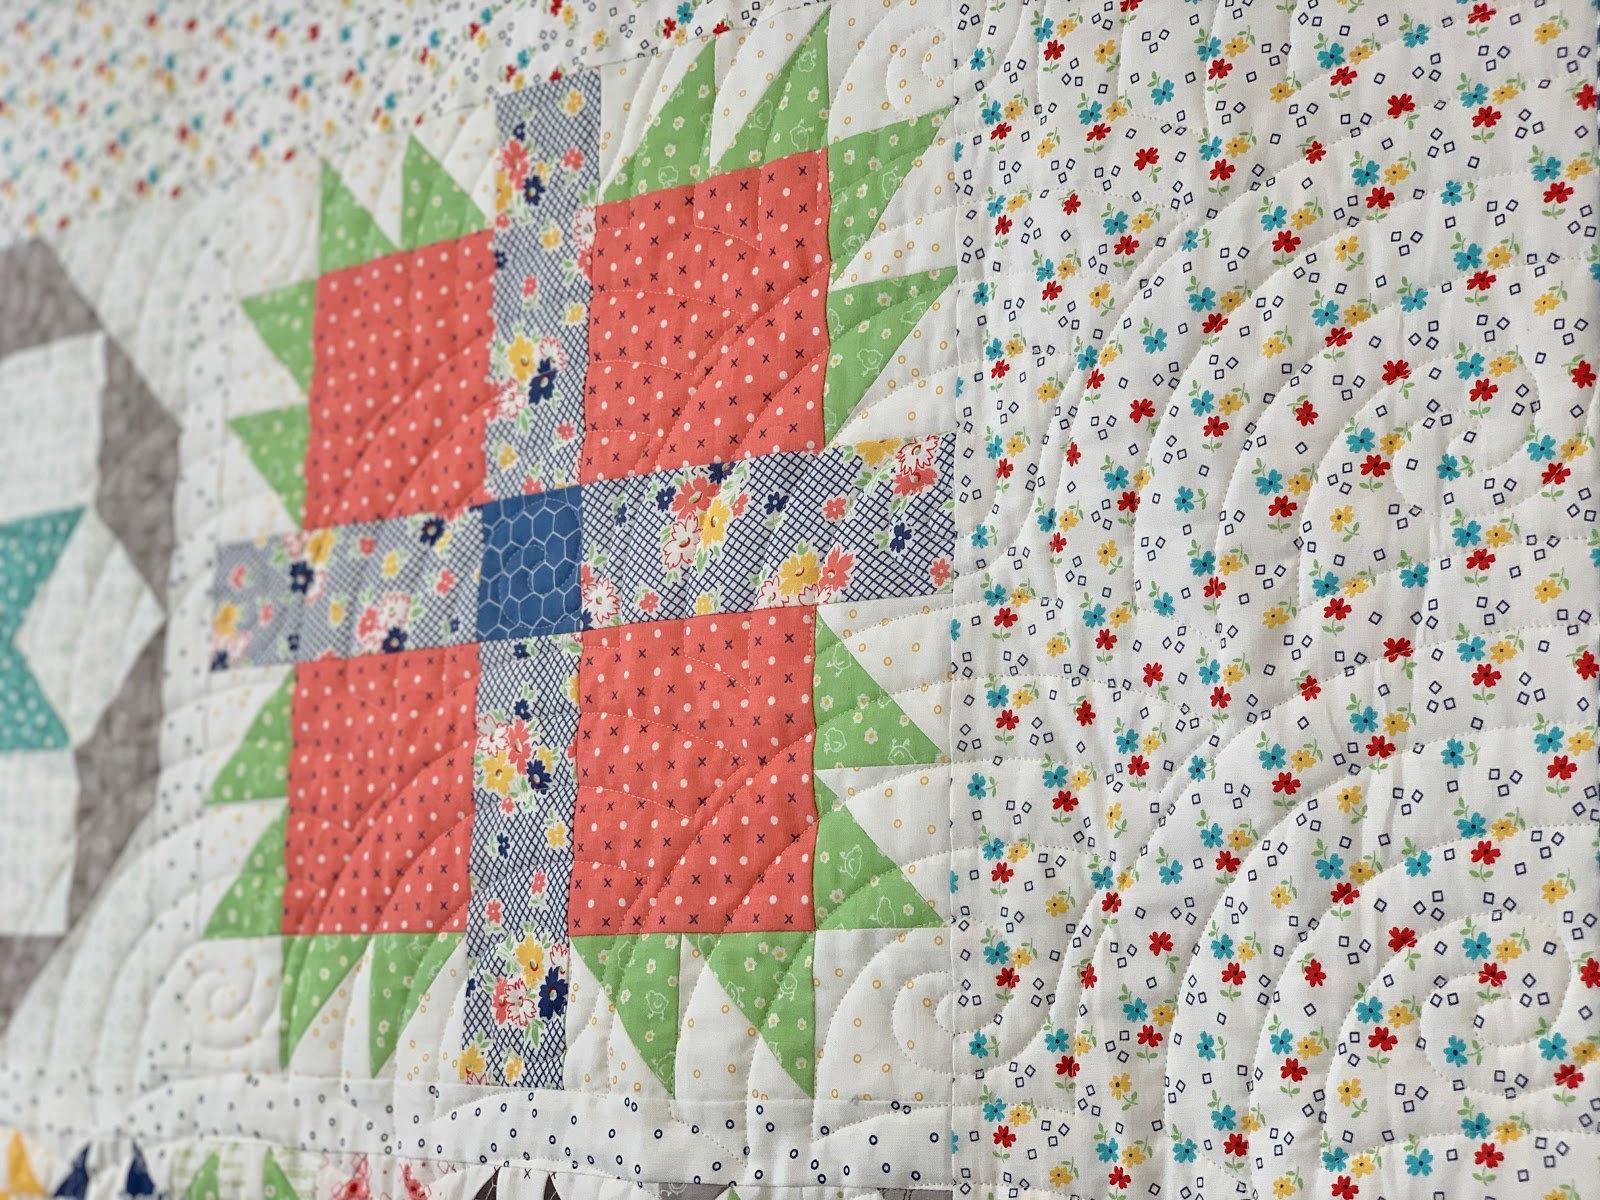
I wanted you to see the quilting...
it looks so good!
I asked Juli to do the Baptist Swirl on it...
it's one of my favorite designs.
I really love my choice of border fabrics...
I think it did what I wanted it to
which was to let the blocks shine.

The width of the quilt fits on my hanging
rod but my ceilings are not quite
high enough for the length...
but that's okay because as you know
it's going on my bed
just like a big hug from Grandma:)
I took a bunch of photos
at different angles...
some close up some far away.
Scroll down to see them all!


The countertop workspace in my studio
is very large and I keep my tools and everything on there that
I am working on currently.
You can see right in the front
is a stack of my newest
fabric collection called


I love to take side shots
so that you can see the quilting...
I just love it:)


I really love the binding as well...
it's just a tiny little frame around
the quilt and it's perfect!


At this point I pulled the bottom
of the quilt up over my counter
and took a few photos:)

I hope that I took enough photos for you
and I have loved seeing all of
your blocks coming together over on
Keep them coming as you make progress...
we all love to see your posts.
Be sure to use the hashtag
so that we can!!

This little cozy comfy corner of
my studio is where I sew my blocks.
I converted the window seat that is
next to it into an ironing station.
The table that my machine sits on
looks really small here ...
but it actually is large and is
shorter that my counter top
because it's normal table height
and so the other half of my table
fits underneath the counter
between the two dressers.
I have plenty of room to keep the
blocks that I am working on
under the counter on top of my table.

If you have not seen my previous post's
about my new studio...
Here's a photo of my two dressers
before my countertop was ready
and I was making do lol
You can see that there is space between
the two dressers and on one open spaced end
is where my chair goes underneath.
This is the side of the countertop
where I draw and I cut my fabric.
The countertop is 37" high...
a nice height for standing and cutting
so that it's easy on my back.
When I am drawing I sit...
and so I have a few comfy barstools
that I use for that.

This is what the dressers looked like
on the day that the countertop arrived.
Mr.Honey joined them so that they would
be sturdy before glueing the countertops on.
The table that you see between them
is my sewing table...
it's now slid over to the left and
my sewing machine is set up on it.
It's the perfect size and has a
wide narrow drawer in the
front that comes in handy!

I have sewn on my vintage
Singer Featherweight
throughout this entire series because
of course I wanted to sew my
vintage blocks on a vintage machine!
I have several vintage sewing machines
and several of them are featherweights
and they are my favorite to sew on.
I name them all and this one is
Miss Doris...
named after the lovely vintage lady
who is also a favorite of mine.
Thank you sew much from the
bottom of my heart for joining me
on this journey of honoring my Grandma and also my quilting heritage.

It sure has been a fun ride!!
It makes me sew happy to know that
we are all sewing together
from all over the world.
It's just amazing that is possible now because of the internet.
I never would have dreamed it
and as I was growing up...
I thought it was so fun quilting
at my grandma's house with all
of us together and I thought
it was a big crowd.
If I had only known how large
that crowd would grow to be!
And I'm so grateful:)
Grandma would be amazed at that too!
I hope you have loved each and every
tutorial and each and every block
from me and grandma:)

I appreciate you all tuning in
each and every episode...

And listening while I chatted about my childhood and memories of grandma:)

My next sew along is
vintage inspired as well.
It starts in January and
it's for my appliqué quilt called
Vintage Housewife

There is a pieced apron in the middle
of the quilt and then all of the
applique blocks surrounding it
represent things that the
vintage housewife did...
of course while wearing her apron:)
Below is a sneak peek of when
I was making the sewing machine block
for the quilt.


The entire quilt is made with
my new collection called
Vintage Happy 2
and my new
Sew Simple Shapes called
Vintage Housewife
If you are joining in and need a kit
just do a quick
google search and type in
"Vintage Housewife Quilt Kit"
and you will find several sources
until they are sold out.
I hope you will join me on this
next journey to celebrate the
vintage housewife!

Here is the quilt hanging in the
Riley Blake Designs booth at
international quilt market....
along with other Vintage Happy 2
projects as well.
The other quilt is in my next book
that comes out May 2020 called
and yes...there will be a
sew along for that as well!

Okay...
back to the Vintage Block Along!
Thanks again for joining me on this one...
sewing vintage with you
all this year has been amazing:)
Sending you all hugs from me to you!
xx
Lori
P.S. All of the tutorials for my Vintage Block Along Sampler will remain on my blog until the end of next year 2020.
If you are just joining us...
click on each block that we have
done in my quilt to go to the tutorial:
5. Rhinestone
6. Vintage Lily
7. Star Shine
8. Humble
9. Egg Money
10. Quilting Bee
11. Sunday Star
12. Sweet as Honey
13. Bear Hug Block
15. Memory
16. Farmers Daughter
19. Picnic
20. Sparklers
21. 4th of July Flag
22. Playing Card
23. Penny Candy
24. Mercantile
25. Family Reunion
26. Parade
27. Shade Tree
28. Wildflowers
29. Crossroads
30. Leftovers
31. Peony
32. September Star
34. Six Sisters
35. Twirl
36. Wash Day
37. Fall Flower
38. Fall Social
39. Holiday Lights
40. Winter Flower
41. Checkers
If you missed the Section One
and Section Two tutorial:
and then
for Sections Three and Four
and then
for the final sections
Five and Six
