

I've been having so much fun
playing with my latest
fabric collection...
Bake Sale 2!


A few weeks ago I made these
potholders for my kitchen...

potholders for my kitchen...

and today I'm going to
show you how I did it:)
show you how I did it:)

I really LOVE the look and feel
of fabric and crochet together...
so vintage!!

I cut a bunch of squares
from my Bake Sale 2
so that I can make some
super fun projects using my
and fabric together.

First project up are the
6" round pot holders
with a crochet scalloped edge.

I'm using just the 2 1/2" squares
for today's project.

I grabbed six of my design boards
and laid out a
scrappy happy nine patch block
on each one...
using the 2 1/2" squares:)

I used just one
Sampler Package of
one cute little skein
for each pot holder.

Also... a Bake Sale 2
5" Stacker
would also work perfectly
for these potholders!

I sewed the nine patches together
using a
1/4" seam allowance
and pressed them nice and flat.

Next I cut six 7" square of batting
and another 7" square of that silver
fabric that's used to
cover ironing boards.

I layered the block on top...
silver fabric on the bottom
and batting in the middle.

I machine quilted them
using a walking foot
and also using the
foot as my stitch guide.

All quilted!

From this point on I'm going to
show you how I made one pot holder...
but keep in mind that
I did all six exactly the same way:)

This is what the back
looks like after quilting!
It's the back now...
But will soon be in the center...

Because I cut 2 - 6 1/2" squares
to use for the final back:)

I pressed them in half like this...

And laid them over the center
of the quilted block like this.
But I didn't pin yet!

First...I used my
and placed it exactly in the center.
The lines marked on the ruler
make it easy peasy to line up!

I traced around the ruler like this...
for my stitching line:)

And then I pinned it into place...

And stitched directly on the line...
all the way around and backstitched
over the folds in the center.

I trimmed an approximate
1/4" seam allowance.

And turned it right side out!
I used the
Clover Point to Point Turner
to help shape it.

See?
Now the silver fabric is in the middle
and I can put a hot plate on it:)
YaY!

I could easily hand sew this
opening closed with a blind stitch...
but I like that these are open
so that I can place my hands inside.

They work perfectly for hot plates...
but also to save my fingers when I'm
getting a hot mug or bowl out of the microwave:)

Or maybe some muffins:)

Before I started playing with the
Chunky Thread
I used these 5 prints and finished up
the other 5 pot holders
up to this point as well:)

Now for the Chunky Thread!

I grabbed my "Chunky Needle" from my
There are six different
types of needles and all are
color coded for
easy identification.
Meaning..the aqua is for embroidery...
the mint ones are for appliqué etc:)
You can see here that the
red ones are for my Chunky Thread:)

I cut about 2 1/2 yards from the
little skein of the pink
and used it to do a button hole stitch
all the way around my pot holder.
This is so that I have a base
to do my crochet in:)
I did them about 1/4" apart
for an ideal total of about 95.
When I did the other pot holders...
some ended up with 97 or 92 etc...
it really doesn't matter...
that's close enough!

I started and stopped inside the back
because its a perfect place
to hide my knots!

Button hole stitching completed.

Here's a view of the back:)

I used a E/3.5mm size hook
which is the smallest in my
100% Cute Crochet Hook Set!

I started by doing a
single crochet stitch
in each buttonhole stitch.

A close up of the back:)

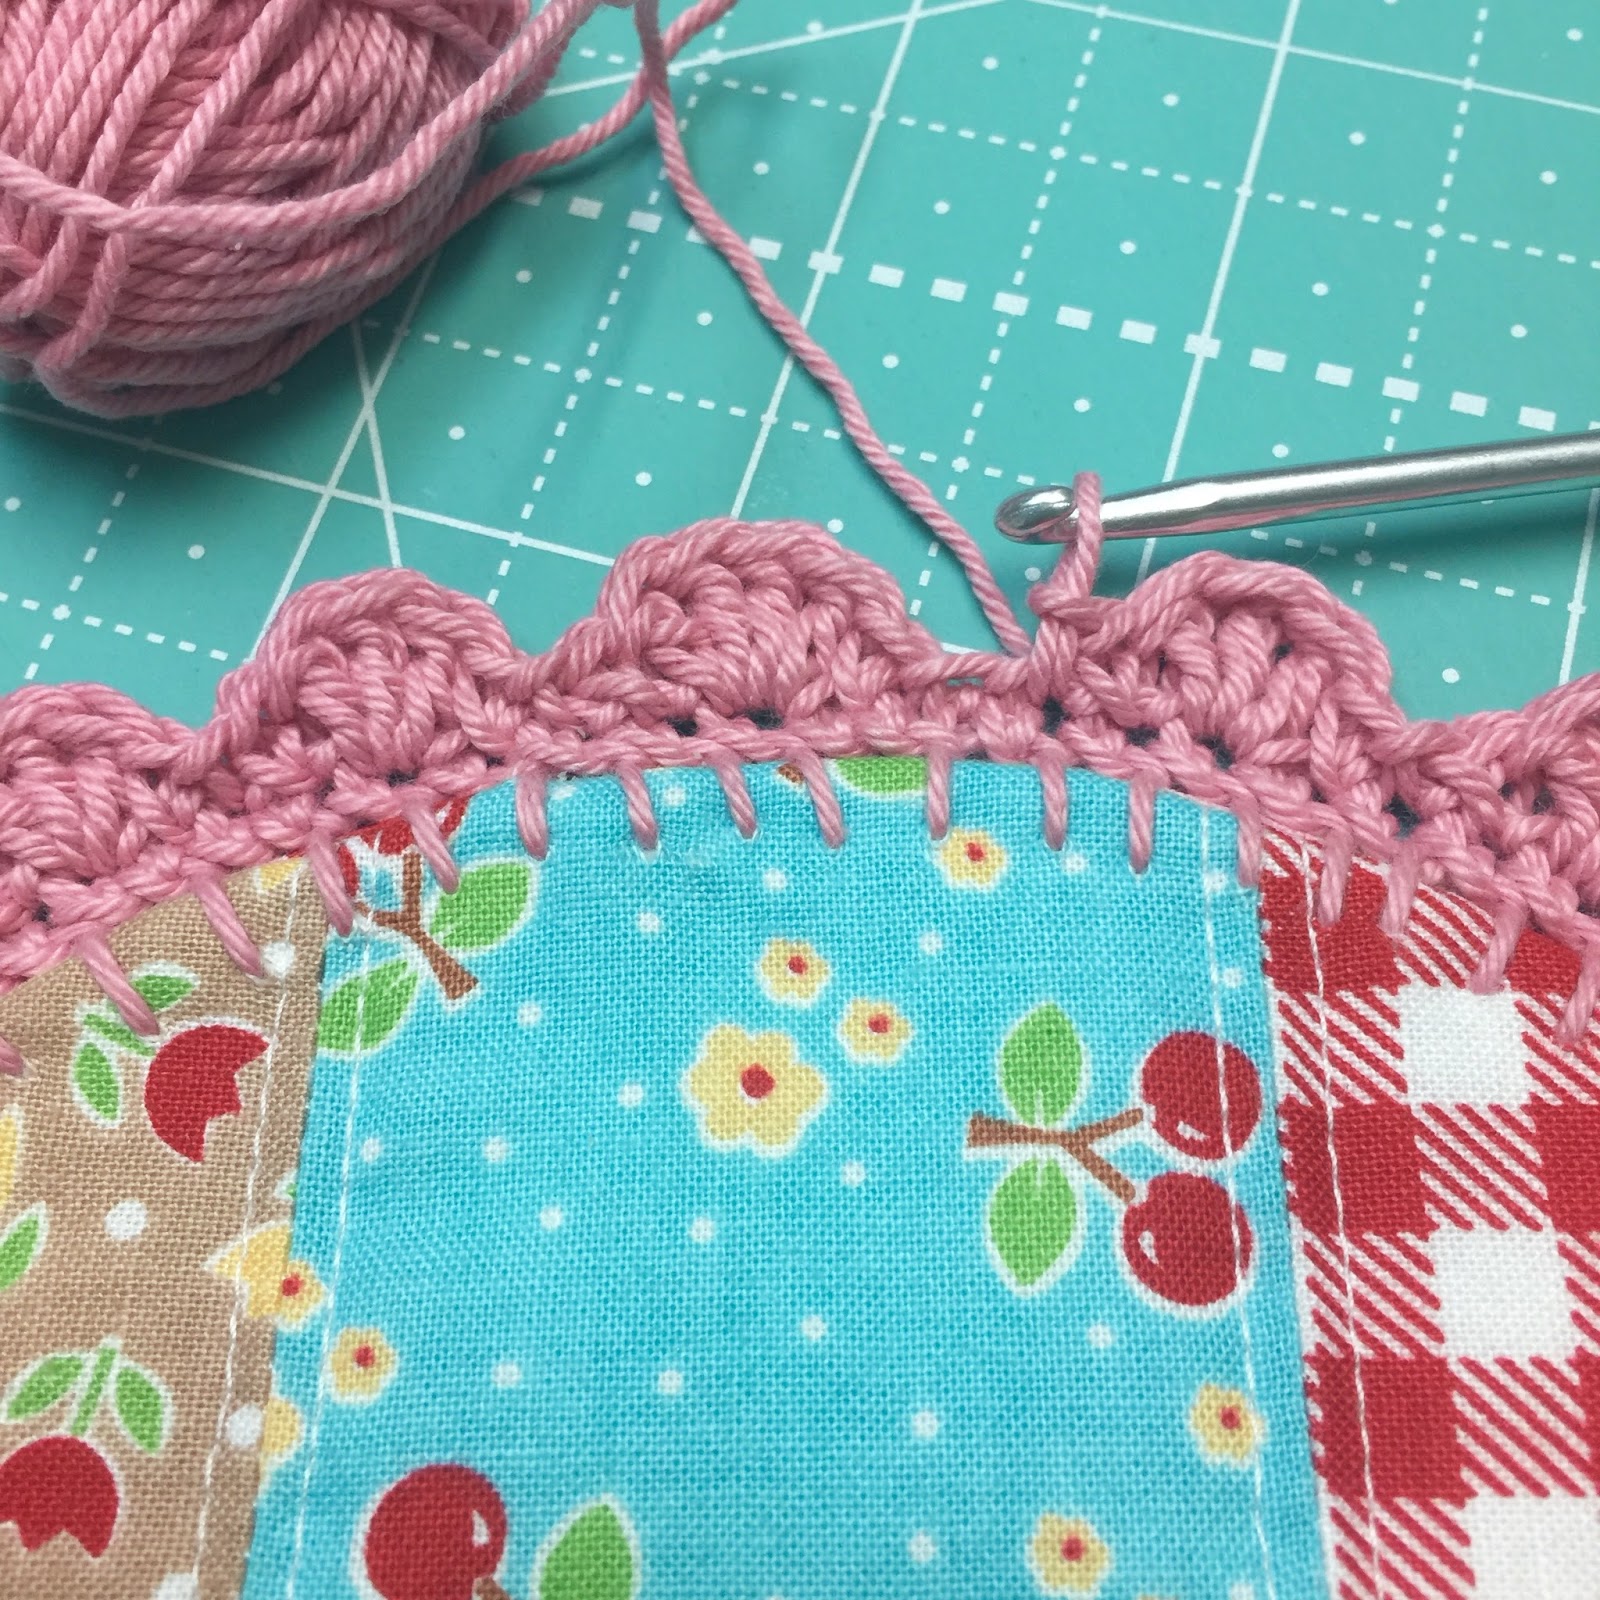
Now for the scallop!
These single crochet stitches are now the base that I used to crochet the edging.
I did a single crochet in the first one...

Then in the next one I did a double crochet..

And then two more in the same one.
This means a total of
3 double crochet stitches
in the same single crochet base stitch.

In the next base stitch
I did a single crochet...

And then ended that scallop
with a slip stitch in the next base stitch.

The next scallop begins again
with a single crochet
in the next base stitch...

3 double crochets in the next base stitch...

A single crochet in the next base stitch...

And again ending with a slip stitch
in the next base stitch.

I continued all the way around using the same pattern for each scallop:
1 Single Crochet
3 Double Crochet
1 Single Crochet
1 Slip Stitch

One more scallop left!
On the other pot holders
that were a few more or
a few less buttonhole stitches...
I simply stretched out or
squished in the scallop
and it worked fine:)
I ended with a slip stitch...

Pulled my loop large like this...

And cut my end and placed inside the loop

And pulled the end up to make a knot.

These are the two ends from
starting and stopping.
I use a big crochet needle
(they have a large eye and a blunt end)
to weave and hide the ends
into the back of my crochet.

First I place the needle through
the back of one scallop like this...

Then I thread both ends through the needle...

And pull them through like this.

And trim off the remaining ends!

First pot holder is completed!

Once again...a close up of the back:)

All six together!!

I really love the way that
these turned out and I
can't wait to make more!


They are going to be so cute
as well as handy:)
YaY!!

Here are the little bitty skeins
that are leftover after
making each pot holder...


How cute!!!

Thanks for joining me for my first ChunkyThread/Fabric project...
I have more in the works and
I'll show you as each one is completed.

P.S.I did a tutorial/recipe last week
on my Pie Pincushion...
if you missed it
See you on Monday for the
next block tutorials in the
Let's Bake Sew Along!
xx
Lori
