Tuesday, December 30, 2014


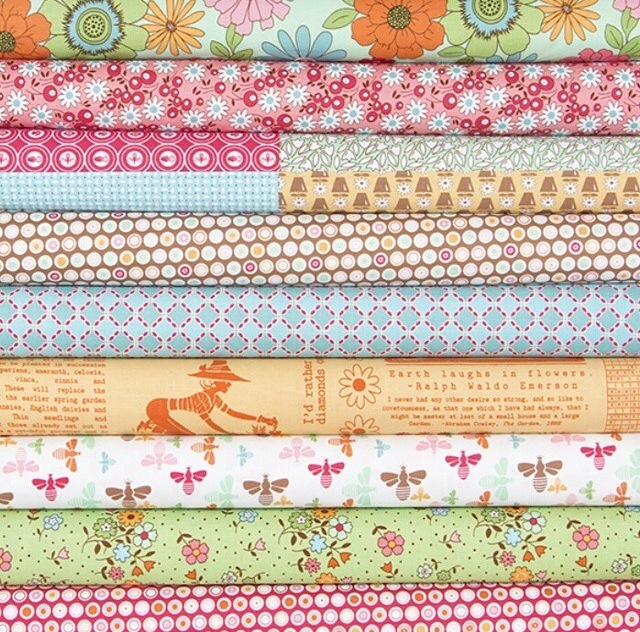
Yesterday I pulled fabric for a fun new quilty project.
That's my very favorite part when I start a new quilt…
the colors and style of the fabric set the tone of the finished product.
For this one I wanted some colorful and happy prints 
with a medium to large scale….
and of course with a vintage vibe:)


Because today is my turn on the 


Vintage Vibe is the first book by my
super cute friend Amber Johnson
and its a super cute book!!!


One of the quilts inside 
the pages of this fun book is called
" Lovely "
and that's the one I'm going to make!
Isn't it sweet???
It's a happy banner/bunting quilt which is 
perfect for a vintage celebration.


Amber's pattern is layer cake friendly
and I chose to use my Millie's Closet fabric
and my Vintage Happy white with green print
for the background.


I love how the colors and styles of both collections go together.


I always keep that in mind as
 I'm designing each of the
Bee in my Bonnet fabric collections…
because I like to use them all together 
like one super big…
super happy …
super vintagey fabric collection!!!


Amber used ricrac in her
 quilt to join the banner together.

I think I'll use 
several colors for mine.
The Riley Blake Ric Racs 
from thier
 Sew Together 
notions are perfect:)


Amber also appliquéd a few hearts
 on some of the pennants
and I'll be using red hearts appliquéd
 on coordinating solids for mine.


For me…
the "Lovely" quilt has
 kind of a 
birthday celebration vibe...


And with the addition of
 red hearts
 it could totally be 
a birthday/valentine
quilt as well…
which is what I was going for
 because
my birthday is 2 days 
after valentines day and so 
when I was a girl…
my mom always decorated 
all of my birthday parties
with a valentine theme
 and I have always loved that!!!


to go visit Amber 
and to see more of the projects
in her beautiful book.

I promise that you will 
want to add it 
to your quilty library!

Have a quilty kind of day…
xx
Lori

Monday, November 17, 2014

Have Yourself a Quilty Little Christmas - an Instagram Sew Along !!!


I thought I would tell you about 
something fun that I'm doing on


It's a little Christmas quilt
 sew along using my book
Quilty Fun as our manual.


Basically what I did is
 just grab a bunch of fabrics
 from my stash and added a
 few Christmas prints in as well…
and started sewing blocks from
Quilty Fun that work
 perfectly for Christmas!


I've introduced and will introduce
 a few new blocks 
that I have designed 
especially for this sew along
 that are not in the book. 
 I have cutting and tutorials
 on my Instagram feed for those blocks.

For those who are new to 
or haven't joined yet…
Please do!
You just need to quickly
 create an Instagram account
and then
you can join up
 with us and sew along:)
If you need help
ask your kids!!!

It's super easy and fun:)
If you want to make new blocks 
designed by me like 
"Mr. Cookie" shown below 
joining up is how you
 access my Instagram tutorial.


You can find me on Instagram by
or on the the link above
 on the right side of my blog or...

Just type in my user name 
on the Instagram search bar…
(my user name is beelori1)
and follow me by simply 
clicking on the word 
 Once you are following me…
 you will see every time that I post or
 add another block to the sew along.


When you do find me…
this is what my 
profile page looks like.

Let me tell you how to
 find my tutorials 
from my profile page.

 I have a picture on my 
profile page that 
represents each post.

All you have to do is scroll down
 and you will see all 
of my pictures that I have posted.

The very first post 
is at the bottom…
and my very latest post
 is at the top left 
which you can see 
is my "Vintagey Ornament"
 block for the sew along.

When you see a photo 
that you would like to 
know more about,
 simply click or touch that photo 
and that post will pop right up 
along with all of my instructions
 as well as everyone 
else's comments and questions
 about that particular post.


Another thing that is fun 
about the sew along is
 seeing everyone else's pictures 
of their blocks all in one place.

When anyone posts a block 
they have sewn for the 
sew along they add
 #haveyourselfaquiltylittlechristmas
to their post.
What this does is add their photo
 along with their post 
onto the same page as 
all of the others who 
have used the same # 
with that title.

You can scroll down and
 look at them all
 for inspiration and even 
click onto their picture 
to bring up their post 
to read more about it.


It's a lot of fun and
 there is a huge supportive 
quilting community there:)


If you don't already have 
a copy of my book
that we are using
for the sew along
you can get one 

Have a quilty kind of day 
and I hope to see you
 on Instagram!
xx
Lori


Thursday, November 13, 2014

Flower Patch - my Latest Fabric Collection!


My latest fabric collection
is here and available 
in your local quilt shop or
your favorite online quilt shop.


Flower Patch is my 
eighth collection for

I love being a Riley Blake Designer!!!


Flower Patch was inspired by my Dad…
who taught me how to grow beautiful things in my garden.


And by my Mom…
who sewed my dresses when I was a girl
(and for my sisters as well)
And let me choose my own fabrics.
I always chose flowers…dots and checks.


The prints in Flower Patch
 have a definite vintage vibe
which is what I love:)
There are 33 prints in the collection…
including the 3 Fat Quarter panels
that I am so happy about!!


I have a new pattern to be released next week...


It's called "Bee Happy!"


And of course there is a Queen Bee quilt pattern included:)


Now that the days are getting colder…
and the skies are getting darker…


I'm so glad that I have Flower Patch 
to play with and brighten up my studio!! 


And speaking of my studio…
Remember when I did this tutorial for my 
Scrappy Crossroads?


Well last week I was in 
in Highland, Utah
and they have made a Scrappy Crossroads quilt 
using my Flower Patch collection:)
I love it!
(they have kits available)

They also used Sweet Mint solid for the background.
Have you checked out all of the

They have an amazing selection…
 and Sweet Mint is fast becoming a favorite!


I also will be doing a Flower Patch tutorial
about this project that I have up on my design wall.
As I have been sewing with Flower Patch…
I have been cutting all of the leftovers 
and making a scrappy Flower Patch quilt for my bed!!


So stay tuned…
there's more fun projects to come using
I hope you have as much fun with it as I do!!!

Have a quilty kind of day...
xx
Lori

PS. I'm loving the projects using
 Flower Patch that I am seeing on
under the #flowerpatchfabric
These are just a few
go over to instagram 
and check them out!
(my user name is @beelori1)


Proven Fact:
Flower Patch plays well with
 all of my other fabric collections
and works for all seasons!!!


Wednesday, November 12, 2014

Tom Turkey Placemat for the Thanksgiving Kiddie Table!!!-Free Tutorial for the Tom Turkey Block-YaY!!! ...


So this is what I made 
for my cutie pie
 grand daughter Sophie
using my 


It's a placemat for 
the Thanksgiving "kiddie" table:)
YaY!


After making the block…
I simply used my 
pattern to make it into a placemat:)


I plan on making a placemat for her to use 
on every holiday using my pattern.
The pattern is easily converted using any 12" block:)


And anytime in the month of November
when Sophie comes for a visit...


She will find her placemat on the table 
to use for meals or even a snack!


Do you have some kiddo's in your family who need
a Tom Turkey on their Thanksgiving Table?
Fun Fun Fun:)

Gobble! Gobble!

Happy Thanksgiving from me to you:)
xx
Lori

Monday, November 10, 2014

Tom Turkey quilt block Tutorial!!! ...


Hello cute people!
Are you ready for a 
quilty thanksgiving tutorial?

Meet my latest block…
"Tom Turkey"


I was inspired to make him from my

Remember the days 
back in elementary school
 when we would make turkeys 
out of the fall leaves?
 We were assigned by our teacher to
 bring several from home and/or collect some
 on the playground during recess.
Remember those cut and paste days?
Were you a glue eater?
There were always one or two
 in every class …hehe:)


So let's get started!
Grab some background fabric…
some gray or brown fabric for the turkey…
a 1 1/2" red square for his wattle…
and your stack of 3 1/2" scrappy happy squares:)


Background cutting;
Cut 6- 3 1/2" squares
Cut 1 - 2 1/2" x 8 1/2"
Cut 1- 2 1/2" x 7 1/2"
Cut 1 - 2" square
Cut 1- 1 1/2" x 3 1/2"
Cut 1- 1 1/2" x 2"
Cut 2- 1 1/2" squares
Cut 1- 1" square


Trim 1/2" off your red square so that it measures
1" x 1 1/2"


Cutting from gray;
Cut 1- 2 1/2" x 3 1/2"
Cut 1- 1 1/2" x 7 1/2"
Cut 1- 1 1/2" x 6 1/2"


Arrange 8 different 3 1/2" scrappy squares on your design board…
and lets start sewing!


As you know if you have made my blocks before…
I always start by making all of the Easy Corner Triangles first.
Use 4 of the background squares and 4 scrappy tail feather squares. 
Stitch a straight line from corner to corner…
trim excess about 1/4" past your stitching line...


And press.
You now have 4 half square triangles ...easy peasy!!!!
I like to cut a 1 1/2" square from my trimming leftovers
 and add them back into my 
scrappy stash for another quilty kind of day:)

Lay your half square triangles back out onto your design board…
to keep pieces organized and turned the right direction.
Using a design board saves a lot of time and mistakes!


These are the remaining 2 pieces that have 
Easy Corner Triangles.
The head piece and the bottom strip…
(1 1/2" x 7 1/2")
The longest gray strip.
Stitch from corner to corner...


And trim off excess and press.


Lay everything back out on the design board.
Now we can begin sewing Tom together in sections.


Start by making a four patch from the center squares.


Now sew the remaining gray strip to the left side of the 4 patch.
Sew the 2 1/2" x 7 1/2" background strip
 to the bottom gray strip and 
add them to the bottom of the 4 patch section...


Like this:)
Now sew the 3 pieces to the right together…
and add to the right side of the 4 patch section.


Now for the left side.
Sew the wattle and little background strip
together and add them to the top
 of the remaining long background strip.


Sew the 1 1/2" x 3 1/2" background strip
to the top of the head and then sew
the head and these top 3 pieces together.


Now sew the wattle and
 background strip to the left side of Tom…
and last…
sew the top row on:)


YaY!
You have sewn Tom together:)

You can choose to have Tom sitting…
or running away from the farmer
on the night before Thanksgiving:)

You are the boss of your own quilt!


I used gray thread and a small zig-zag stitch
to sew his legs on by machine.
I just drew them in with a pencil and let 
those lines guide my stitching…easy peasy!


Don't worry…
Tom's legs don't need to be perfect.
He is meant to be a little whimsical 
and has wobbly knees from all the running anyway:)


Tom finishes at 12" square.
If you decide to frame your block with 
background fabric strips like this…
he will measure 14"square.
Cut 2- 1 1/2" x 12 1/2" for sides
Cut 2- 1 1/2" x 14 1/2" for top and bottom.


I have plenty of 3 1/2" scrappy happy squares
 in my stash and you better believe that 
I have a full on Tom Turkey quilt going!


But I made this Tom Turkey for a special little project
for my little grand daughter Sophie…


In my next post I'll show you what it is!


 I love Thanksgiving…
and I really wanted to 
make a turkey quilt:)
I hope you love Tom as much as I do!

Have a quilty kind of day...
xx
Lori


Related Posts with Thumbnails