Thursday, August 29, 2019

Vintage Block Along - Week 30 - Leftovers Block!!


Well hello there!


I'm back from glamping 
so it's time for Week 30 in our
 Vintage Block Along


I'm sharing another vintage block
 with you from my 
grandma's pattern basket:)


I'm using Farm Girl Vintage fabric...


And this weeks block is sew scrappy happy!

It's the perfect block to 
use some of your stash
 and also "leftovers" from your 
easy corner triangle trimmings:)

And that's exactly what 
I'm calling this block...LEFTOVERS!!

I'm sure that I'm not the only one
 that has memories of their 
grandparents using everything up 
and not wasting ANYTHING!


Grandma made many casseroles 
and stews using leftovers...
basically recycling last nights meal
 into tomorrows lunch or dinner.

She often made clothes for her children 
by re-cutting and re-sizing
 her older dresses or grandpa's
 worn out shirts...
nothing went to waste!
Growing up during the depression
 made this a necessity for them 
and is still sound advice for today.

Of course the leftovers
 also became quilts...
both utilitarian and beautiful:)

I like to keep that tradition alive 
through my quilting as well...
by saving up and USING my scraps:)
I know that grandma would be proud!


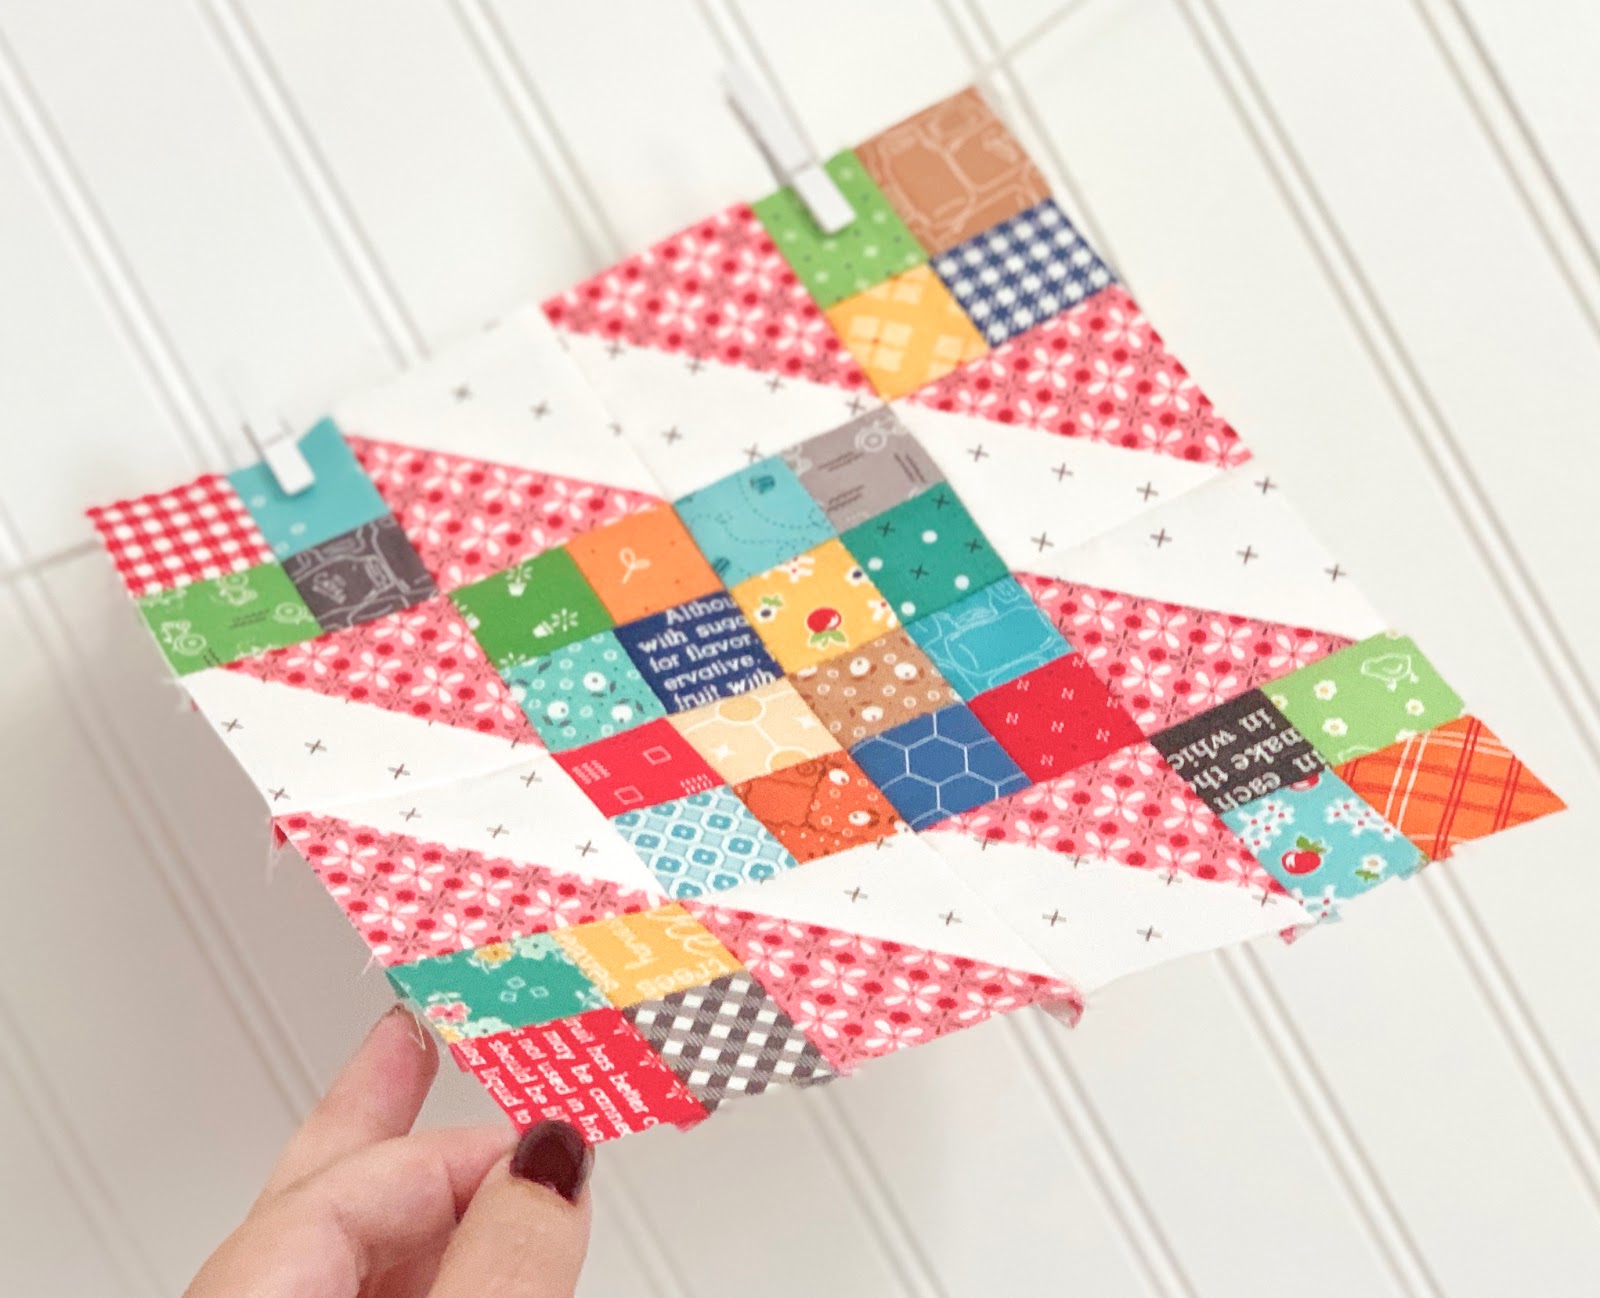
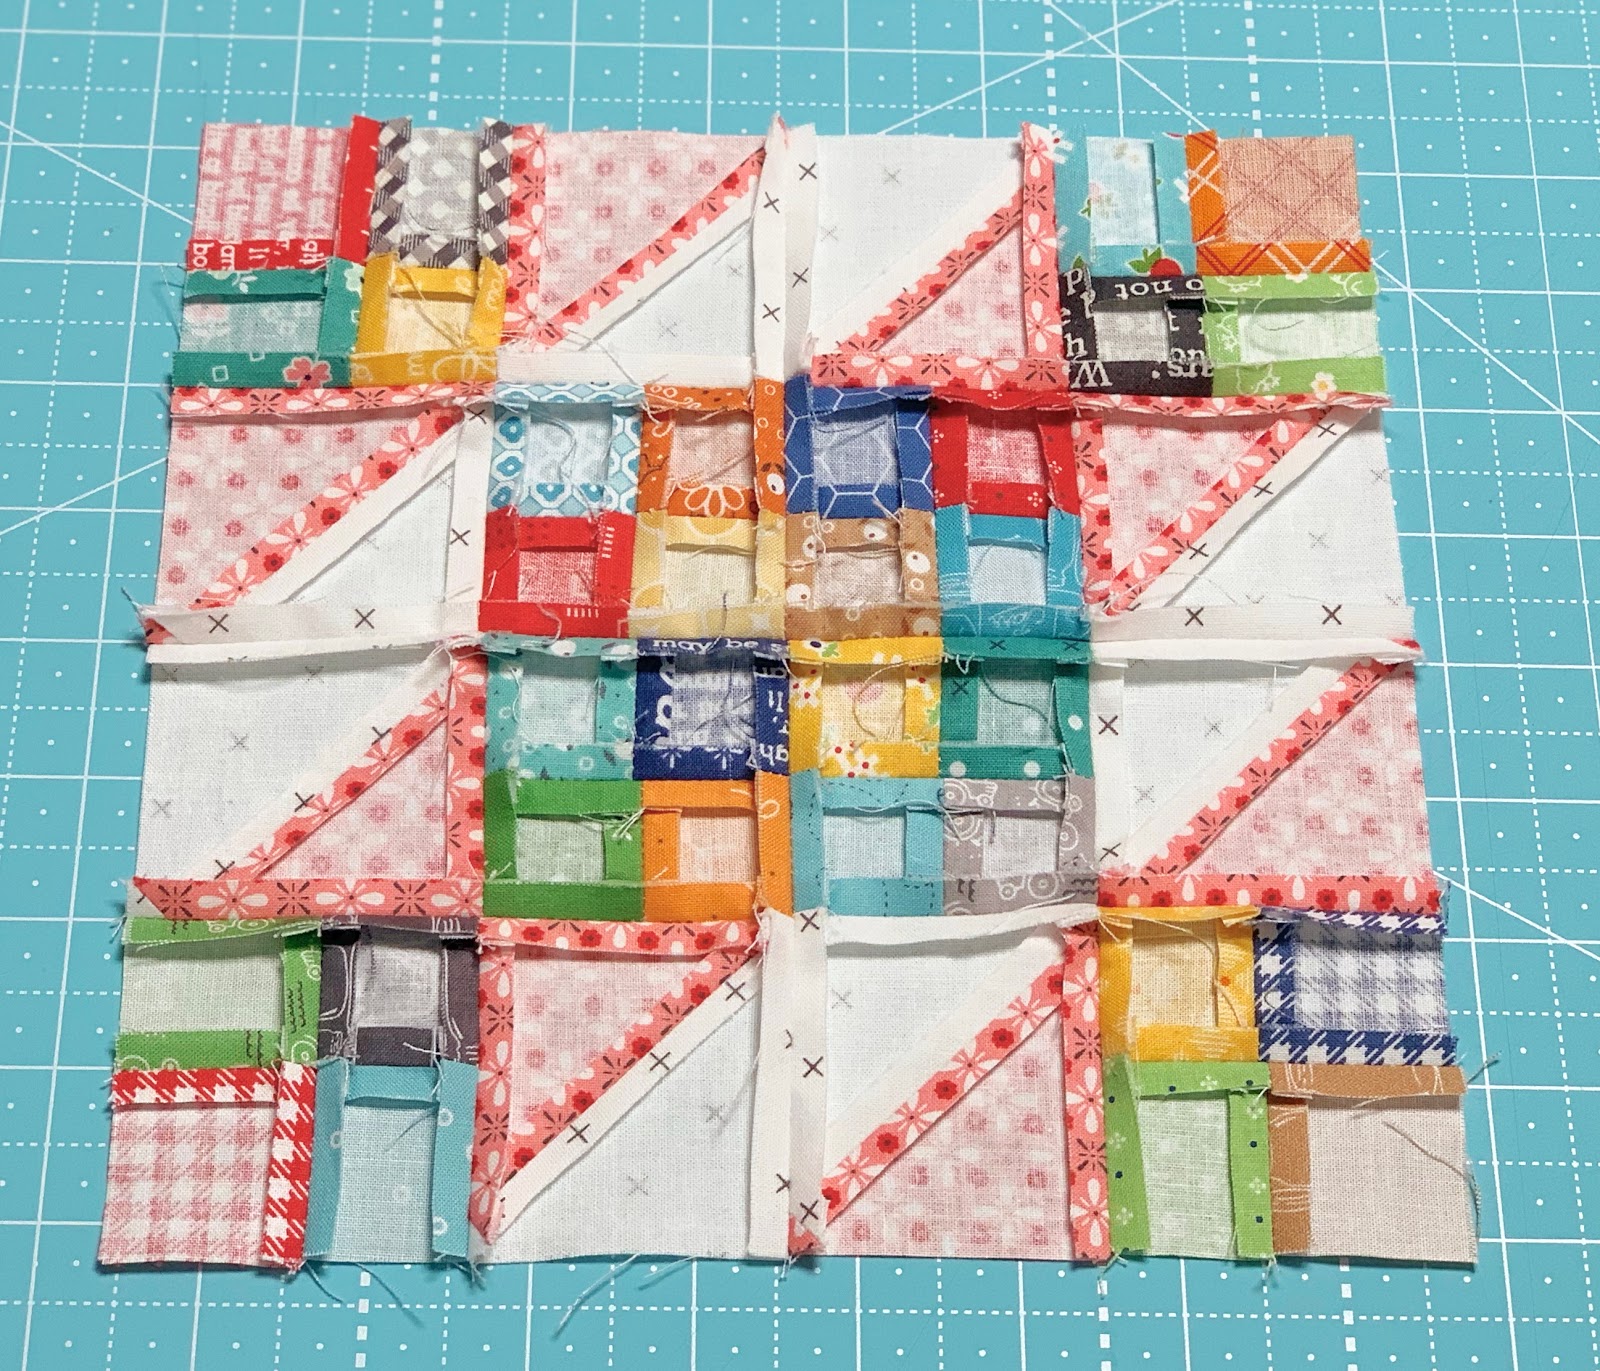
For the LEFTOVERS Block you will need 
32 - 1 1/2" leftover squares:)


For the background cut:
8 - 2 1/2" squares


From this print cut:
8 - 2 1/2" squares


Pair up the 2 1/2" squares...


And sew from corner to corner
 to make half square triangles.
Draw a sewing line or use the 


Trim off the excess...
which by the way are 
too small for me to save:)


Press the seams open and you should have 
8 - 2 1/2" half square triangles.

Now for the scrappy squares...
you will need to make 
4-patch blocks with them.


You will need 8 of them and 
they should also measure 2 1/2" square.


Now you will need to make 4 segments.

Look closely and you will sew
 that the top two are arranged 
differently than the bottom two.
The difference is how the
 half square triangles are turned.

Make 2 of each kind.
They should each measure
 4 1/2" square at this point.


Now sew your segments together like this...
pay close attention to
 how each segment is turned...


Once they are sewn together
 your block should look like this!


This is the back of my block:)


LEFTOVERS BLOCK
should measure 8 1/2" square 
before we sew it into our quilt.

As I said ...we are about 3/4 of the way finished making blocks and I'm sew excited about how our quilt will turn out!

It's going to be a beauty 
with all of the scrappy prints....
scrappy backgrounds and
 different sized blocks 
all coming together in
 pure vintage style


Thanks for sewing vintage with me 
and I'll meet you right back here
 next week for another
 vintage block tutorial:)
xx
Lori


If you are just joining us...
click on each block that we have
 done so far to go to the tutorial:


8. Humble
15. Memory
19. Picnic
20. Sparklers
26. Parade


Monday, August 26, 2019

Granny's Garden Sew Along - Week One!


Welcome to week one of the
 Granny's Garden Sew Along
YaY!
It's finally here:)


We will be making this quilt:
GRANNY'S GARDEN


Using Granny Chic fabric...


And Granny's Garden 
Sew Simple Shapes


And my Shabby fabric
 in CLOUD for all of the background circles.
As far as supplies...
they are all listed in the 
 and I blogged about all of them
 a few weeks back in my 
"Bee Prepared" post.

if you need to read it again
 and see all of the information 
and sew along guide updates
 before beginning:)

***At the end of this sew along***
I will add a link to each week 
of the entire sew along
at the bottom of this post.
All you have to do is scroll down
to the end and click on each one!


Okay...
are you ready to grow a granny garden?
Let's do this!


Of course today we are starting with
 Block One.
Grab your kit and ...
to see the video tutorial.

 I always kick off each sew along
 with a video tutorial of the first block.
The remaining block tutorials
 will be here on my blog each week.


We will be doing blocks 
2...3 and 4 this week as well.
The tutorial schedule is
 in the sew along guide:)

Please go at your own pace 
and do not feel pressure 
because that's not fun!
The tutorials will remain right here
 for your convenience 
so that you can do just that!


After you have watched the video 
and your Block One
 is ready for appliqué...
let's talk about Block Two:)


You will need to use the 
4" Circle Ruler for the flower center
 and for the petals you will need 
shape I-12.


For the petals in this block 
you will make 2 petals with one shape
 by tracing as usual and then 
marking 2 lines 1/2" apart
 in the center like this.


Sew on these two new lines as well...


Cut them apart...


and then trim them as usual:)
Now cut the "X" in the back 
of the interfacing for turning
 just like I showed you in the video.


Turn them right side out...
shape and press.


After making sure that my
 flower center circle is 
right in the middle 
I pin basted my lighter
 petals first like this.


Then I added the four darker ones ...
then glued and let it dry.
Now it's all ready to applique.


By the way you could add buttons 
from the Granny Chic set in-between 
the petals on this block if you would like.

The buttons are packaged by weight
 so each package has all of the
 same buttons but maybe different 
amounts of each size and color...
but no worries because 
there is plenty to choose from! 


I'm using the 
Granny Chic Aurifloss 
 to sew my buttons on. 

I always add my buttons after applique.
You can check with your quilter
 to see if you need to wait
 until after quilting 
is completed to add yours.


I have not appliquéd my block 2 yet 
but I wanted to show you this
first week how I add the circle
 onto the background after applique.

First...I always press my square 
in half both ways like this.


That way it's easy to 
center the circle for applique!


After applique is completed 
use the 10 1/2" Trim-It Ruler 
to trim your blocks down to 
10 1/2" square.

Use the lines on circle is centered 
correctly in the middle 
of the square before trimming:)

This is the way that all 42 blocks
 in the quilt are trimmed 
before sewing them together.

I'm going to applique 
all 42 of my blocks first 
and then trim them all at the end:) 


Okay now let's talk about Block Three!
Shapes used are I-6 and I-22
Cut longest stem 7" and 
press one end under.

 Cut the two shorter ones 
2 1/2" long
 and trim one end on an angle like this.
 Those ends will 
tuck under the center stem.


After sewing your shapes....
don't forget to clip the cleavage areas 
in the flowers before turning.


Turn... shape and press!


Grab your circle and pin baste 
before applying the glue.


Let the shapes dry flat by 
placing a ruler and 
something heavy on top:)


Ready for applique!


I'm thinking about using the
 same color of 
buttons as the
 flowers for the centers:)


Now let's talk all about Block Four:)
Shapes used are I-9 and I-23
Cut two stems 4" long.


Sew your shapes!


While trimming....
clip the cleavage ares between 
the flower petals before turning.


Turn...shape and press:)


Pin and glue baste to prepare for applique.


Be sure to take advantage of 
the lines on the 
10 1/2" Trim-It Ruler.
They are diagonal as well as
 vertical and horizontal.

By using the ruler you can 
center everything perfectly
 onto your circle...
and that's something to be happy about!


I'll probably use yellow buttons
 for the center of the flowers in this block but I will also do that at the very end AFTER I have trimmed up my blocks because I want the Trim-It Ruler to lie flat and not on top of buttons LOL


Okay so now we have planted 
the first four flowers in our
 granny garden and I simply 
couldn't be happier about it!


I hope you are looking forward to 
making each and every 
block along with me.
Have fun with it...
be patient and kind with yourself 
as you grow and tend 
to your granny garden:)

I'll see you 
right back here next week:)
xx
Lori

************** 
P.S. I've added this list of links
 for your convenience
( after the sew along ended )
Click on each one to go to that week:


Related Posts with Thumbnails