"SEWING SCISSORS"
Welcome to week two of the
"MY HAPPY PLACE"
Sew Along!
Join me here each week
when I will be doing tutorials
on the blocks for the quilt.
I will be posting each Monday
right here on my blog
and you can follow my tutorials
any time during the week that
is convenient for you.
For this sew along...
We are making the
My Happy Place Quilt
74" x 88"
I've been sew excited to begin...
This is going to be fun!!
The quilt is made with my newest fabric
collection called STITCH...
Along with several Bee Backgrounds:)
I have had several questions
from those of you who are new
to my sew alongs about if you
should have your kit cut separately
into each individual block.
My answer is:
That is what I do because
it makes the sew along and
each week go very smoothly.
Chances are that if you
have the blocks cut and all
ready to go each Monday
you will be able to keep up!
Of course...
with all of that being said...
you can do it as you go
if that's what you enjoy more.
It's all about having fun and
making your own choices.
As all of my
Sew Simple Shapes Sew Alongs go...
We are using the shapes
for the pattern of this quilt
and of course the Sew Along Guide and my tutorials each week.
The set of shapes that we are
using for this quilt are called
MY HAPPY PLACE
I have already posted the
post which details all of the supplies
for the sew along and how it works.
I have also given the link there
for the free PDF Download
of the Sew Along Guide
to read that post.
As per the sew along guide
cutting instructions...hopefully
you were able to have
everything for this weeks blocks
all cut and ready to go.
This weeks tutorials
are here on my blog
and let's get started on them!
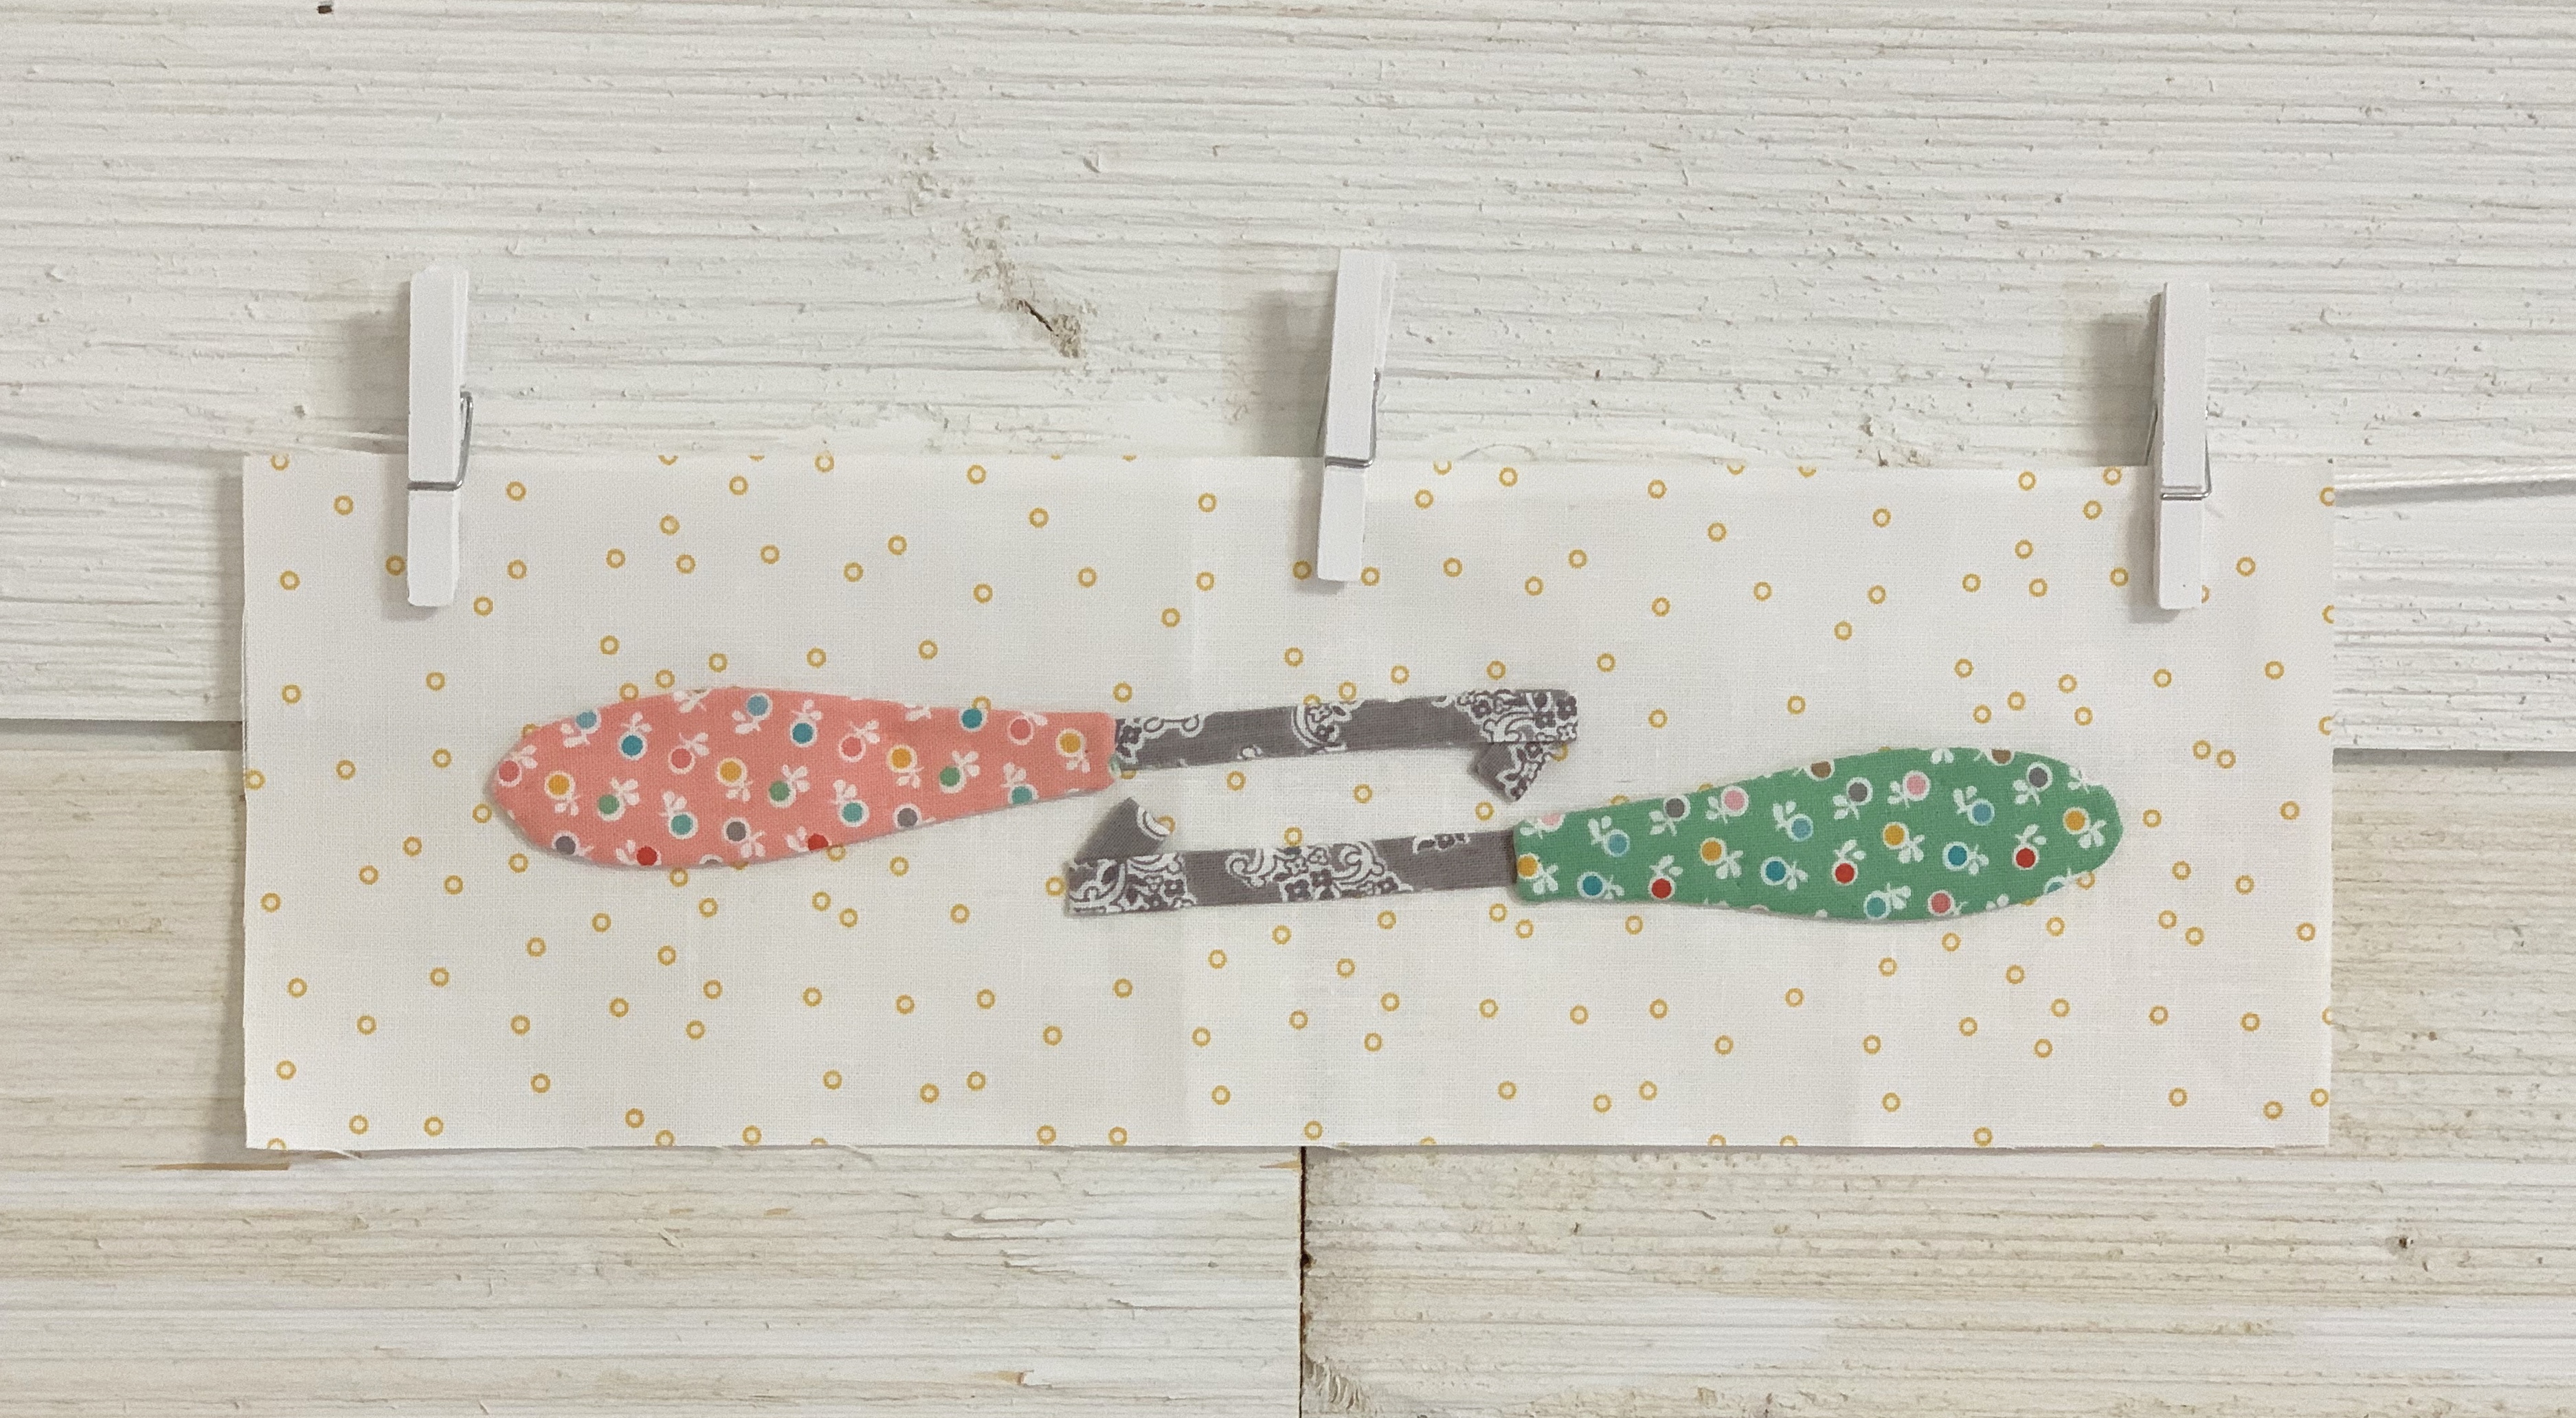
For the Sewing Scissors Block
you will need:
2 - L15
2 - L16
2 - L21
You will need to
have your background cut:
11" x 14"
and you will trim it to
9 1/2" x 12 1/2"
AFTER
it is appliquéd:)
Don't forget to trace one of the
L21 scissors blades in reverse:)
Pair up the traced interfacing
with the fabrics and
stitch stitch stitch!
Trim your red sewing scissors shapes
with your red sewing scissors:)
LOL
Outside curve seam allowances
do not need any clipping before turning...
However this inside curves on the
scissor blades will need clipping:)
Cut an X in the oval shapes
but just do one long cut
for the blades because of their narrow shape.
I turned and shaped the blades
and then used my
Quick Press Seam Roller
on the edges...
And then pressed it with the iron.
Using all three of these tools
plus the iron helps to
shape up these blades very nicely!
All ship shaped and ready for glue basting:)
Before basting I pressed my background
in half so that I could easily
center the scissors when laying them out.
The bottom of my blades measure 7" wide...
And my scissor handles measure 7 1/2" wide.
From top to bottom measure 10 1/2"
Now to sew on one large red button.
Remember you can choose when to
sew your button onto your scissors.
SEWING SCISSORS BLOCK
will finish at 9" x 12"
AFTER
it is sewn into your quilt.
After appliqué you will trim it down to
the unfinished size of
9 1/2" x 12 1/2"
I haven't appliquéd my blocks yet
but I am going to go ahead and
sew on all of the buttons onto each
of my blocks before I applique
so that I can take pictures
of each block to show you:)
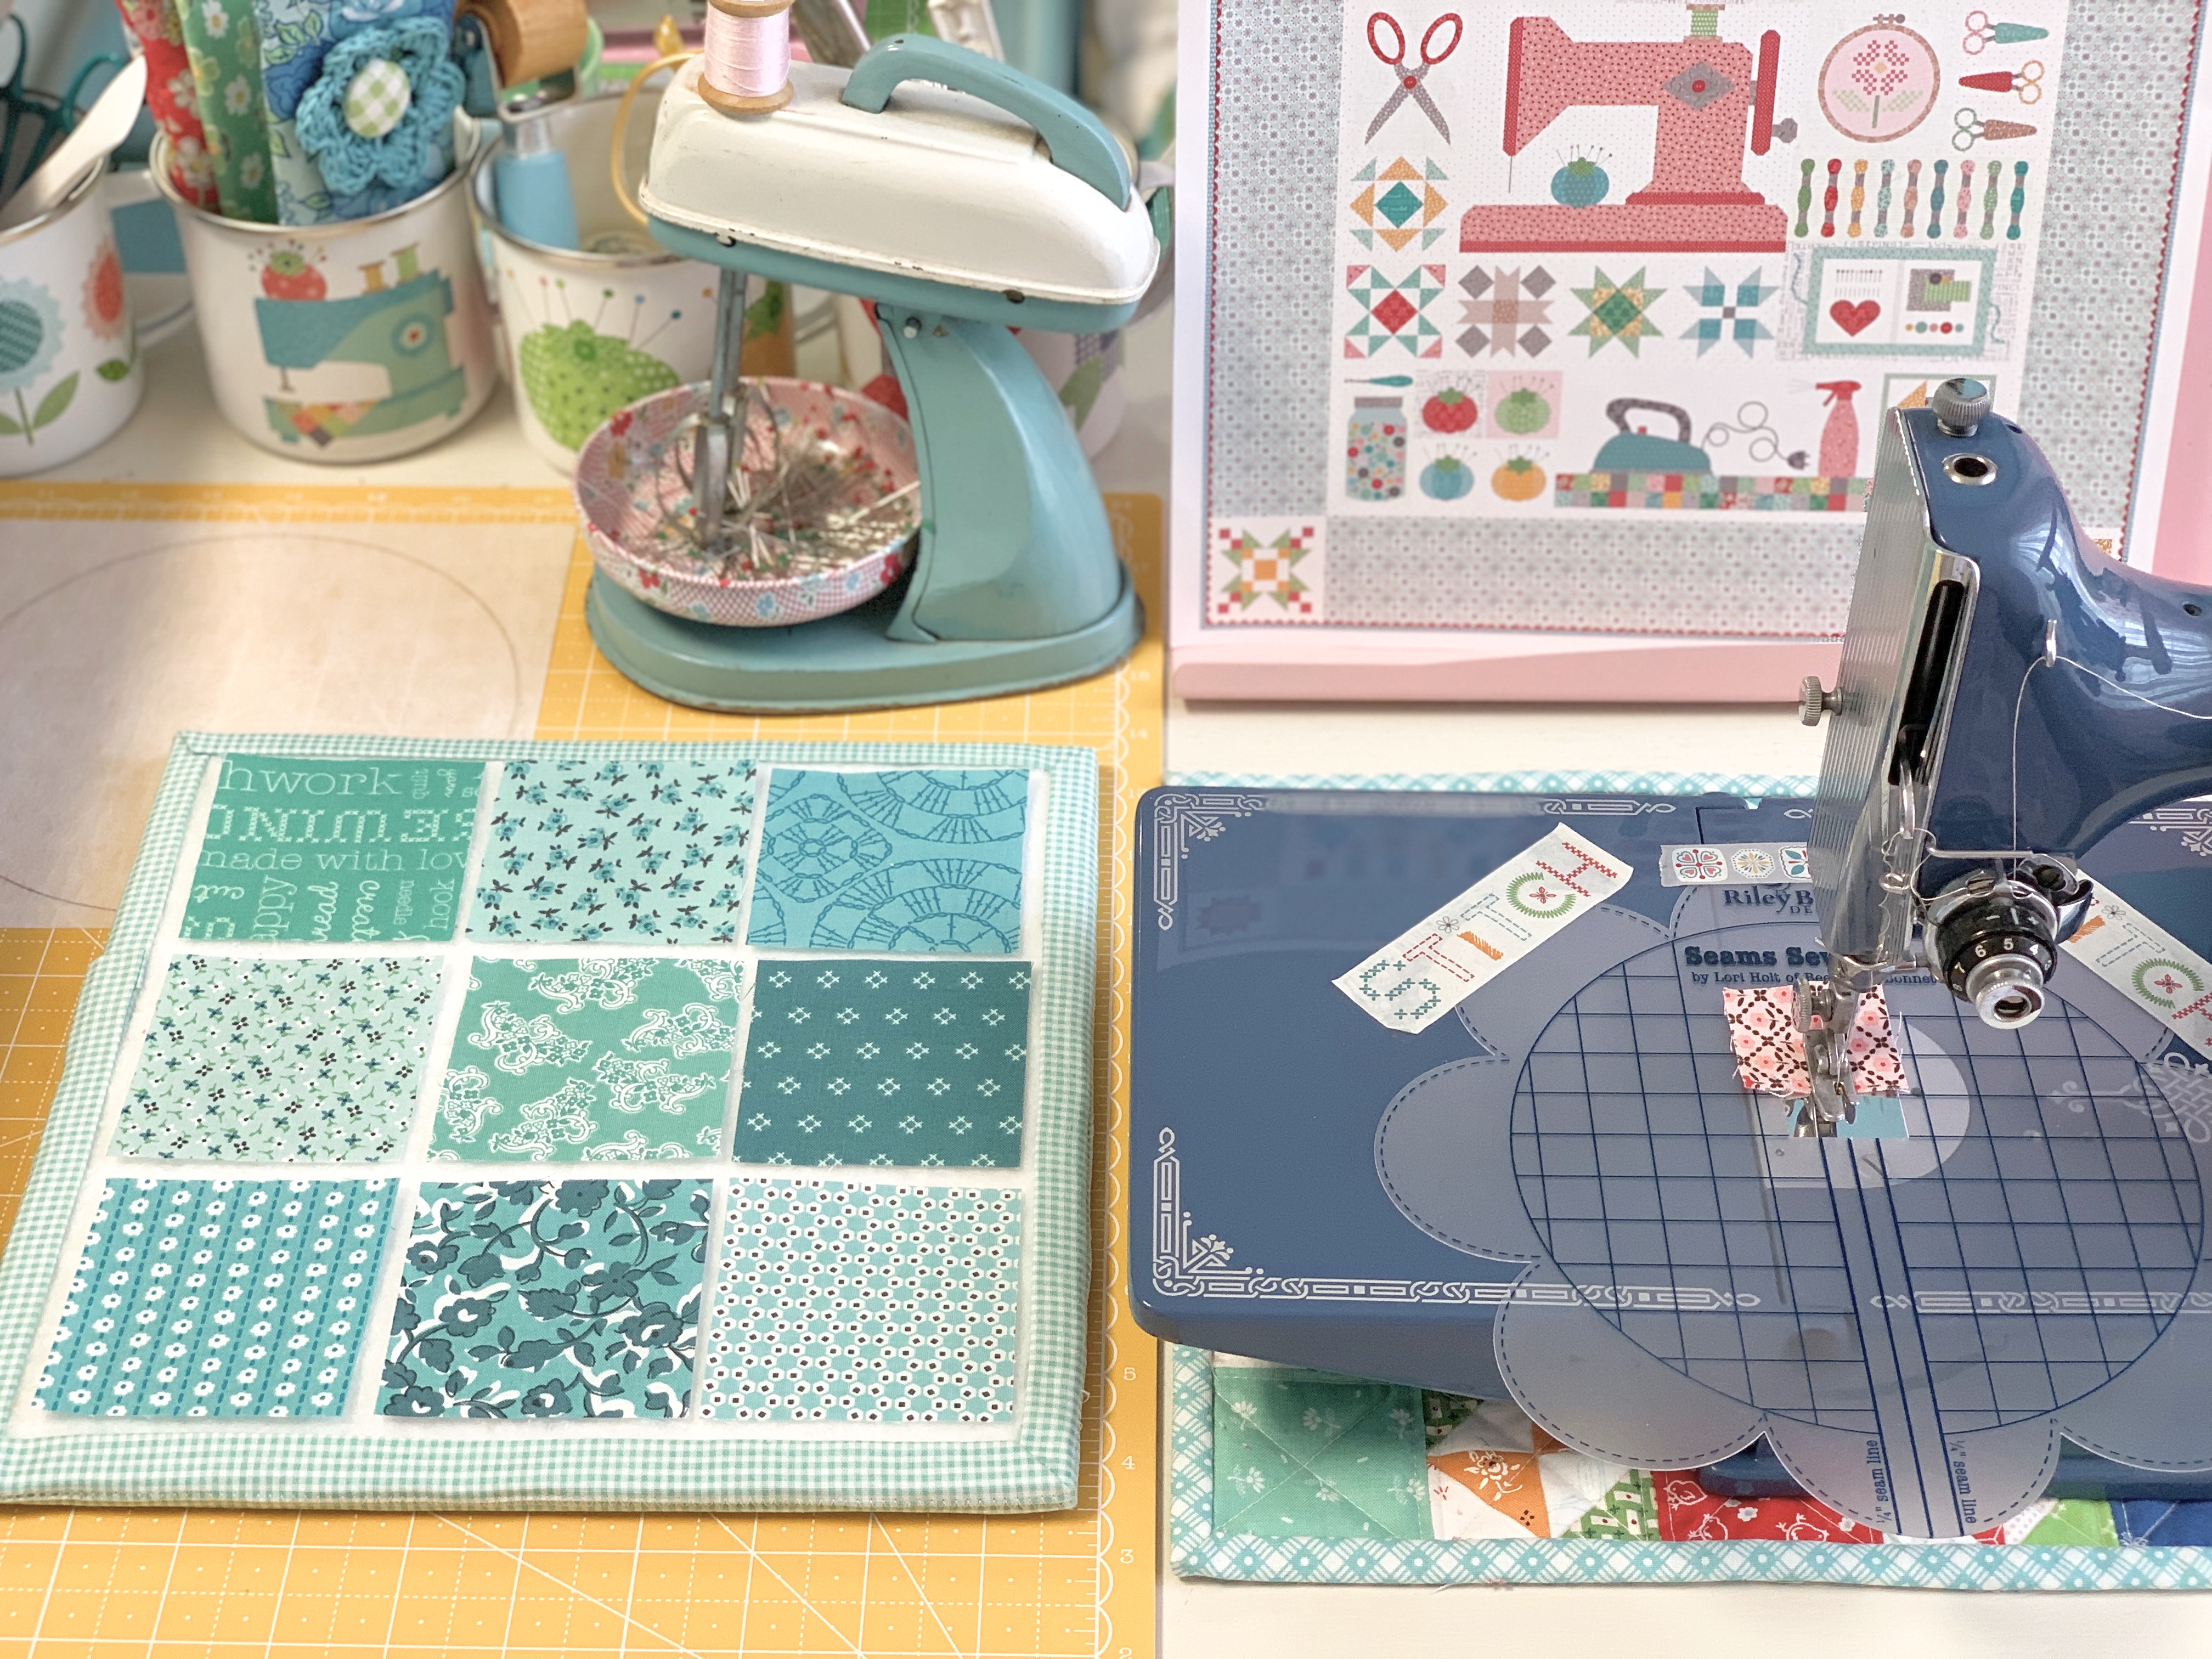
Knitting Block
You will need
1 - L3
Sew Simple Shape
2 - 5/8" x 21" strips
for 1/4" straight bias
Your background will
need to be cut
12" x 16"
and trim it down to
10 1/2" x 14 1/2"
unfinished size
AFTER applique
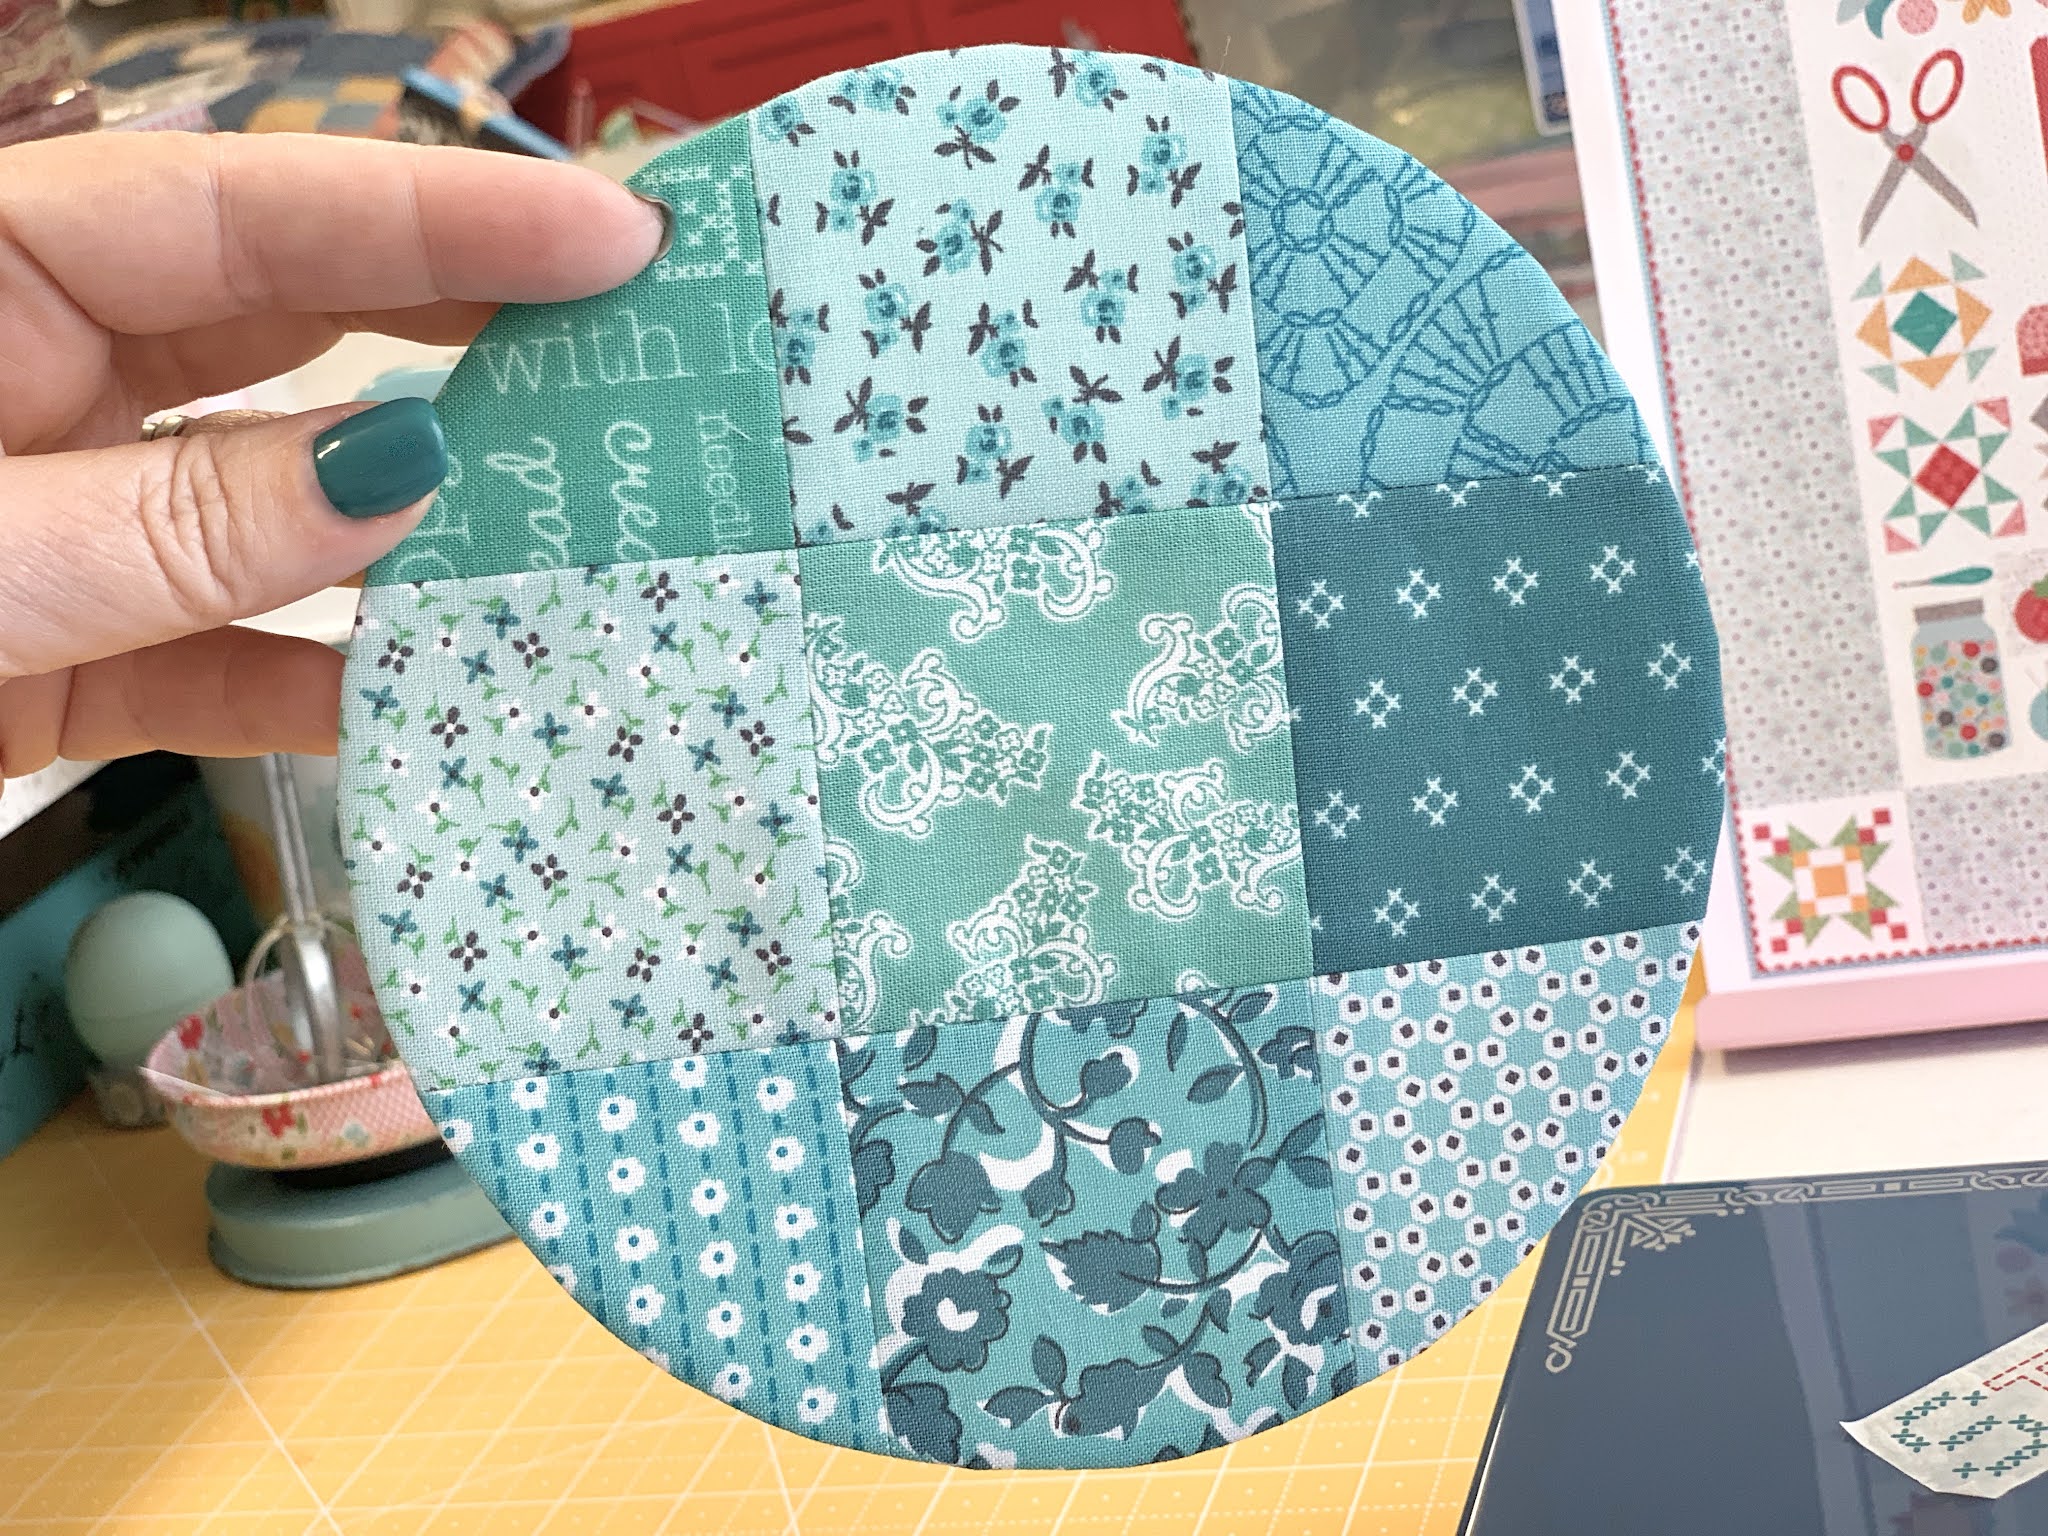
Layout your 9 squares
onto your design board like this...
And sew them into a 9 patch block
using an accurate 1/4" seam allowance.
Press your seams open so that
your applique will lie flat:)
Use the lines on the circle shape
and mark them onto your traced circle...
This will help you to center
your traced circle over your patchwork:)
Sew directly onto your
marked lines and trim:)
(View from the back before turning)
Turned...shaped and pressed!
Now you have a cute patchwork
yarn ball all ready to go.
I ran my 2 strips through the
1/4" bias tape maker
and then I decided to do the same
for the straight bias for the
Crochet Hook Block
that we will also be doing this week.
If this is your first time
or you need a refresher
on how I do this...
to watch one of my videos
where I talk all about my
bias vs straight bias strips
for my sew alongs and I show you
my process of running the strips
through the makers.
I pressed my background in half both ways.
Okay...now for glue basting!
First I placed the yarn
right in the center of the background.
Then I placed the two strips
for the knitting needles underneath
in a criss cross like this.
Notice that I used the corners
of the background fabric to line up
the angle of the knitting needles.
That's a good guide to go by
in keeping them even.
For the bottom end of the knitting needles
I'm taking advantage and using the end
that goes through the bias tape maker
first because it kind of is always a
little narrower and tapers in a bit.
I'll end up sort of "pinching" those ends
to more of a point and trimming off
the selvedge part when I stitch them down
so that they are looking a bit more
like the end of a knitting needle:)
As far as the measurement goes
it will end up 4 1/2" from the yarn ball
and pointing towards the corner of the background fabric.
At the top I just measured up 4"
and clipped off the remaining.
This is where my buttons will be
sewn for the knitting needle tops.
The entire knitting needle length
will measure about 15" long when
I am finished with the applique.
Go ahead and save the pieces
that you trim off for the
Cross Stitch Block
to use for the screw in the hoop.
We will only need a few
short pieces and these will work perfectly!
I took a photo of pinching the
bottom ends of the knitting needles
so you could see what I was talking about:)
I'm using the red buttons again
for the top of my needles.
Of course you will use your own
personal preference or if you
didn't happen to get a lot
of red buttons in your bag.
As I have said before...
these buttons are scooped up and
put into the bag and sold by weight
and not by even amount of colors.
I'm really excited about these buttons.
I designed them to look like the
vintage buttons that I collect
and I'm really happy
with how they turned out!
KNITTING NEEDLES BLOCK
will finish at 10" x 14"
AFTER
it is sewn into your quilt.
After appliqué you will trim it down to
the unfinished size of
10 1/2" x 14 1/2"
Here is what you will need
for the Crochet Hooks Block:
2 - L23
1 - 5/8" x 21"
for 1/4" straight bias.
You will also need to cut
your background 4" x 12"
as it says in the guide:)
Time for sewing the crochet hook handles!
After trimming...
you will need to clip the inner curves
near the top of the handles.
I shaped these in the same way
that I did the scissor handles
because they are long and narrow as well...
Then ironed them and used the clapper
so that they are nice and flat:)
For the hooks I cut 2 strips 3 1/2" long
and pressed one end under.
I cut 2 more strips 1" long and
pressed them in half for the hook ends.
This is how I laid out...
pinned and glue basted the hooks ends.
They measures about 9 1/2" long
from end to end of handles:)
Glue basted and ready for applique!
You can save the leftover
straight bias strip
and put it with the
Seam Ripper Block
just in case you decide that you want to
use it in place of the satin stitch.
CROCHET HOOKS BLOCK
will finish at 2" x 10"
AFTER
it is sewn into your quilt.
After appliqué you will trim it down to
the unfinished size of
2 1/2" x 10 1/2"
I hope you enjoy making your
3 blocks
for this week.
We are now on our way
to making the quilt...
YaY!!
Next week on the schedule is the
Sewing Machine Block
I'll meet you right back here on Monday!
xx
Lori
Click on the links below
to visit each week of this sew along:
Lori Holt of Bee in my Bonnet
"Vintage 1966"