"PEARL"

Happy Monday!!!
Welcome to week three of the
"CHICKEN SALAD"
Sew Along!
Join me here each week
when I will be doing a tutorial
for one of the 12 chicken blocks
for the quilt.
Of course because we are sewing
from all around the world
we all have different time zones...
But I will be posting each Monday
right here on my blog
and you can follow my tutorials
any time each week that
is convenient for you.

We are making the
Chicken Salad Quilt
64" x 80"
*I'm going to say this again because
I feel it's important:
Please sew at your own speed ...
whenever your time allows
so that you can enjoy
each step of this sew along.
Quilting should be fun and not stressful:)
The schedule in the front of the
sew along guide is simply the schedule
to let you know which block tutorial
that I am doing for that week.
If you are not able to do it that week
please remember that these tutorials
will remain on my blog forever:)

And just as a reminder...
I am also using an additional
Chicken Salad Quilt Kit
to make a second quilt
out of my Cook Book fabric
using twelve 12" Farm Girl Blocks from my
Farm Girl Vintage Book
and my
Farm Girl Vintage 2 Book.
Again, that means I am using TWO kits
that are the same.
It makes me sew happy to find out
that so many of you are making
a second quilt along with me!

COOK BOOK KITCHEN QUILT
and show and tell mine as part of
each weekly blog post
each Monday here on my blog.
Last week I made my
PIE CHERRIES
Farm Girl Block

Each quilt is made with my newest fabric
collection called COOK BOOK...

If you are looking for a fabric kit...
just do a quick google search for
"Chicken Salad Quilt Kit"
to find shops who still have some left.


We are also using the
Chicken Salad
Sew Simple Shapes


I have already posted the
post which details all of the supplies...
and all of the cutting and
all about the sew along and how it works.
I have also given the link there
for the free PDF Download
of the Sew Along Guide
to read that post.

As per the sew along guide
cutting instructions
you should have everything for your
PEARL Block
all cut and ready to go!

If you missed week one and the
first introduction tutorial
I have posted that for the
Hattie Block
on my YouTube channel.
to visit my channel and watch the
tutorial and I hope that you love it!
Leave me a comment there and let me know:)
If you like what you see
and my other videos there...
click on subscribe and click on the bell
to be notified whenever
I post another tutorial:)


Okay!
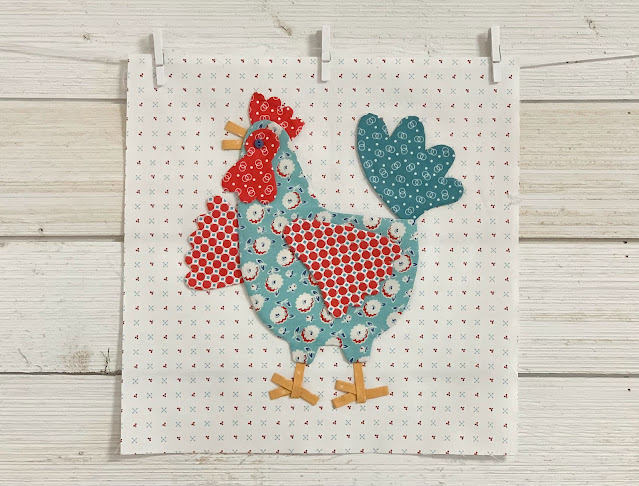
Let's get started making
PEARL
and her cute little baby chick:)

all cut and ready to go!
I have also laid out the
squares and rectangles for the border
so that you can tell for sure
which prints they are:)

Here is a list of the
Chicken Salad
Sew Simple Shapes
needed for the
PEARL Block:
1 - M-4
1 - M-6
(sorry but for some reason
I don't have M-6 in the photo)
1 - M-11
1 - M-19
1 - M23 (reversed)
1 - M24 (reversed)
1 - M-30
You will also need to cut
the background 13 1/2" x 13 1/2"
and your straight bias strips
for the feet and beaks 5/8" wide
as it says in the guide:)

*Take Note*
You will need to trace the baby chick
in reverse so it will be facing Pearl
and not running away from her:)

ready to get pin-basted:)
Don't forget to clip all of the
cleavage and inner curves before
turning, shaping and pressing.

1.Use your 12 1/2" Trim-It Ruler
when laying out your block so that
it does not "grow" too large
and stays within the 12" square size.
2. When using the Sue Glue you only
need a small dot about 1/4"
in from the edge of applique.
"A dot is a lot"
3. Don't stress too much over
making the chicken feet.
They are just feet and will not
look the same or match each other.
They will not be perfect
and that's good because they
are not supposed to be.
4. Have fun building your chicken!

Pearl and her baby are
all ready for applique.
I think baby chick is asking to
go out in the yard to play
and Pearl is being a good mama hen
and telling her baby
"Don't wander off too far"

Okay!
Now it's time to talk about which
of my 12" Farm Girl Blocks
that I chose to make this week
for my Cook Book Kitchen Quilt.
I chose to make
BAKED WITH LOVE
You can find the pattern on page 13
of my Farm Girl Vintage 2 Book.
It's all cut...and each piece labeled
with my Sew Handy Stickers:)

Fun and Done!!

This Farm Girl Block has a lot
of pieces and
when sewing it I basically treat it
as three separate blocks
(2 oven mitts and a pie)
that are sewn together to form one block.
*With any block no matter
how many pieces it may have...
breaking it down into segments is key!

And now there are three:)
I love all three together and
they will be perfect for my
COOK BOOK KITCHEN QUILT
Have fun each week
making your kitchen block!

of the Chicken Salad Sew Along
and that you enjoying
playing with my Cook Book fabric:)
I'll be right back here on my blog
next Monday for week four
and the tutorial for
CORNELIUS
and the next 12" Farm Girl Block
from my Farm Girl Vintage Books!
xx
Lori
***********************************************
This recipe is also a
tried and true family favorite...
Chicken Roll Ups!
My Mom made them for us a lot and
it's the first meal that I made for
Mr.Honey's parents right after
we got married and it was a hit.
Mr.Honey requests these often and
they are one of Kassidy's favorites as well:)
CHICKEN ROLL UPS
4 cups cooked and diced chicken
8 oz. cream cheese
2 cans Crescent Roll Dough
1 cup Italian bread crumbs
6 Tablespoons melted butter
1/2 cup grated parmesan cheese
1/4 teas pepper
1/2 teas salt
1/2 teas garlic powder
1/2 teas dried chives
Gravy:
2 cans cream of mushroom soup
1 can (soup can) of milk
Preheat oven to 350 degrees.
Lightly grease a cookie sheet and set aside.
Mix together the softened cream cheese, chives, garlic, salt and pepper
then add the chicken.
Unroll room temperature crescent dough and separate into the triangles.
Spoon about 2 tablespoons of chicken mixture into the center of triangle.
Fold each corner over the center of filling and press together to cover filling entirely.
Roll up to wrap the remaining long end of triangle at the same time.
Push down after rolling up to flatten just a bit.
Repeat with all triangles.
Once all are rolled up and formed,
dip each into the melted butter, and then coat in breadcrumbs.
Place each coated chicken pillow onto the greased cookie sheet.
Sprinkle them with Parmesan Cheese.
Bake for 20-25 minutes or until golden brown.
While they are baking,
make the chicken gravy.
In a small saucepan, mix together the cream of chicken soup and milk.
(no water added to soup)
Bring to an almost boil being careful not to scorch because of the milk.
Reduce heat to low, cover and let simmer until ready to use.
Add a little more milk if needed.
Pour gravy over each chicken pillow and serve!
Mom often made this in the springtime and served with new peas from the garden and that's still my favorite side with them.
We also had fresh strawberries
from the garden during spring and here is
one of my favorite ways to
serve the strawberries as a side:
Lori's Strawberry Side Salad
You will need fresh spring berries,
about 3/4 to 1 cup per serving.
Clean strawberries and remove hull.
Slice in half or quarter very large ones.
Arrange each serving of strawberries
onto individual salad plates.
Add a dollop of sour cream...
yes I said SOUR cream:)
I like to use Daisy brand.
(do a dollop of Daisy lol)
The sour cream brings even more sweetness
from the berries.
Sprinkle fresh light brown sugar over
both sour cream and strawberries.
Add a sprig of garden fresh mint
for garnish and serve!
Very pretty and also VERY delicious.
Enjoy!