

Hello friends!
It's "Bee Happy" time and
this week we are adding
the borders to our quilt:)

We have been having so much fun
making this quilt...
and I can't stop smiling about it:)

I've loved playing with the
Bee Happy set of
If you are just getting started...
remember that there is
a link to each and every blog post
of this sew along...
right here on my blog.
Simply look on the right side bar
and scroll down to find the
Bee Happy Sew Along...
and click on the post
that you would like to read!

Thanks so much to everyone who is participating
and especially for all
of your sweet and kind words
about the sew along...
my fabrics...
the quilt design...
my methods and tutorials...
as well as the detailed
Sew Along Guide

This was taken just minutes
after the last borders were
sewn onto my quilt...
And I just have to say...
it was a bittersweet moment for me:)
I was super happy to see it
come to life for reals...
after it's humble beginnings that buzzed around in my head and then
to just paper and pencil.
Once again...
a big thank you to
for allowing me to bring my dream
of this project to life.
I put so much of myself into this quilt!
Because of using all 3
fabric collections together...
I really wanted it to be special.
You and your participation...
along with your
amazing enthusiasm...
have indeed
made it truly special for me.
I thank you from the
very bottom of my heart:)
It almost made me a little sad
to have it finished!
I really did enjoy every step
of making my Bee Happy Quilt....
from start to finish:)

I designed the Honeycomb borders
because of course...
honeycombs are perfect for
finishing off a
"Bee" happy quilt:)
We are using D-10 and D-11
Sew Simple Shapes

In addition to the squares that
you cut for the borders...
I used these 3 from the
gingham Multi Patchwork print.
You should have a total of
sixty eight - 4" print squares
for the large honeycomb shapes
And a total of
thirty one - 2 1/2" solid squares
for the small honeycomb shapes

I know y'all have it down by now...
but I'm going to go through the steps of
making one of each size of honeycomb shapes.
Here we go!
After tracing...

It's time to sew...
trim and cut an "X" in the back:)

Turn...shape...and press!

YaY!

There are four square honeycomb
blocks in the border.
After applique...
trim these down to
4 1/2" square to
sew into the border.
The denim honeycomb block
goes on the left side border...
and the mint gingham goes
on the right side border.

The red stitched heart honeycomb
goes on the top border
and the coral chicks honeycomb
goes on the bottom border.

But wait!
Don't forget to do the
running stitch embroidery
around the solid honeycombs first:)

I used all 6 strands of Aurifloss.
I used either a lighter or darker color
in the same tones...
and how I decided was
which one contrasted the most:)

*I did all the embroidery first
on all of my small hexagons...
I just pinned all the blocks
for the photos to show you placement*
These four strips have
3 honeycombs across
and should measure
4 1/2" x 10 1/2"
to sew into the quilt.
*FYI*
The top one goes in the top border...
the second one goes in the bottom border...
the third goes in the right border and
the fourth one goes in the left border.

These are the two strips that
have 5 large honeycombs across.
They should measure
4 1/2" x 16 1/2"
to sew into the borders.
The top one shown above
goes in the bottom border
and the one underneath
goes in the top border.

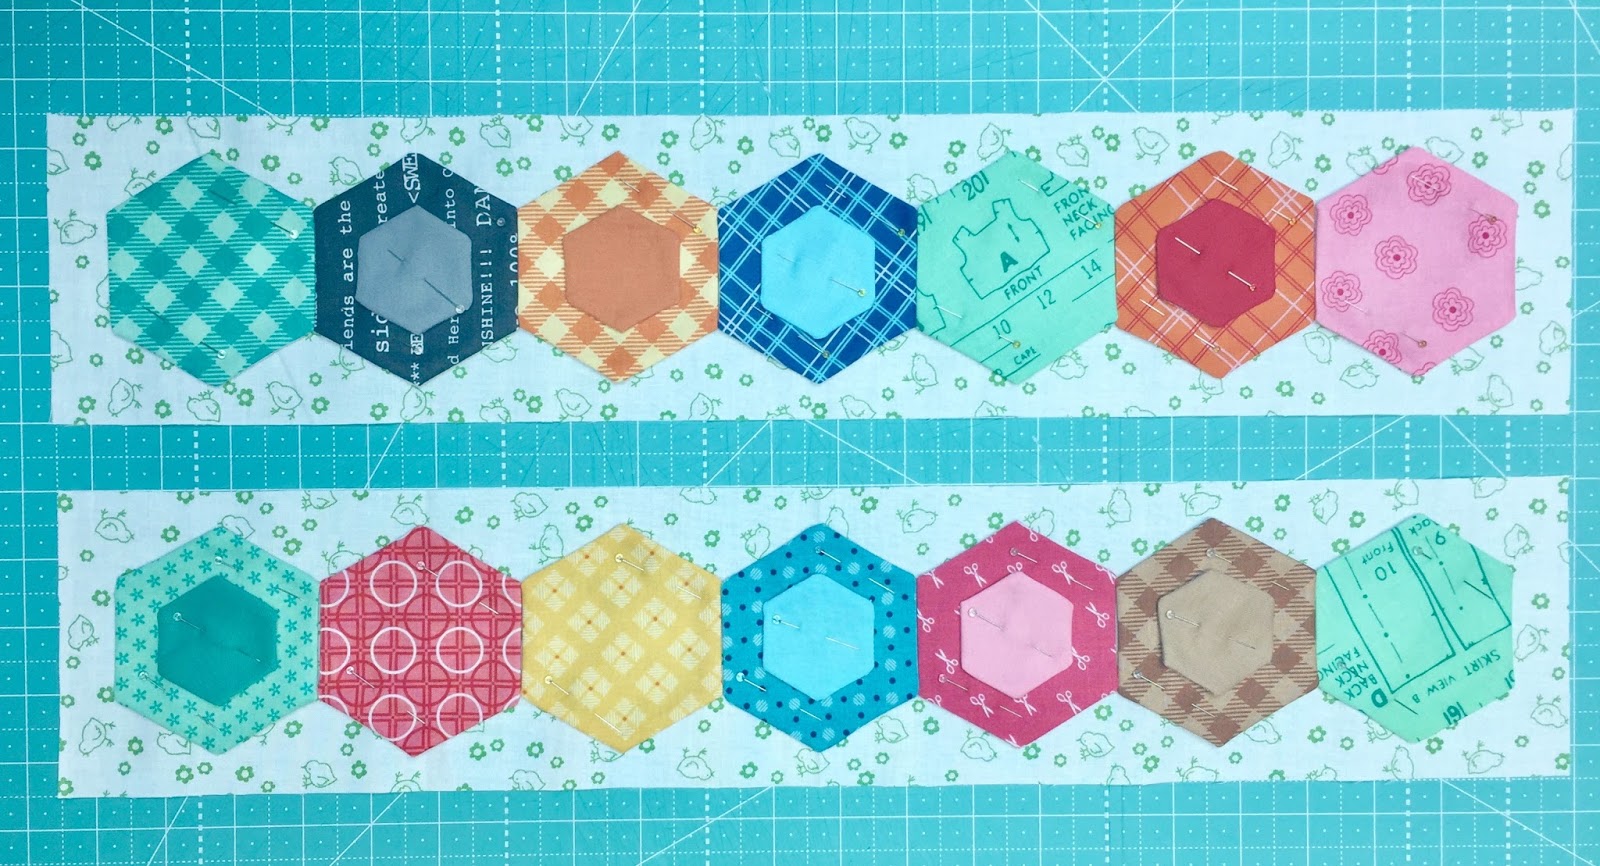
Here are the two strips with
6 large honeycombs across.
They should measure
4 1/2" x 20 1/2"
to sew into the borders.
The left one above
goes in the right border
and the other one
goes in the left border.
The two strips with
7 large honeycombs across
should measure
4 1/2" x 22 1/2"
to sew into the borders.
The top one goes in the
bottom border and
the one underneath it
goes in the top border.

The last two strips with
8 large honeycombs across
should measure 4 1/2" x 26 1/2"
to sew into the border.
They go in the side borders...
the one on the left
goes in the left border
and the other on the right!
Sew all of the four border strips together
(add the coral chicks cornerstones )
and sew onto the quilt after adding the
inside border and cornerstones...
using the directions and diagram
on page 4 of the Sew Along Guide.
All side borders always go on first:)
Lastly...
add the green bandana
outside border!

Bottom left corner...

Bottom right corner...

Top right corner...

Top left corner...

All ready for quilting!!
I'll show you mine after quilting
next week
and I'll also show you my
BONUS QUILT
that I made using leftovers.
It's called "Bee Blossoms" and
I can't wait to
tell you all about it:)
xx
Lori

1 comment:
That is the most adorable quilt, love our designs.
Post a Comment