Welcome to week 19 of the
Vintage Block Along!
I have another block to share with you
from my Grandma's pattern basket:)
I'm using Farm Girl Vintage fabric...
And Bee Backgrounds:)
I picked these five prints
to make my block...
And then ended up switching one
of the prints afterwards...
I'll tell you about that as we go along!
I chose to name this block
PICNIC
When we were at grandma's house...
and when I say WE I mean that
there were always some of my
brothers and sisters or cousins
there because we all lived
in the same small town.
Anyways...when we were there
and it was lunchtime grandma of course
would make us lunch and when
the weather was warm she would say
do you want a picnic?
Of course we did!...
I love everything picnic!
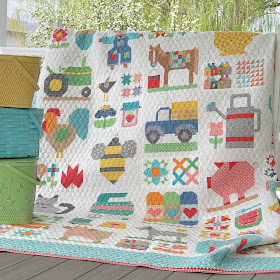
Above is a photo from my upcoming book
Farm Girl Vintage 2
and you can see just a few
of my vintage picnic baskets collection:)
I like to paint them in my
happy Farm Girl colors!
Grandma would prepare our lunch
for outside in a basket or a cooler
depending on how far we were going...
and of course she had
a colorful and well loved
scrappy quilt or two for us to sit on:)
These kind of quilts were always made
with blocks that could easily
use up scraps and leftovers from
sewing dresses and
previous quilt making....
so many colorful prints!
This is probably the reason
that I love vintage fabric and
scrappy happy quilts so much:)
Okay...let's move on
to making the Picnic Block:)
From the background you will need to cut
8 - 3 1/2" squares
4- 3 1/2" x 6 1/2" rectangles
From this fabric you will need to cut:
4 - 3 1/2" squares
This is the fabric that I
ended up switching out:)
From this fabric cut
1 - 3 1/2" square
From this fabric cut
4 - 3 1/2" squares
From this fabric cut
4 - 6 1/2" squares
And finally from this fabric cut
4 - 3 1/2" squares
First step is grabbing these pieces...
And sewing them together like this!
You should have 4 segments
that each measure 6 1/2" square.
Now take the remaining
4 background squares...
And add an Easy Corner Triangle
onto the blue square corner
using the
Like this!
Do this on all 4 segments.
Mark a line down the center
of the 6 1/2" squares.
This is your sewing line.
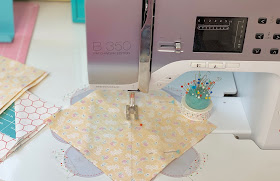
Pin onto the segment like this.
I like to use a small pin in the center
(this one is my Pretty Applique Pins)
that I can sew over if needed
to pin right where the sewing line
needs to meet the corner
of the blue square.
Sew directly onto your marked line...
And it will look like this!
It's an easy peasy way to do this
normally difficult on the bias
segment because we are sewing first
and then trimming...
no triangles to cut
and to accidentally stretch out
because we use squares instead!
Trim off the excess leaving
an approximate 1/4" seam allowance
and press towards the large triangle.
Do the same thing to all 4 segments.
They all should still measure
6 1/2" square:)
By the way...
of course I always continue to
cut my trimmings into
useable squares sizes
for my scrappy sewing.
Recycling at it's best!
Now take these two fabric squares...
And sew them together like this:)
Now all of your segments are completed
and you are ready to
sew your Picnic block together!
Lay it out onto your large
design board like this.
Sew your block into 3 rows
and then sew those 3 rows together.
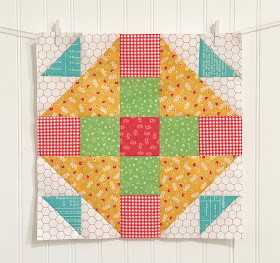
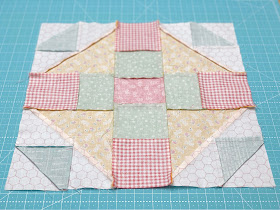
Finished block:)
But wait!
I was not happy with the contrast
of my lighter red floral print
against the yellow fabric.
I mean...
I liked it and it was okay
but I wanted to love it!
So even though it is one of my fave prints in the collection...
I grabbed my seam ripper
and took out those squares.
And switched them for the red gingham.
The gingham has more red in it
than the floral and so it has
more contrast which is what I
was looking for
in this particular block:)
Gingham to the rescue!
So here is the block after switching
and I'm really happy with
how it turned out...
much better on the contrast.
I mean really...
what was I thinking when I
in the first place
didn't include gingham
in a picnic block?
I really should have known:)
LOL
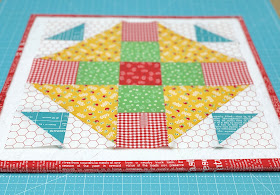
Here is the back of my block
and how I did the pressing:)
PICNIC
15 1/2" x 15 1/2" before
we sew it into our quilt:)
I really love this block...
it's great stash buster and a fun one
to play with a lot of different colors
within one block...
the kind grandma always made
and used for picnic quilts.
Thanks so much for joining me
along this journey of sewing vintage!!
Come back here next week for
another fun block tutorial!
xx
Lori
If you are new and just joining in...
Click on each one block
to go to that tutorial:
5. Rhinestone
6. Vintage Lily
7. Star Shine
8. Humble
9. Egg Money
10. Quilting Bee
11. Sunday Star
12. Sweet as Honey
13. Bear Hug Block
15. Memory
16. Farmers Daughter











Thanks again for another pretty vintagy block! Yes, I like the first red print but love the red check better too! Love the quilt from your book and all those fabric samples for 14 cents per yard! Thank you for the warm memories from your story too.
ReplyDeleteReally like this one, and I have some 3 1/2" squares to see if I can use them up when I sew this one. I've admired your baskets for so long, and have a couple of that style - I wondered what paint you used to paint them, I know they have been painted a long time. I am constantly asking the husband to pick it up by the handles, as he is bending the the side trim!!! Uh!!!
ReplyDeleteBeautiful - and love how those corners come together!! I still remember when fabric was often 99 cents a yard, and mom and I would search for any fabric that would work for garments - then it was off to cut 4-5 yards of each, because we had no pattern in mind yet, but that should do for whatever came up later :)! Your block reminds me of all the lovely quilts we could have made from those remnants, if only we had known how to quilt then! Another lovely vintage block, Lori!
ReplyDeleteI read these blogs and mostly fail to comment. Gratitude. Working on that. I am so thankful for your time and efforts.
ReplyDeleteYour work is gorgeous and I too liked the gingham and the $.14/yd piece. So cute.
Your work is absolutely beautiful and so fun to look at! I love your vintage look fabrics and the country feel to your blocks. I am working on my very first quilt, teaching myself from youtube and other online resources. You are so unbelievably talented and so generous with sharing your patterns and instructions. Thank you for all you do! Hope to finish what I'm working on so I can try a Lori Holt block next!
ReplyDelete