Wednesday, January 26, 2011

Celebrating my "New Look" with a Giveaway!...

Hello there bloggy-world....how do you like my new look?
I just decided it was time for a little bit of a change to brighten up my cold & snowy winter days....and I mean cold. Brrrrr!
So anywhoo....about the new header.... that little girl in her underwear... reading a book...and wearing pink curlers...and sitting under the hairdryer...is me in 1966.
The sad thing is that you can still find me the very same way...minus the hairdryer and of course substituting the book for your blog...lol.


The above photo is my new button which I am hoping you will add to your blog:) I of course am the one in the white cotton print dress wearing the bonnet (with a bee in it)...and you are the one in the fabulous red dress!
If you do add my new button to your blog...and blog about my giveaway...leave me a comment and let me know that you did and I will enter you in my giveaway!

No blog?...no problem. Just leave me a comment and tell me which of my patterns is your favorite. (make sure that you leave me your email)

What am I giving away you ask?
My answer is that I am giving away 3 of my patterns to the winner....the patterns will be the winners choice...any 3 that you choose!


You may want to choose my Family Reunion pattern...

Or my "eat CAKE"...


Or perhaps you might choose my very first applique pattern...Apron Club.

Or my newest pattern....Paper Dolls.
Feel free to click on all of my patterns on the right side of my blog for a closer look and decide which 3 patterns you might like.
I will close the giveaway on Monday, January 31st at midnight my time and announce the winner the very next day. Good luck to everyone who enters....
and a big thanks to all of you for celebrating my new look with me!
P.S. You can have yet another entry by becoming a new follower of my blog or subscribing to receive my posts by email...both buttons to do so are on the right side of my blog...just scroll down till you see them!

Monday, January 24, 2011

How I Made my "Cup Cozies" Tutorial...

I heart two and a half inch scrappy squares. I use them in alot of projects.
I thought that since I showed you a quilt in my last post that I made with 2 1/2" squares...I would show you something else that I made last month using them.

I made some cup cozie's for gifts for a few of my friends....so I thought I would do a tutorial for you on how I made them.
Have you seen these clear cups that you can buy at Old Navy?....I heart them too. They're perfect for a nice cold Diet DP with x-tra ice....

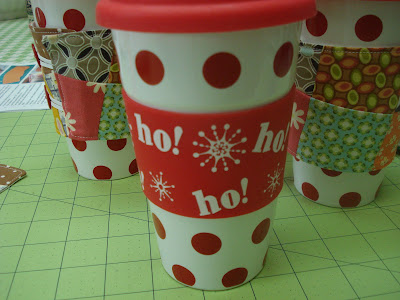
....or another alternative cup is one like these for smokin' hot drinks! (like cocoa...lol). I bought these at Hobby Lobby.


I used the soft foam rubber wrapper on this cup for a pattern base for my cozie's...

I cut it off the cup and laid it out on a piece of paper.
I wanted it longer to allow for overlap and a button closure.
I also wanted it wider because I thought it would be cuter and also show off more of my scrappy squares...so I traced around it accordingly....and cut my paper pattern out.


(I traced my pattern without allowing for seam allowance....I wanted it to be the FINISHED size cozie)

After figuring that I would need 12 squares sewn together in 2 rows of 6 in order to be big enough for my pattern.....I picked out the squares in a variety of pleasing colors and patterns and stitched them together.

I chose a fabric for the lining and cut it about the same size as the 12 squares segment after they were sewn together...

Then I cut a piece of thin Pellon the same size to use for batting.
I layered the 12 squares segment and the lining fabric right sides together and then placed the Pellon on top.
I pinned my pattern on top through ALL layers.
I also cut 2 pieces of 1/8" wide elastic about 3" in length each to use for the button closures.
Sorry that I have no picture of this step....I guess I forgot to take one!

I stitched through all layers around the edge of my paper pattern....no tracing!...then I cut around my stitching leaving about a 1/4" seam allowance.*I stitched the 2 elastic pieces in one end of the cozie at the same time...back stitching for strength....and I also left an opening in the bottom middle for turning.
You can click on the pictures for a better look.
I turned right side out and pressed. I topstitched 1/8" from the edge...sewing the opening closed and strengthening the elastic at the same time.

I decided to use some red buttons from my stash and found matching ones in pairs.

I wrapped the cozie around the cup and marked dots on the cozie with a pencil where to put the buttons.
I made sure to sew the buttons on so that the elastic would stretch enough to hold the cozie onto the cup without slipping off.

The finished cozies on the cups for hot drinks....made out of 2 1/2" squares.

You may have noticed that these "Cup Cozie's" above are not made from 2 1/2" squares. Well....I also heart 1 1/2" strips!
I have containers chock full of strips... because for years I have cut my leftover fabrics from projects into 1 1/2" and also 2 1/2" strips.
These are always my "go-to" containers to use in scrappy quilts and small projects such as this. I can use the strips as is or cut them into squares or rectangles as needed.

To make the cozie's out of strips....I simply sewed several 12" long strips (I think I used 18) together making a rectangle piece about 12" x 18".
I also cut a piece of fabric the same size for the lining.
I layed my pattern out across the top of the strips diagonally and stitched after layering lining fabric and Pellon just like I did with the squares.....(and also placing elastic pieces inside for stitching)

These clear cups were a little bit wider around than the polka dot cups...but I still had plenty of room for the cozie to overlap. If not...I would have just added another inch or so to the length of my pattern.


These were really fun and easy to make and I loved how they turned out....I even kept one for myself!
And because Valentine's Day is coming up....wouldn't these be adorable in cute valentine fabric?
So girls...save your scraps from your projects...and stitch up a few "Cup Cozie's" for some quilty fun!
P.S. I added this tutorial onto a couple of linky party's.
Go over and check them out for more fun tutorials!


Thursday, January 20, 2011

Yo-Yo Mama Show and Tell...

Yesterday was our Yo-Yo Mama's 1930's quilt group day at Material Girls....so I'm bringing you some of the show and tell.

This is my quilt that I brought to show...It's my secret project that I made from our 2 1/2" square exchange that we just finished up... I posted about here.
The pattern for this quilt came from a picture in an old magazine...it's very simple as you can see.


Look how different this quilt looks when viewed with the blocks on point...


Or on a straight setting.
I just have to add a border and get it quilted....then I will use it for a table topper in my kitchen.

The following are a few of the blocks from our new exchange we are doing this year...


This is my good friend Judy striking a pose for the camera....lol...she cracks me up!
As you can see...we always have a great time together:)


These are just a few of the blocks I will be showing throughout the year...that's how long this fun block exchange will go.

Pat made an adorable ipod cozy out of scraps...


Way cute bag from one of my favorite Heather Bailey fabrics...I used this print for one of my crochet edge pillwcases...check it out here.

And a Valentine's apron made by Becky....love it!
I sure hope you enjoyed my little show and tell...and I also hope you have a quilt-y kind of day!


Wednesday, January 19, 2011

How to Make a Valentine...

...I'll bet that Valentine making is happening all over the place....sooo.... I thought I would show you a previous post about my "How to make a Valentine" quilt.
My quilt shows you everything you need to make a very special valentine for all of the kids in your school class.
After all, you do want to be prepared when your teacher says...

"OK class, it's time to exchange valentines...everyone put your boxes on your desks and begin passing them out."


This is my "How to Make a Valentine" quilt that I designed in 2007.


These are the borders where my friend Helen quilted cute little hearts in. I wanted the borders to look like lace.


Now I'll take you through each and every block...they show everything that you will need to make your valentines.


You will need stamps so that you can send one to your friend that moved away last year....and some of Grandma's hand dipped chocolates for your teacher.


Mom will help you make sugar cookies....and yes... you can have one while gathering your supplies.


You will need stickers...


...and those heart suckers individually wrapped in thier own little cellophane bag...


...bubble gum balls and a giant Tootsie Roll for someone special...which I renamed Quootsie Roll (say Cutesie Roll)...because I can. It's my quilt you know:)


...your favorite crayon colors...I named my own crayons too...
Sweetheart Pink
Love Machine Green
Passionate Purple
Mellow Yellow
Without you Blue.


This is your Valentine box....Dad helped you make it out of a shoebox.


You will need tape for taping the candy to the valentines.


And plenty of Hersheys Kisses...you can have a few of those too while you are making them.


Don't forget the paper doilies.


And the conversation hearts.....these are important because you can send a message to that cute boy that you have a secret crush on but will never tell.


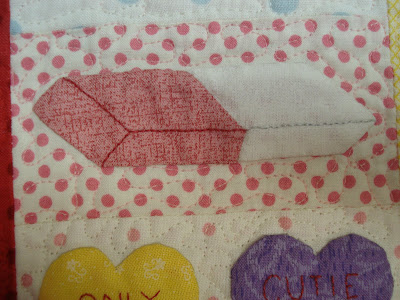
A big pink eraser just incase you spell someones name wrong. (remember to check the list of names that you got from your teacher for correct spelling).


You can use your older sister's paper punch but don't forget to put it back in her desk when your done....or else!


Individually wrapped "Love Savers"...


Lots and lots of paper.


A list of everything you will need.


Individually wrapped cherry Twizzlers...


A ruler....you want your lines to be as straight as possible.


Wide pink ribbon to tie up the sugar cookies for Grandpa and Dad.


Red Ju-Ju hearts....cinnamon ones too.


Always remember to S.W.A.K. each envelope.

Scissors for cutting...(don't run with them).


A #2 pencil and ...LOTS of glitter.


Glue or Paste.


Smarties....the pink ones are the best.

Chocolate hearts...both Milk and Dark to please everyone.


Have fun making your Valentines!
*note* If you are interested in purchasing my pattern to make your own "How to make a Valentine" quilt...you can get it from Nadine's website (Material Girls).
She might not have a picture up because it's a seasonal pattern but you can call her and she'll send you one. 801-495-4290.

Related Posts with Thumbnails