
Good morning lovely quilters! I have yet another tutorial for you.
It's the very traditional vintagey tree block:)
YaY!!!
I love tree blocks because I love trees...
but they can be tricky because
the trunk shape of the tree often
use complicated template shapes.
But not this way!...of course I like to use easy corners on my tree blocks too:)

I cut 18 - 1 1/2" scrappy squares
and 18 - 1 1/2" background squares for the half square triangles and
2 - 1 1/2" red squares.
I cut a 4 1/2" red square and gingham square…
and 2 - 4" background squares.

Lay them out on your
the order which you would like to sew them together.
My leaves are colorful and scrappy...
inspired by the upcoming season of Autumn.

Don't forget to snap
of the layout so that you can
refer back
to it later:)

With a stack of your
background fabric squares...
you will make all of the colorful squares into half square triangle leaves.
Remember that I showed you how


After you have trimmed all of the excess...press towards the dark triangle.

Referring to your photo
for correct placement ... lay your
cute little/just sewn
half square triangles back onto your
mini design board.

Let them sit together patiently and
get to know one another
while you construct the trunk:)

FYI…another lesson on drafting…
if you are making a 6" finished size block, you will need to cut the
trunk square (mine is red) 4 1/2" x 4 1/2".
You will use 2 of your background squares for each side of the trunk.
Cut each of them 1/2" smaller (4" x 4")...
for a 1" wide trunk.

Lay the smaller square on top of the
larger square with RST...

And stitch from corner to corner of the background square.

Like this.

Trim...

And press towards the triangle.

Now repeat the same process for
the other side.


Now take your other 4 1/2" x 4 1/2" square that will be the body of the tree
(mine is red gingham)...

And lay it on top of the square that
you just completed...
(they should be the same size)...

And stitch from corner to corner...
making sure that you are stitching
across the trunk!

Trim off the excess leaving an
approximate 1/4" seam allowance.


Press it towards the gingham ...and
you have a tree trunk!
yay!
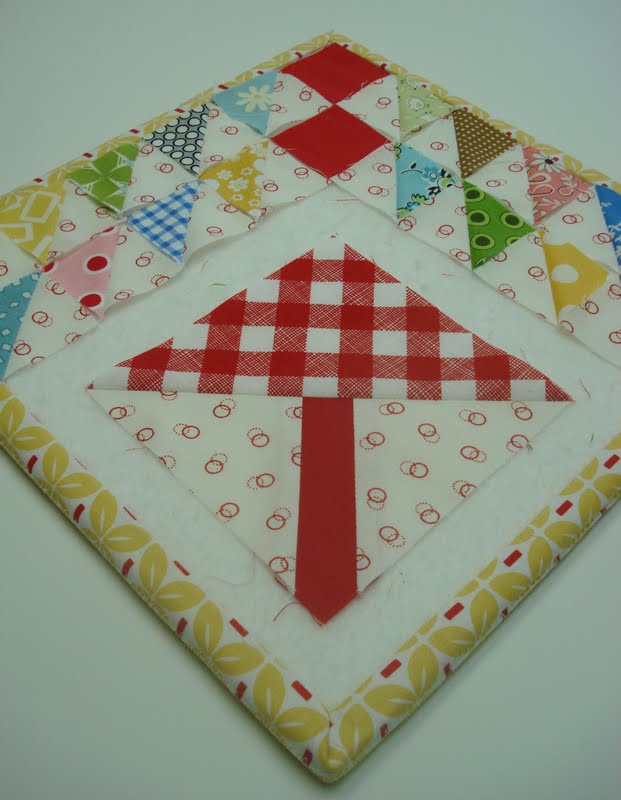
Back onto the design board to join
the half square triangle leaves:)

Delete your last picture and snap a
new updated version:)

Begin sewing the HST's together by two's.
I like to press my seam allowance open with pieces this small...it reduces alot of bulk and makes a smoother, flatter block.

Back onto the design board for accurate
color placement... and to make sure they
are all pointing the right way!

Then join them into four patches and
press the seams open.

When you are doing a quilt block with this many pieces...don't get discouraged!
The steps are simple and they just take time.
With each step complete...you can see the block taking shape.

Now you can see where it's possible to stitch the leaves to one side of the trunk.

Press this seam toward the trunk
instead of open.

Now for the last seam...

Press it towards the trunk also.

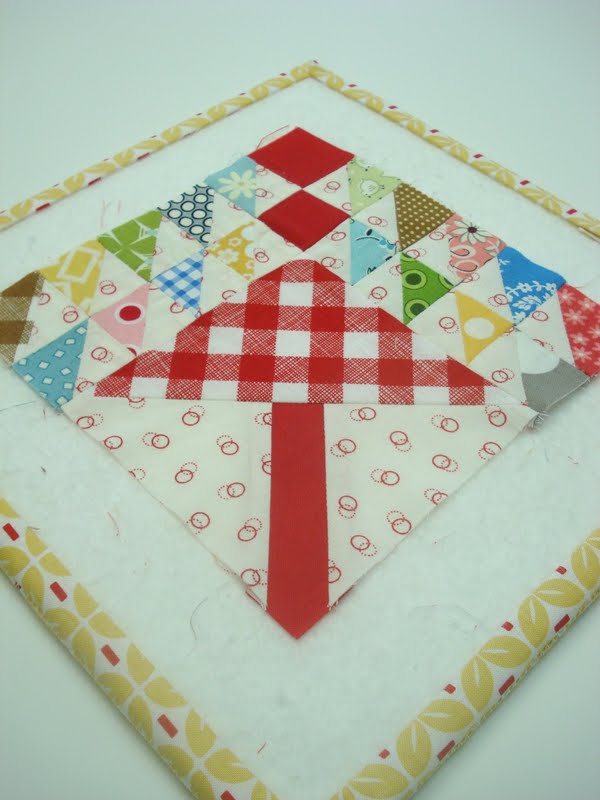
And there you have it...
a cute tree block!
(made up of 42 pieces...lol)

Do you like it?...
your very own cute and tiny
little work of art:)

Fabric Used:
White = Redwork Romance
Gingham = Sew Cherry
Red = Sew Cherry
HST = My Stash:)
Have a wonderful weekend my friends!
I will be traveling a few hours away
to beautiful Logan,Utah for a nice long weekend with the wonderful Mr. Honey.
I'll type at ya when I get back:)
xx
Lori

26 comments:
Taking pictures is a fab idea!
you make this block look very
'do-able' as this 'temprance tree' could have driven me to drink!!
Lori thank you so much...this is a phenomenal tutorial! I'm making this on this afternoon!
Love this pretty block!
Thank you so much for all your tutorials. I love your ideas about drafting and just picked up the supplies I needed. I was a bit stumped on the pine tree block but this will certainly help so much! Thanks again.
Another great block....I love all your ideas. I need to get gong on all these blocks..Wish I was on my way to Logan to see your trunk show...maybe one day you could have one down here in St George. I think I need to get the Farmers Wife book to at least read...Thanks again Lori for your super great tut!!! Drive safe
Lori: You're simply one of the smartest, most talented, brilliant woman I know! I miss you friend and hope you are well on your little trip to Logan. Wish I could be there...the quilt shop sounds darling and your classes are always the best. Hugs
Thanks again for a super tutorial Lori!
this has been so helpful. thanks so much!
Lori:
Love, love your tutorials. Thank you so much for sharing your knowledge! Your tutorials make us quilters want to get sewing. Beats reading book instructions. In addition, I purchased your pillow and runner patterns. Runner is done; pillow coming up.
Could you do a tutorial on your crossroads block?
Thank you
Wow! Beautiful!
I FINALLY started cutting AND made 2 blocks last night!!!
I FINALLY realize how tiny all these pieces are!
I am in awe of your work!!!
I am now a little terrified ... but my blocks are to pretty it's kinda addictive!!!
I could use a tutorial on getting my blocks to measure 6 1/2 unfinished size...mine are very close but 1 side is off a bit by 1/8th?
I drew the line down the middle of square like your tip! LOVE YOUR TIPS!
I feel like such a newbie!!! I usually to applique so this is really testing me! I'm so happy I have you helping me along the way!
Thank you sooo much for the tutorials! I just received my FW book and can't wait to begin. You have made this so much easier!
Thank You!
Thank-you so much! You have made this quilt-a-long fun! I was tearing my hair out trying to do this on my own!
Now that is a clever way to get a stem! Thanks so much for the tutorial. Your FW blocks are fabulous, too.
Just love this little tree block and feel that even I (a newbie quilter) can do this with your great tutorial!!!! Much appreciated and have a wonderful trip to Logan!!
~Terry~
I LOVE it when you show your graph paper with the measurements. Is that "cheating"....that I'd rather use your measurements than calculate my own? :o)
Fab Job! This is so helpful. I am getting to enjoy my graph paper more and more. Having soooo much fun. Found plenty of sew cherry at my LQS yay!
THANKS
Cindy from Utah
Thanks again for another great tutorial.
Olá Lori Holt! Visitando seu Blog, adorei. Seus trabalhos são lindos de se vê. Parabéns!
Convido a me visitar, também adoro bordados. http://alcastrosantos.blogspot.com
Um grande abraço, Algecira
I love all the blocks you've been showing how to tackle. It's like patchwork 101, very helpful so thanks for sharing the processes.
You are just AMAZING! Thank you sooo much for your tutorials (PLEASE don't ever remove them from your website!!!). I would like to do the FW quilt along, but I am a newbie to quilting and need to get a little more quilting under my belt before I tackle this challenge. Your tutorials will make this a doable project for me down the road - they are worth their weight in gold!
Hope it all went well yesterday. Another perfect block here.
Really,really appreciate your Farmers Wife tutorials! So much easier than using the templates. I'm referring lots of people who are making this quilt to your blog. Thank you so much for taking the time to assist all of us!
Thank you for these wonderful tutorials. They are making the FW quilt seem much more achievable and I'm now fully inspired to give it a try.
Love this wonderful block and how you did it, and I love your delicious new line!!! Have to get me lots of it :-)
wow, perfect and very nice
Post a Comment