Yesterday I just sent off the last of my
projects
with Jina to take with her to spring market:)
YaY!!!
I won't be there this time...
but all of my goodies will be displayed
in the Riley Blake booth.
Cindy and Jina will be setting it all up for me!
(thanks girls)
If you happen to be going...
go over and visit them.
Please snap a few pictures of my
Bake Sale goodies so I can see what they look like in Portland!
I mainly designed my Bake Sale collection for the kitchen
but of course there are several prints that
could be used for many other things.
However...
my projects and new patterns are all kitchen themed
and are each named accordingly:)
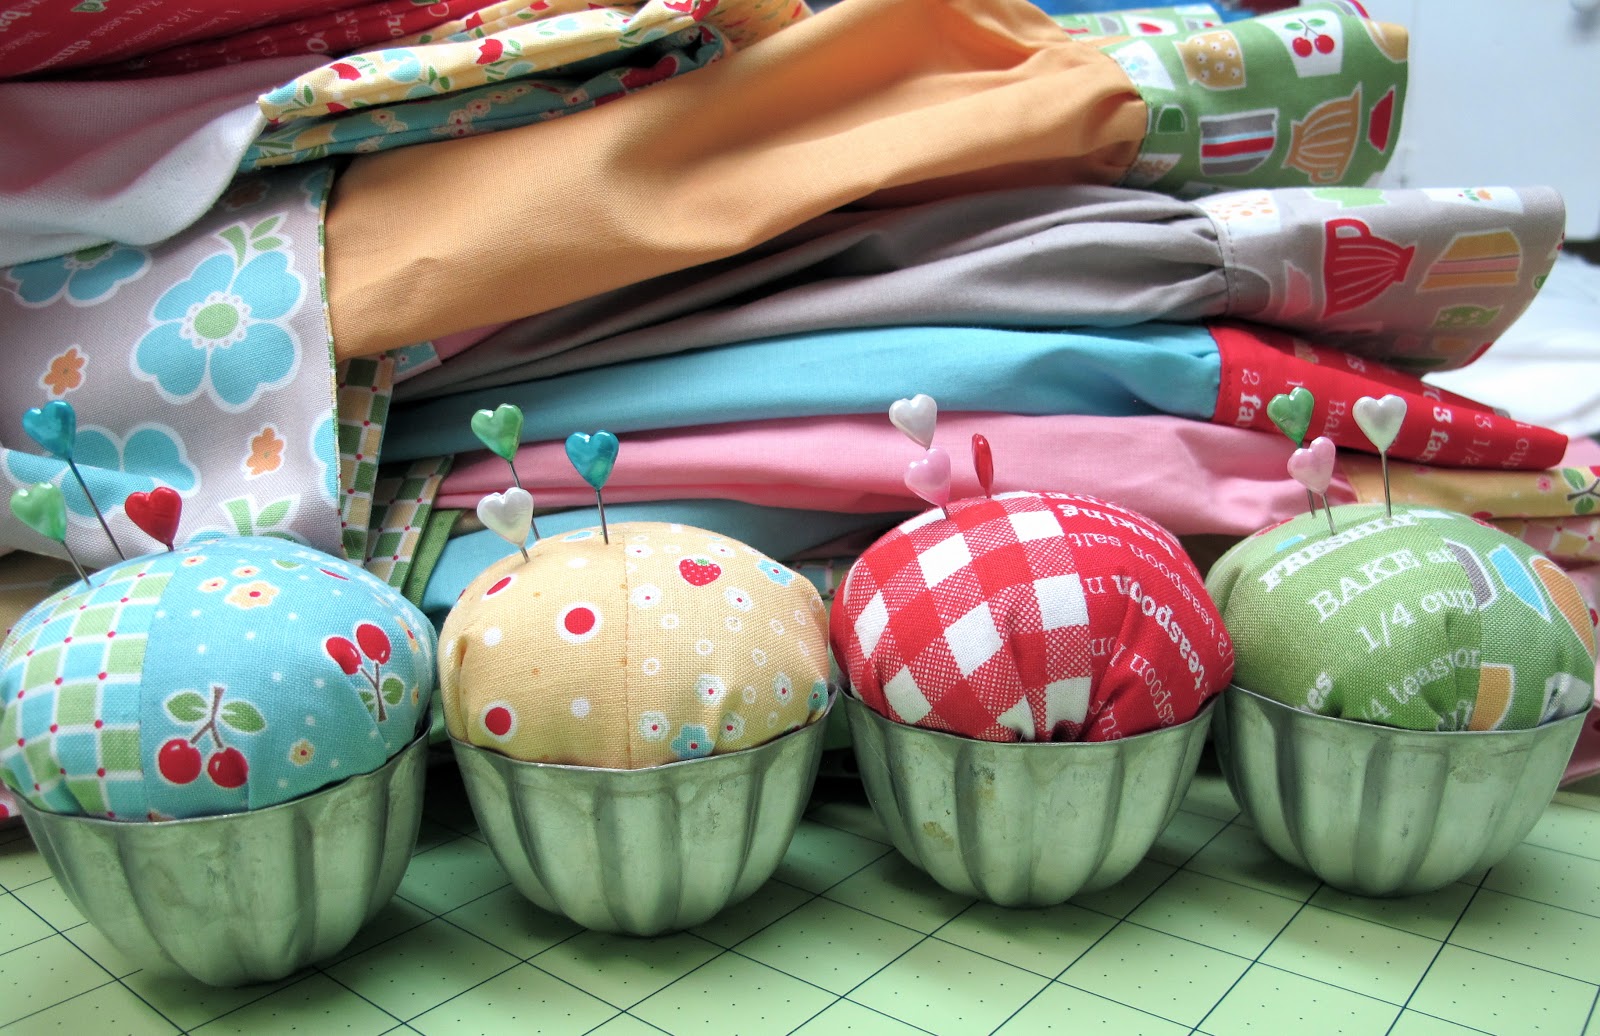
For instance...meet my new
blueberry - lemon - strawberry - lime jello
little pincushions made with one of my new precuts...
"Bitty Stackers"
(3 1/2" squares)
and four vintage JELLO molds.
And a pretty in pink
"Cake Pincushion"
using my
I have used my rulers for several projects
and one of them is this giant dresden.
YeP!!!
I'm so excited to finally
be able to tell you that
when I designed my
I purposely drew the angle in such a way that when
you cut 12 thimbles and sew them together...
they make a dresden!
YaY!!!
The one above is made with my large
Thimble Ruler and 10" squares...
And the dresden in the middle of this one is made with my
small Thimble Ruler and 5" squares...
it fits inside the giant dresden perfectly!
The rulers really make it easy and each dresden
works up quickly with only 12 blades:)
The above is a peek at the quilt that will be a new pattern called
"Blue Plate Special"
I combined 5" and 10" squares from
several of my fabric collections for the quilt:)
I have used all 3 of my rulers to make potholders.
This one is made with my
these are fast and easy potholders to make.
There is a cute little pocket that would be fun
to place a cookie...
a recipe...
a crochet dishcloth or any little kitschy gift inside...
and give to a sweet friend:)
The possibilities are endless!
All you need are three 10" squares and the Hexie Half Ruler!
Another new pattern from Bake Sale is a set of
"Kitchen Canisters"
I made them using a set of
cracker jars available at Walmart.
I'll write a tutorial showing you
how I make the lids when I release the pattern:)
I am also doing a cookie jar!
Here is a sneaky peek at my
"Tulip Pot"
quilt.
Of course I will talk more about each quilt as I release each pattern:)
Don't you just want a a real pot of tulips on your kitchen windowsill?
And a peek at my
"Mixing it Up!"
quilt...
I will be teaching this one at the workshop in Idaho
that I told you about in my last post.
And of course...
I had to do a new apron pattern...
after all when having a Bake Sale
you must wear a cute apron!
This is actually an apron pattern that I published several years back...
but I have been designing so long that everything old becomes new again.
The ties are nice and long so they make a cute bow in the front...
and I like my aprons with nice deep pockets.
This pattern has four:)
It's called the
"Easy as Pie Apron"
because it's so simple to make!
It takes a combination of 1 1/2 yards of fabric to make.
There are a pile of 13 aprons so far and I'm just showing you a few today:)
All made from the Easy as Pie pattern...
just different combinations of
Bake Sale fabric.
Kassidy played model yesterday as I
snapped pics of them in the backyard.
Can you see the half circle tab sewn into the waistband?
It's for holding a dishtowel of course!
Very handy as well as cute so that you don't have to
wipe your hands on your cute apron:)
Yes!
I designed my own simple set of
Days of the Week
dishtowels.
I grew up on days of the week everything...
dishtowels...
handkerchiefs...
and undies...hehe:)
I love them !!!
All you need is a good ready made flour sack towel...
a fat eighth of fabric along with perle cotton for stitching:)
This cute little quilt is called
"Cherry Bake"
I made it for my kitchen table but it would be a cute little wallhanging too!
I will be teaching it along with
a few other things
at the first annual
in Las Vegas this September.
I know that you have already signed up for my classes
without even knowing what the projects are...
you are so sweet!!!
I can't wait to see all of you there:)
Kassidy Grace was a good helper yesterday
getting last minute pictures and
everything together to get sent off.
I took this picture right when I told her that
this would be the last quilt to hold up!
You can see the relief on her face...haha...
She doesn't complain much but I'm sure that
she gets tired of humoring her mom:)
By the way...
just try to ignore the dandelions
in my flower beds like I am trying to do.
As you can tell...
I've been a bit busy and
I havn't tended to my garden yet.
However...no worries because it's still
springtime here and now
that my Bake Sale projects are sewn...
I can get out and play in the dirt
as soon as my patterns are all written!!!
So this is the end of my sneak peek....
but there are still more projects that I have not shown to you:)
I will announce the second that each and every pattern
becomes available for purchase.
I hope to have 2 of them ready by weeks end:)
I finally got a good nights sleep last night for the first time in weeks!
Wish me luck on the pattern writing and
PLEASE...
let me know what you think of all of my new creations...
after all...
a girl needs some bloggy love to keep her
writing during the midnight hours:)
Have a quilty kind of day...
xx
Lori


