

Good Morning!
Today kicks off the first day of the

This is the January page of my 2016 Calendar....
all photos were taken
in my own cozy cottage:)
At the end of the calendar are
my instructions for the
Cozy Cottage blocks and projects.

to get a copy if you
want to make your own
cozy cottage projects...
as well as today's tutorial
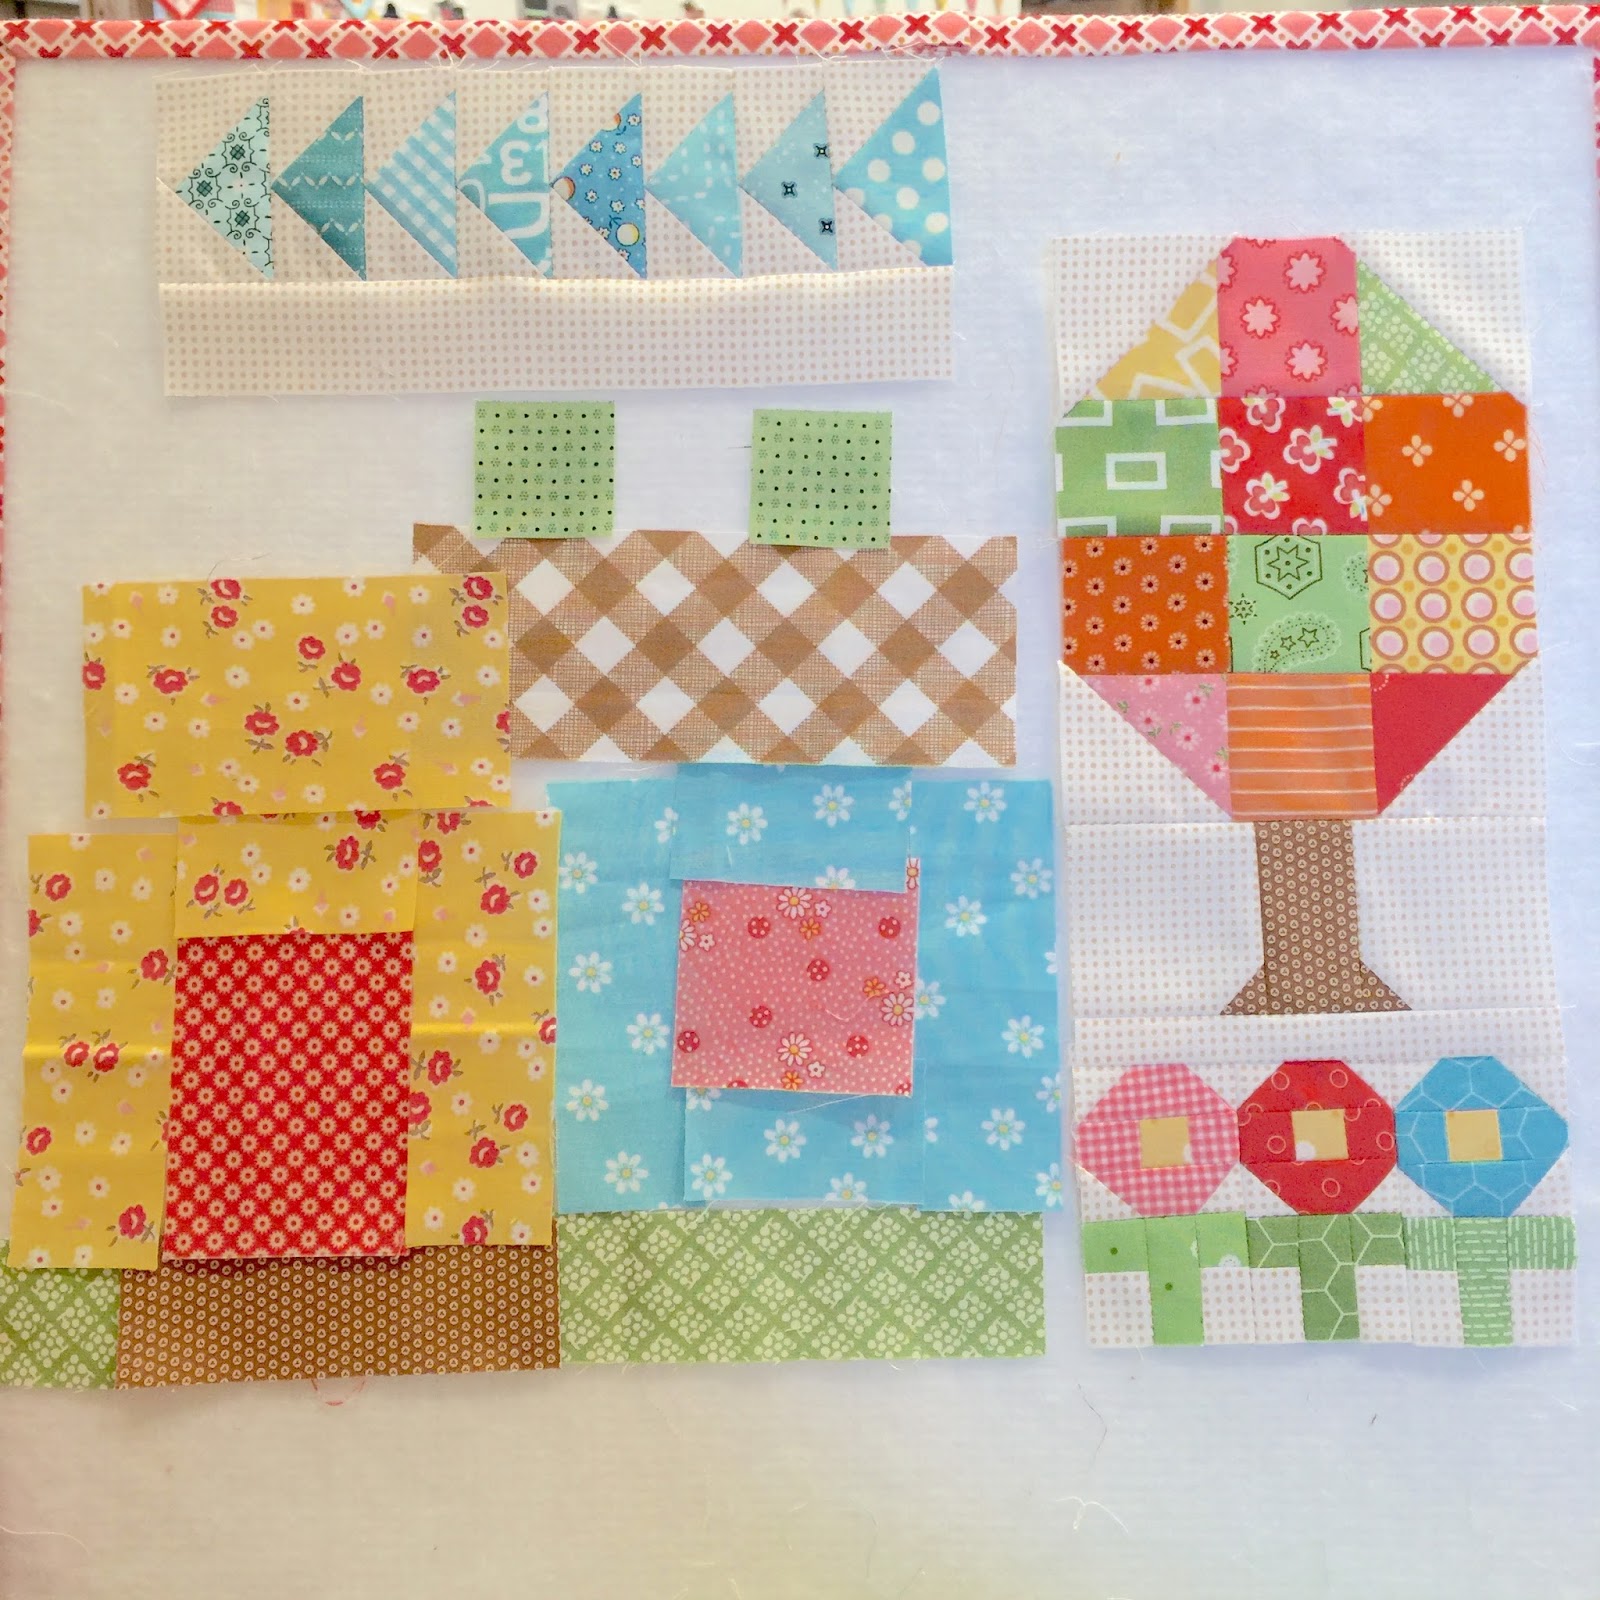
for my Cozy Seasons Mini:)

This is the first little
cozy cottage that I made.
I made it out of my
small scrappy stash
while I waited for
my Modern Minis fabric
collection to be available
for sewing
all of the projects for my calendar:)

I had so much fun
making the cover quilt!
***WARNING***
These little cottages
are addicting to make!

And I LOVE the 8" block as well:)
I designed this little
"Cozy Season Mini"
especially for this week's blog hop.
It finishes at 13" x 15"
A perfect little project to
add to your fall decorating this season!

I grabbed my scrappy stash basket
and quickly cut the pieces.
Here is the cutting for the
3 cute little fall flowers;
Cut 18 - 1" squares from background.
(yes! I said one inch lol)
Cut 3 flowers...for each ONE:
Cut 2 - 1" x 2"
and 2 - 1" squares for flower top
Cut 1 yellow 1" square for center
and cut 1 - 1" x 1 1/2" for stem and
Cut 2 - 1" squares for leaves.

Sew them together like this...
using an accurate 1/4" seam allowance.
These are small pieces so
be sure to press the
seams open for less bulk.

Add the Easy Corner Triangles
onto the 4 corners of
each flower like this.
Press these seams open as well.

Sew them together and press seams open.
Add a 1" x 5" background strip
to the top and
press towards the background.
Aren't these fall flowers
so cute and tiny???

Set them back onto your
and let's move onto the flying geese:)

Cut 8 - 1 1/2" x 2 1/2"
rectangles for the geese
and
Cut 16 - 1 1/2" squares
from background.

Sew an Easy Corner Triangle
onto one side of the rectangles.
Trim and press seams open...

And add another ECT
onto the other side.
Trim and press seams open as well.

Sew them together and press seams open.
Add a 1 1/2" x 8 1/2" background strip
to the bottom and press towards background.

Now for the tree!
Cut 12 - 2" squares
out of bright fall colors
Cut 1 - 1 1/2" x 2 1/2" and
2 - 1" squares brown for trunk
From background;
Cut 2 - 2 1/4" wide x 2 1/2" tall
for sides of trunk and
Cut 4 - 2" squares for ECT's.

Stitch your tree
together like this...
then add the ECT's.

You will of course need to
add them onto the background pieces
before you sew the
trunk sections together.

Again...
Press all seams open.
Now you have a
cute little fall tree
to add to your
Cozy Seasons Mini:)
Lay it back out on your
and sew one
8" Cozy Cottage block
from the instructions
inside the calendar.

Easy Peasy and Fun!

Sew the flying geese to
the top of the cottage
and the tree to the
top of the fall flowers:)
Press seams towards
the background strips.
Cut 1 - 1"x 11 1/2" background
and join the two sections together.
Now for outside borders...
Cut 4 - 1 1/2" x 13 1/2" from background...

And sew to the
top and the bottom first...
then the sides.
Time to quilt it!!!
Cut batting and backing fabric
2" larger than quilt.
Pin baste and quilt as desired.
I used two strips of
2 1/2" x Width of Fabric
to prepare my binding.
to see my tutorial on
how I bind my quilts.

Your mini is complete...
wasn't that fun?!
I hope you have enjoyed
my little tutorial:)
Today's guest bloggers are;
Click on each one
to see more Cozy Cottage fun.
Happy Sewing!
xx
Lori

16 comments:
Lori,
This is soooo cute! Are you going to do a cozy season mini for each season? That would be really neat! The name of our farm is Four Seasons Farm and that would fit right in to my "season" theme!!
Thank you...Thank you...
This was just what I needed a little filler project....Happy Sewing my friend..
You have made my Monday, Lori! Love this!! I had 4 - 8" cozy cottages sewn, and then didn't know what to do - make more, or use them in 4 corners of a quilt. I think a table runner is in order now with all these added treasures. Thank You!!
What a cute little quilt! Thank you for the tutorial....
VERY cute!
I am in love! This looks like a project that I would be able to complete in a short time. And I am in love with that idea! Your designs are so precious.
I am not a quilter but I adore your cozy cottage blocks and quilt. I also noticed your hard working tractor pin cushion and I am in love. Creative Bliss...
I already started mine before having to leave for work! Love it!
I purchased this fantastic calendar and love it. It livens up my studio and it let me start scheduling for next years quilts for quilting.
That is so sweet!! I love the colours of your tree! Thank you for the extra additions to the cottage, they definitely are addictive :)
My turn is this Wed, but I wanted to tell you how much fun I had with your calendar!! I've learned so much from you.. Your directions are super easy to follow. Thanks so much for the opportunity to be on your blog tour :) - Marni / HaberdasheryFun
Super cute! I will plan making this little quilt for sure!
Oh how fun. You continue to just provide us with the cutest projects to make!! Thank you. I find myself so often coming to your blog as a day brightener after work. You always have something wonderful for us--today was no exception!! Thank you!!
Loved seeing every cottages today! I love everything you do! I already have my calendar and can't wait to hang it up next year. I even bought one for a Christmas gift. :-D
usairdoll(at)gmail(dot)com
So adorable!!! I just ordered my calendar!! Can't wait to get started.
Cute pattern Lori! xox
Post a Comment