

If you have already constructed
your boards from
you are ready to give the edges a
cute finish with fabric!
Okay girls.....plug in your irons and
load up your glue guns!
Lets get started:)

As I said yesterday...
you will need a 2 1/2" x Width of Fabric strip to edge one mini design board.

Press your strip in half with
wrong sides together.


Use this center fold as your guide....

And fold one side into the center and press.

Repeat for the other side.

Stitch over the raw edges
right down the center of the strip using a wide zig-zag stitch.
Don't forget to backstitch at the beginning and the end to secure your stitches.


Now it's time to glue!...Start by placing a line of glue on the very edge...aka the foam in the middle of the board.
Press the center of your fabric strip onto the line of glue....(raw edges down).
Continue all the way around the board...


When you get to the end...
trim the end of your strip so that it overlaps the other end by about one inch.
Glue it down as neatly and smoothly as possible for a nice finish.
You may want to place a small amount of hot glue along the raw ends of your fabric strip to stop it from fraying.

This is how your board should look
at this point.


Now you will glue the edges down
onto the batting side.
Be patient and work around the edges a little at a time to keep control of the glue...
and also...try not to use too much glue...
if you do it will gush out past the folded edge of your strip:(
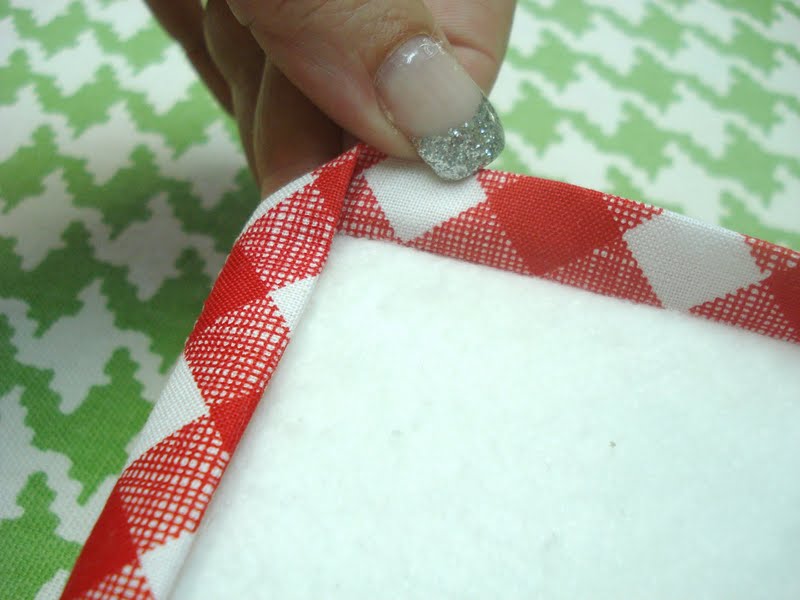
You will finish the corners just like you do when binding a quilt!...
(except you will glue instead of sew...lol)

Just fold them over and glue them down!

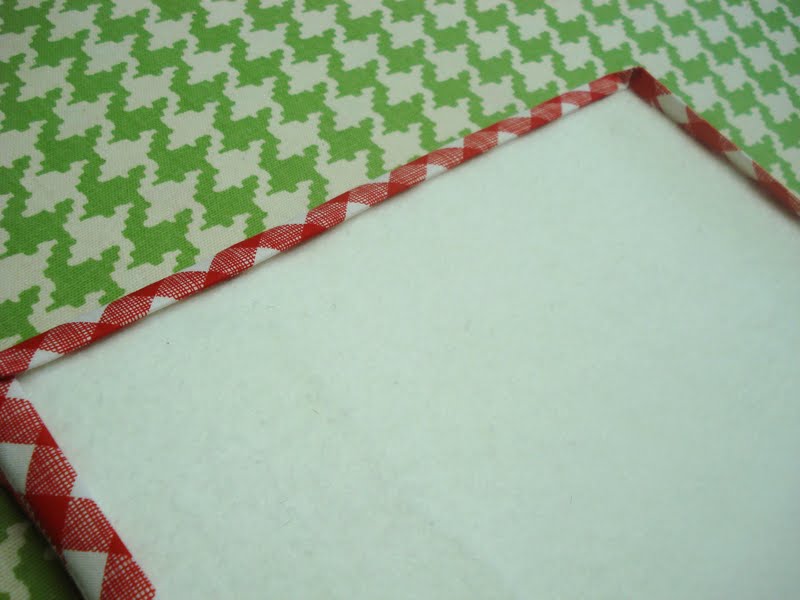
Okay...good job:)
One side finished and one to go!

Turn it over and repeat the process on the smooth side of the mini design board.


Yay!!!...you did it!
You made one cutie-patootie
mini design board:)

Can you stop with just one?....sure.
If you want to.
But I didn't...
and I'll tell you why in my next post!
xx
Lori

52 comments:
Too stinking cute! Love it/them, want to make them :) Thanks sooo much for sharing!
Thank you very much for this tutorial Lori, I will give a try, these mini design boards seeem very great !
I went to JoJos yesterday and found foam board on sale 2/$3. I am going to make these for the quilters @ Quilt Camp. Eight of us will be quilting together at the end of the month. Thanks for the tutorial!
oh... JoJos = JoAnn Fabrics
Such a great idea. I missed the first part and am going back to it! thats me - backwards! thanks!
That is sucha great idea! I love how you did the edges.
I love these, Lori. Thank you for sharing a tutorial.
You are just so smart! These are REALLY cute. Oh and I love your nails.. They even made me look at my own in disgust.. and think maybe I need to find some press on's to wear at my daughters wedding.. I can't otherwise handle long nails while stitching and cleaning.. my natural nails just don't last.. they are so flimsy.
Yipee Skipee!! My boards and fabric are ready to go! Plugging in the iron and glue gun this very minute :) CUTE!!!
Loving the fabric edges my friend. ADORABLE!
cute! Thanks for the tutorial!
JoAnn
Love this so much! I might actually give it a try!
Thanks 'sew' much for this easy-to-follow tutorial (and great pics)...can't wait to make some!!!
~Terry~
Thank you for sharing the mini boards....I am going to make them for our next sewing day at Quilt Guild....I know that everyone is going to want one. ♥
Yeah!!! Can't wait to make some...this would make a great gift for your quilting friend..and your nails are also a great hit....How do you work with nails? I can't pick up anything when I have nails...You always have such cute nails....
Hi Lori, Waaaaay cute stuff you ALWAYS do. You have done it again? I am making mine this weekend, its always fun to have something cute to work on. Thanks for providing the world with a little fun. And I always love your nails too. I think the best ones you have done are the polka dots :}
These are SO WONDERFUL! Thank you so much for showing us how. Everyone is going to be out of the house tomorrow! I can't wait! I got to make me some!!!!!
Sweet design board... great tutorial! I am going to have to give them a try for sure. Thanks dear friend!
These are absolutely adorable!! You are so creative and clever Lori!!
Have a wonderful weekend.
Sincerely, Trish
I'm so excited...I have a quilt retreat next month and we are suppose to bring a giftie for each gal....this is what I'm making!!! Such a great idea..thanks for the wonderful tutorial.
You are such a smartie. I love the edges. What a great way to do it. And the zig zag is cute! It really adds a touch to the boards. I've had Allison this week/weekend and I've taken a break from everything. Back to life tomorrow. I hope you are well. I'm online now posting my cherry cheesecake flimsy for tomorrow. Yayy.
Yay! I cannot wait to have mine done!!!!!! Love this!! I am going to get going on them this week! Thanks so much for the fun idea and great tutorial! Thinking about doing a larger set also for my larger blocks... but love these for Farmers Wife and smaller blocks... haven't jumped in ... yet... but soooo close to getting the book and getting going... THANK YOU!!! xoxo Bari
Love the design board idea. Thank you for sharing. I will be making them in different sizes. Fun!
Peggy H.
www.neverenoughstash.blogspot.com
I really love these boards. What a great idea. Its obvious you're a great teacher ;). And I especially appreciate your attention to detail with the finished edges. That little extra effort at the end always pays off, doesn't it!
Thank you for sharing.
I'm so making this!!!! I love the whole idea but the zig zag stitching on binding is just so cute!!
Lori,
We are starting the FWQAL today during lunch at moda. I am addicted to your design boards so everyone is making one of these today. They just think they are making a quilt block! Ha ! My machine does not zig zag so i am going to have to bum from someone else. I made one last night and it isn't as cute with 2 rows of straight stitch.
Thanks for another addiction.!
Thanks so much for sharing your tutorial....I will try to make one for myself!
Absolutely love this. Saw it yesterday and made 6 of them. I've been struggling on making the blocks and then keeping them in place. Your idea is an ABSOLUTE TREASURE :-)
Thank you!
Darlene
Thank you for the tutorial! I covered the batting with felt and bound the edges. Perfect for jewelry-making; just the right size, plus they're easy to store. T felt makes the beads stay put, pieces can be pinned down, but in case a bead rolls, the bound edge stops it.
So clever!..and so cute!
Regards,
Elizabeth
(Bountiful)
these are way tooooo cute. What a great gift idea, once I have made a stack for myself. Thanks so much for the great tutorial.
I know I keep on leaving your comments but you so deserve them. I love your tutorials, especially this one, but not quite as much as I love your So Cherry fabric and stupid dumb me didn't buy enough of it.
Loved this and I am going to try! Thank you so much for posting!
So cute! I made mine with an old cork board instead of foam core board so I can us it for a mini-pressing board, too :)
I made two last night (see my most recent post!)
Thanks for posting this!! These are great for me!
I made 2of these yesterday and I love them!! I did 12.5" so I had to piece the binding and they came out great. Thanks for the tutorial!
What a great idea. I need to go buy some foam board!
Love these. Off to buy foam board...!
Thank you so much for sharing this tutorial. These things are the best thing since sliced bread. I made six 10" ones and one 20" one and have been using them to catch up on the quilty barn along.
Thank you so much, I am new to quilting and made 1 20" and 2 10". I have found them to be very helpful. I am also working on the quilty barn using chickens in the 6" block area.
I made 6 of the 10" minis today! I plan on keeping half and giving the others as gifts. I'm looking forward to using them often :) thanks for the detailed and informative tutorial!
These are adorable - I'm always looking for some little giftie for my quilting group that is easy, quick & inexpensive. These fit the bill! Thanks for sharing!
Great idea and super cute!! I'm probably going to need a couple of these for the BOM's I signed up for this month! =)
Love these. Fun to make and great for blocks. Thanks for the lesson.
Just made 2 that are 10x10 and one 8x8. Only one burned finger that hurts like mad! Thanks for the idea and the tutorials.
Love your tutorial Lori. I made one 8 inch board tonight. I have one more 8 inch to make , four 10 inch and two 12 inch boards cut and ready to glue. Great fun. I love the rest of your blocks also. Hope to make a few of those as well. Thanks again
Thanks for this wonderful tutorial, Lori! I made a sandpaper board using your technique. It'll be so useful when I need to mark lines on fabric! Then I made one design board, and I love it! I see myself making a whole stack of them. Such a fun, practical project!
Brilliant! Thanks for the lesson - I made 3 from one board I had on hand, and they're adorable. Hubby loves making his own tools so was really excited that I could too. Didn't burn or cut off any fingers - bonus!
Wonderful idea and Exallent lesson!!! I only made one for now. I will be making more!!
Thank you Lori sew very much!! ��
#mariposaquilts
I think this is a great idea for peg board too. I am carpentry challenged and have always been stopped my by inability to cut a mitered corner for the frame. Here's my answer! Thank you for your creative idea and the time you took to post.
I have made a few small ones made one large one to put in front of each of my sewing machines. They are wonderful I love them.
Stephanie
These design boards are so fun. Plan on making some this weekend. Just bought your Farm Girl Vintage book and cannot wait to start. Chris from Texas
Thank you so much! I love how awesome these look and I am for sure making a few for myself.
Ty Lori for the tutorial, I found the 20 x 30 foam boards at Dollar Tree yesterday. Am getting started today! Always wanted some but couldn't afford to buy,but I can afford to make them. Thankyou for selflessly sharing your talents.
Post a Comment