Monday, January 2, 2017

Sweetie Pie Sew Along - Bee Prepared Post - Cutting Instructions!!


Hello cute people!

 Let's get ready to play 
with my latest fabric collection 


In just two weeks the
 sew along to make my
 Sweetie Pie Quilt
will begin right here on my blog:)

I've already posted  
about all of the supplies needed...
to go back to that post 
if you are just joining us:)


Today is all about cutting the fabric
 from your kit so that you can
 "Bee Prepared"
You will need to download my free 
Sweetie Pie Quilt pattern first. ...
 because it has all of the cutting information!
In this post I will explain what 
each piece of fabric 
in your kit will be used for.

to download my pattern from the 
Riley Blake Designs website:)


We will be using all three 
pin dot background prints in the quilt.

The pink will be used 
for the appliquéd daisy backgrounds.

The cutting is on page 2...top left:)


The aqua will be used for the 
fruit appliqués in the
 center of each pie!

Cutting is on page 1...bottom right.


The rest of the quilt background 
will be the green pin dot.

All of the cutting is on page 1 as well.


The red daisy print will be used for
 the postage stamp inner pieced border.

Looky how perfect this 
Cute Cuts Ruler 
works for that:)

It's one in my new collections
 of rulers that
 will be available 
in just a few short weeks!


The aqua cherries will be the border...
it's one of my favorites!


Okay! 
After you have all of that cut...
what you have left
 are the pie slices 
and the appliqués.
(oh yes...and the interfacing:)


It's time to open your 
fat quarter bundle...
YaY! 
The six gingham prints will be 
used for the 
appliquéd daisies only...
not for pie slices.


There are 20 daisies total...


I snapped a photo of my
 daisy petal cutting checklist for you:)


Set aside these 6 prints from your fat quarter bundle.
We will not use these 
to cut pie slices 
for obvious reasons...
(meaning the light ones
 would not show up...
 and the red would take away
 from the fruit appliqués)

We will be using these for
 other fun things 
during the sew along:)


Next...
cut the three fat quarter panels
 in your kit 
apart on the dotted lines...


We will use all 12 of these prints
 to cut slices for the pies:)

Variety is the spice of life!


Here are all of the prints
 together that we will
 be using to cut slices 
for the 12 pies in the quilt.

There are 30 total...
the 12 fat quarters from the panels 
plus the fat quarter bundle...
 minus the ginghams and
 the 6 prints that I showed you.


Okay!

I used 1" Stick-its and put them
 on the back of my 
Of course you don't need to ...
but I like to use them 
on the back of my 
specialty rulers 
when cutting multiple pieces.


if you want to purchase
 a package or two:)

These are also 
what I use for my 


I grabbed one of the fat quarters
 to show you how I cut the slices.


First I cut a
 7" x Width of fat quarter strip ...
which is about 21" wide.

*Take note that my strip is folded in half 
in this photo and that you can see
 the selvedges are on the right.

Ignore the bottom 1" of the ruler
 for this particular quilt...
you won't need it!
Lay the top edge of the ruler even
with the top edge of the fabric 
as far to the right as you can
 without cutting into the selvedge...


and make your first cut like this.
(if you are left-handed work from the opposite side)


Turn the fabric strip and 
continue cutting like this...
flipping the ruler each time
 to save fabric.

So far you have 6 slices cut 
because you are 
cutting 2 at a time.

You can see that 2 more
 cannot be cut from the end...


So press the end piece open
 and cut one more slice...


For a total of seven! 


*Quilty Math: 
You will need to cut 
192 slices total.
If you cut 7 from 
each of the 30 prints 
you will have 
210 slices. 

You will have 18 leftover ...
and you can make an 
extra block for a pillow.

YaY!


Next are the 
8 solids in your kit.
These are all from the
 Riley Blake 
Confetti Cottons

From the top down:
Beehive
Nutmeg
Waterfall
Bear Lake
Granny Smith Apple
Holly
Peony
Riley Red

These are used for the 
fruit appliqués
 as well as the daisy centers.


Use this page in the pattern 
to identify your appliqué pieces...


and the handy dandy 
cutting guide page 
included in the pattern  
for the sizes to cut:)


Don't forget to cut the 
daisy centers from the 
Riley Red, Peony, Beehive, Waterfall, 
Granny Smith Apple and Nutmeg.

Use my daisy petal cutting chart  
from above to determine
 how many of what color:)


Last but not least is the

It's my favorite with just 
the right amount of 
strength and thickness:)


Each package contains 
3 yards of 20" wide interfacing. 
You will need 2 packages because
 4 1/2 yards are needed 
for the Sweetie Pie Quilt. 


Of course I used a checklist
for cutting all of my 
interfacing pieces
 and took a photo for you.
I hope you find it useful!!

*TIP* from Miss Bee-
Always cut your pieces from 
largest to small 
for very little waste.


*After all of my pieces were cut...
I wrote the number on the top 
of each stack of the 
that they go with. 
I'll use the labeled piece last
 so that I will always know 
which piece it is:)

YaY!


Doesn't it feel good to 
"Bee Prepared?"

Next Monday I'll be showing you
 just a few things that 
I'm doing with the 
leftover fabrics...
just in case you 
want to do the same!

See you then!
xx
Lori


Monday, November 28, 2016

Cozy Christmas Sew Along - Sew Simple Shape Dresden Star Tutorial!!


I LOVE sewing Christmas decorations...
and I LOVE dresdens...
and Six Pointed Stars!
So...
I've been making these little 
Dresden Stars...
do you want to make some too?


YaY!

Grab your Cozy Christmas fabric...


And your B-14 


My 2 1/2" x 4 1/2"
rectangles leftover from making the 
Cozy Christmas quilt for this sew along 
work perfectly for one star point.
Place the triangle upside down
 and even with the top edge...
 trace down both sides...


Like this.


Cut on your traced line.


Six of these make one cute little dresden.


To sew the point on top
 of each dresden blade...
fold like this with right sides together.


And sew 1/4"...
I like to chain piece mine:)


Open the seam like this 
and give the seam only a little press 
with just the tip of your iron....


Then flip it right side out and use your 
Clover Turning Tool 
and gently push out for a nice point.


Lay out on your design board...
 and stitch them together
 using a 1/4" seam allowance.


Cute!!!


It's super important to
 press your seams open 
so that they will lie nice and flat.


You could make fabric circle centers 
for a more traditional dresden 
if you want and that would be super cute!


But I thought it would be fun to
 use the largest size in my 
 jar for the centers of these:)


 I made a few more 
because they're so fun!!


After cutting...
 I separated them 
into sets of 6.


And sewed them together!
(This is BEFORE pressing the seams open)


They look like cute little 
Christmas Cookie Stars!


They would make super cute coasters...
all you would need to do is back them with felt or wool...
or appliqué each one on
 a square or a circle:)


I just love these cozy stars...
they're so fun to play with:) 
You could even hang them on your tree! 


I decided to use 5 of them to make a pillow.
I grabbed 16 - 3" squares 
that were leftover from the sew along 
and laid out the pillow like this.

(I sewed one four patch 
using four squares:)

I chose 5 different buttons 
but didn't sew them on yet 
until after appliqué and trimming.


I decided to appliqué mine onto 6" squares...
then I trimmed them down to 5 1/2" using one of my new 
Bee in my Bonnet Trim-It Rulers!
(available in January)


     It's super easy to make sure that
 your star is centered before trimming 
by using the centering lines on the ruler:)


After trimming...
 I sewed each button on
 using the matching


I laid it out on the design board and sewed the blocks together.


I had a 20" pillow form on hand
 so I added borders and I love how it turned out!

I hope you enjoyed this "cozy" tutorial 
and are inspired to make some 
of your very own
Cute Little Stars:)
xx
Lori

Monday, November 21, 2016

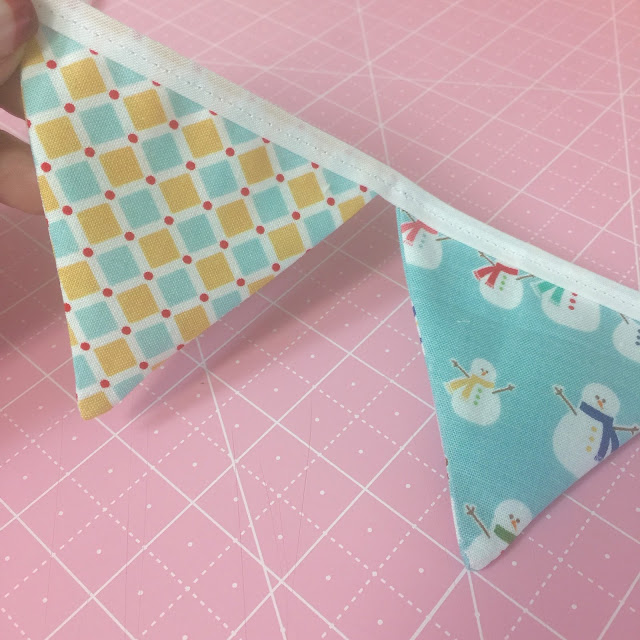
Cozy Christmas Sew Along - Cozy Bunting Tutorial!!


Good morning and welcome to
 another tutorial during my 
Cozy Christmas Sew Along!

Today I'm showing you how I made my 
#CozyBunting


Once again...
I used the B-14 from my 
for this weeks tutorial.

It's the perfect size for a cute bunting!
You will need two - 4" squares
 of the same print for each bunting piece.

I cut 38 sets... 
for a total of 
38 bunting triangles.


Or you can use two sets of 
Cozy Christmas 5" Stackers:)

I used these plus some of the prints 
in the Cozy Christmas fat eight panels.


I used one 4 yard package of
 1/4" double fold bias tape.


I placed 2 matching prints
 with right sides together like this.

I traced all the way around the
 B-14 Sew Simple Shape 
on one of the squares only 
and then pinned together.

When using the 5" squares ...
I traced in the bottom corner so that 
after sewing and trimming I could 
use the leftover fabric 
for something else:)

Waste not want not!


I sewed on the two traced lines
 down both sides only...
and backstitched where I 
stopped and started on both ends.

I traced the top line even though
 I did not sew on it because 
I cut right on that line after trimming 
so that each bunting piece
 will be exactly the same size...


Just like this.
Again...
I cut right on the top traced line
 but trimmed about
 1/4" past the sewn lines.

I also cut the tip off just a bit:)


I turned each piece right side out 
and used the Clover turning tool
 to gently push out the point.


I pressed it flat...


And trimmed the little triangles
 off on each corner....


Like this.


Now it's ready to sew into the bias tape.


Unfold the bias tape with the short fold on top and place a bunting piece inside.
I left about an 8" tail on each end for tying.
Start sewing on the end of the bias tape...
backstitch when starting and stopping and when you get to each bunting piece...


Sew across the bias tape and the top of each piece at the same time like this.
I sew one piece at a time and then place the next one in and continue sewing. 
I do not find it necessary to pin but you could pin if you wanted:)


Here is what the other side looks like.


I sewed 38 bunting pieces because
 that's how many fit on one 4 yard package of bias tape
 with an approximate 8" tail on each end:)


I love how it turned out and after finishing one 4 yard length ...
I immediately cut more 4" squares to make more!
It's super easy and addicting...


Bunting can be hung anywhere and it
 always makes a fun and festive addition to any decor.


I love it!


It even looks cute on my aqua piano:)

I hope you have fun making your own Cozy Christmas Bunting!
 Add it to your holiday decor and make your home cozy:)


Next time I'll show you something else
 that I made using B-14 Sew Simple Shape 
so stay tuned!
xx
Lori


Related Posts with Thumbnails