Friday, November 1, 2013

Announcing the Quilty Fun Sew Along and Blog Tour !!! …and a Giveaway...YaY!!!...


Good morning cute people!!
I'm so excited to announce a new sew along...
YaY!
I hope we will be sewing together again!
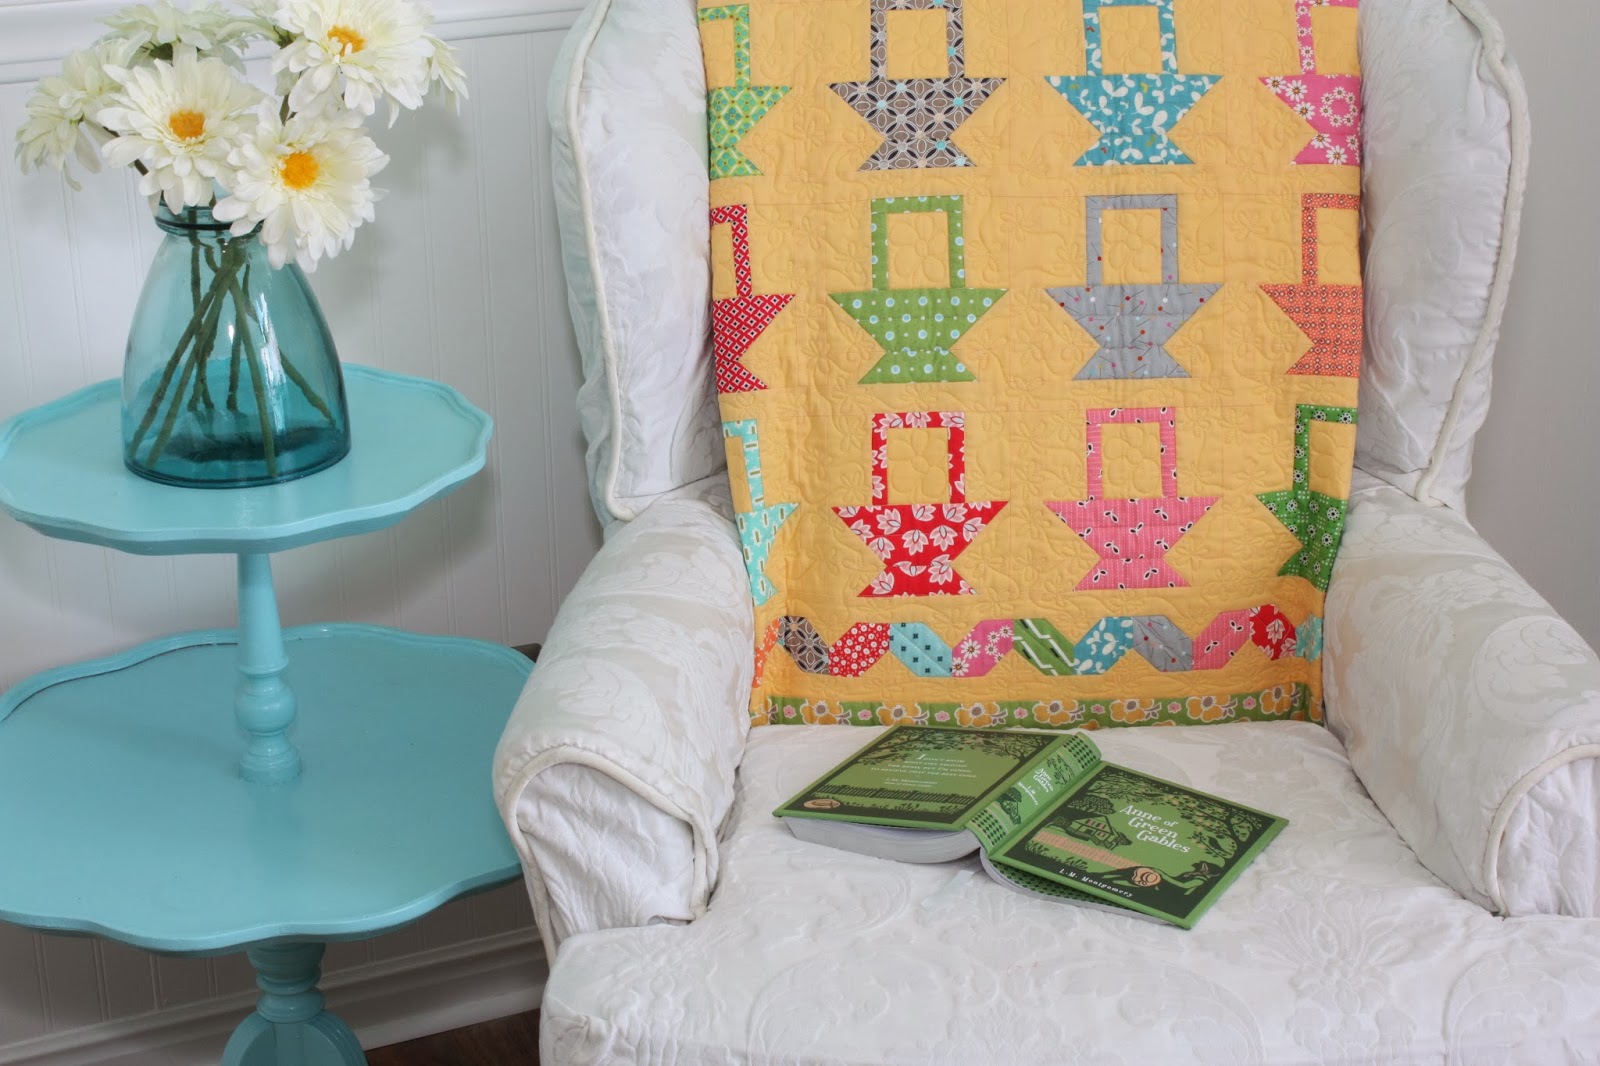
I designed this
 Quilty Fun Sampler
 using all of the blocks
 in my new book Quilty Fun:)


The Sew Along will be a part of the 
celebrating the release of the book.


It will start this Monday (Nov.4th)
She will be doing the 
apple blocks for the sampler quilt.

Every Monday you will
follow along with each blogger
as they show off their blocks
and put their quilts together! 


Every week there will be
 contests
prizes
 and giveaways…
YaY again! 


You will need your copy of
 because it will be 
your instruction manual…
so be sure to keep it handy:)


Next…
you will need to get 
up close and personal 
with your scrappy stash...


and get it organized in 
preparation to make the blocks.
Click here and here 
if you'd like to see how I organize my scraps.


You will use all different sizes of 
scrappy fabrics from
 strips and squares to make the blocks…
such as 1 1/2"...2 1/2"...3 1/2"...

*FYI - You will need 3 yards of
 background fabric for the quilt.
(I used "snow white" from the Riley Blake Blenders collection)
and 1/2 yard for Red inner border
as well as 1 1/4 yard
 for the outside border.
So besides the background ...
you will only need to purchase
 1 3/4 yards of fabric 
if you are making the blocks
 from your stash.
YaY!!!


If you made some of 
these blocks before when
 you did the row along...
 you can play with them again:)
And if you didn't join then...
now is your chance!


There are however
a few new blocks in the book.


And I included them in the
 Quilty Fun Sampler:)


Sew…
are you ready for some more
happy scrappy patchwork?


In the Sampler Quilt
 I made the red pieced inner border...


To echo my green outside border
 on the row along quilt...


It's just shorter and not as wide:)


There is a fun mix of a little bit of everything from the book…
which is why it's called the 
Quilty Fun Sampler!


This is the back of the quilt.
Do you like it?
I love pieced backs too:)


I used 24 fat quarters...


and of course I designed a new block for the label…
a cute little
"Bee in my Bonnet" block:)


I'll be showing you how to make it when 
it comes my turn for the blog tour
 at the very end of the Sew Along.
(as well as the borders and pieced back)


Sew…
what do you think?
Are you in?
Do you want to have some more 
 Quilty Fun with me?

I sure hope so!


to go over to the Jolly Jabber 
and to join up today!

Don't forget to leave me
 some bloggy love and 
let me know if you are excited about the 
and
 if you have joined in!

(*HINT - there just might be a little something like
 a giveaway from me for those who do!)

Have a quilty kind of day…
and sew it like you mean it!
xx
Lori

P.S. There will also be a PDF to download 
each week as a companion to 
the book with sashing measurements 
for that weeks block.
 The PDF's will help to keep you
 organized during the 
Quilty Fun Sew Along!
 Also... the embroidery on the 
bumblebee block and the label will 
be provided in a PDF as well:)


Wednesday, October 30, 2013

Herringbone Table Runner Tutorial!!! ...


I just can't seem to quit making things with
There are just so many things buzzing around in my head to make...
 in addition to the quilts that I have already made:)


One of the projects that I've been planning
 is a table runner for the desk top in 

I thought you might like
 to see how I made it:)


My friend Nedra works for 
 and she recently sent me some of their product to play with.
Thanks Nedra!!!


I chose to use the
 6" braid paper for this project.
It also doubles as flying geese paper if you follow the black lines...
but if you follow the red lines you will get braids...
aka herringbone design:)


I chose to use this size because it works out perfectly
 for the 5" precut squares of Gracie Girl:)

I also used a few 3 1/2" precut squares...
I cut them in half to use as a starting triangle for each braid section.


On the paper it will tell you what size 
to cut your strips for the braids...

notice on this one that it 
says to cut the 1 1/4" x 5".

It also says light and dark but
 I just used all of the
 Gracie Girl prints on mine.

(by the way...those are the large Clover green clips that I use to keep my rolls together after opening them)


You can get exactly 4 - 1 1/4" x 5" strips
 from one 5" square with absolutely no waste.
YaY!

I stacked my squares 4 deep 
and cut 16 at a time.
I used about 40 strips per paper section.
(That means I used about 70 - 5" squares for the whole runner)


I cut 7 lengths of the paper about 20" long.
I rolled it up and clipped the sides with two red Clover clips
 to make it easier to handle when sewing.

I pinned a fabric triangle onto the paper...
lining it up with the red lines and about 1/2" hanging off the edge like this.


***Before you begin sewing you will need to shorten
 your stitch length so that you also
 perforate the paper while sewing.
This way...the paper will tear away
 easily when it comes time to remove it:)

I lined up my first strip even withe triangle edges and stitched down...
using a 1/4" seam...
starting from the top and stitching past the edge of the paper a bit.
I did not back stitch.


I finger pressed it back like this...


and added the new strip on the left side ...
lining all edges up again...
stitched and finger pressed back.
If you use a 1/4" seam allowance and your strips
 are cut correctly they should line up
 on the red lines every time.


But sometimes you will notice that they are just a bit short of the red line... 


like this.
But don't worry!
All you will do is place the next strip
 on the red line and it will correct itself.
YaY!
That's what makes this paper so great
 when working with small pieces.
You always have that line as a guide:)


Just keep adding on the strips until it covers the paper.


This is what mine looked like on the back.


One side hangs over more than the other...
no worries!
You have to trim off the edges of the fabric anyway:)


I trimmed off the fabric edges even with the paper on the sides...
and trimmed the ends so that each piece measured 18 1/2" long.


Then I removed the paper by tearing at the perforated lines:)


I cut 8 pieces of Jade (Riley Blake Solid)
1 3/4" x 18 1/2" for in-between herringbone sections...
and 
2 pieces for the top and bottom of the runner...
 1 3/4" x 47"
(i cut 3 - 1 3/4" x WOF and joined on the diagonal to use for the long strips)


Here I am getting ready to pin baste it for machine stitching.
I layered it with batting and backing fabric
 that measures a little larger than the runner top.
(I like to use 100% cotton batting for table runners
 and toppers so that they lay nice and flat)


***When I sewed the runner top together...
I alternated the direction of each herringbone.
I pressed all of my seams towards the green fabric.
Be careful when sewing the herringbone sections...
they will stretch if you let them because when
 you trim them they are on the bias.

No worries though...
remember that 
you are the boss!


All machine quilted and bound:)


I used a walking foot while quilting and used the edge as my guide for the width.


I did not quilt on the herringbone as I did not feel that it needed it...
that is totally up to you!


(however i did stitch in the ditch all the way around each herringbone section...not each strip...but around each of the 7 whole rectangle sections)


I used white thread for around the section and green thread on the solid fabric.


I loved the" triangle on a roll"papers 
because I could cut them any length that 
I needed for an exact fit for Kassidy's desk top.

It looks great in her room and will protect the painted surface ...
it seems to be a catch all place for everything!

I hope you enjoyed my tutorial on how to make a table runner 
with cute and tiny patchwork herringbone sections!

Have a quilty kind of day...
xx
Lori

P.S. I also made a herring bone quilt using
 3 1/2" Gracie Girl strips and no paper.
As soon as I get it back from the quilters next week...
 I will do a tutorial on that too!


Monday, October 28, 2013

All About the Quilty Fun Event... Trunk Show...Book Signing...Luncheon...Giveaways... and an Invite to Come Sew with Me!!!...


Hello cute people!!!
Today I want to announce that on Saturday November 9th...
 there will be an event to celebrate all things
 Quilty Fun!


Hosting this event is 
in Logan, Utah.
This is a beautiful quilt shop 
owned by my friend Kris and her husband Mike.

If you have been to an event there...
you know that they know how to put on a party!


The day will start out as a trunk show where
 I will show all of the projects in the book one by one...
and you will get a chance to see them 
up close and personal.

There will be giveaways also...
YaY!!!!


I will of course have my Bee in my Bonnet row along quilt there 
and I will be talking about how this quilt came to be 
and all about the row along on the blog and finally the book!


I will be doing a book signing while there...
so bring your book or pick one up there:)


Following the signing will be a lovely luncheon 
and then you are invited to stay and sew with me!


I will walk you through each step of making my spool blocks...


and the quarter square triangle blocks...


For the sewing machine mat/cover 
which is one of the projects in Quilty Fun.


You can use it as a mat...


and also tie it on as a cover:)


It fit's a featherweight and also my Bernina ...
so I'm sure that it fits most machines out there.
It's plenty wide but...
You could add a row on the end if you need it taller.


The spools on the front...


are actually cute little pockets ...


to keep your sewing machine notions close at hand:)


You simply tie it on the machine at the sides for a cover.


You can bet that this handy little mat/cover will be
 traveling with me to every quilt retreat from now on...


to use while I'm stitching away:)


As you know...
all of the photography for the book took place in my home...
here are a few shots that you may not have seen before.
I will have each and every project at the trunk show.


So come and join me while I talk about each one of the quilts...
and also the mittens runner...
the cups pillow...
 and the fall leaves quilty...


and of course the sewing machine cover:)


And if you are so inclined...
bring along some bits and bobs from your stash 
to sew along with me!


I promise it will be fun!


For all of the information 
about this event and
 also to sign up...


I hope to see you there:)

Have a quilty kind of day...
and sew it like you mean it!
xx
Lori


Related Posts with Thumbnails