Showing posts sorted by relevance for query board. Sort by date Show all posts

Thursday, July 7, 2011

Mini Design Board Tutorial...


I'm excited to show you how 
I make my design boards 
that I told you about in my
I made 6 of them that
 measure 10" x 10" to use 
when making my 6" blocks...
of course you can make 
as many as you want and 
in any size according 
to the projects that
 you are currently working on.

 I have several sizes that 
I use all the time...
including ones that are as large 
as the foam board that I use 
to make them with.


You can get foam core board at any office supply store and usually most department, grocery and drug stores sell them too. They are with the poster board.

I got these at Walmart....Elmers brand...2 in a package that each measure 20" x 30".
They are about 1/4" thick which is great for the mini boards.

I can get six 10" x 10" mini boards out of one foam board....10 x 10 is the perfect size for the 6" blocks used in the Farmers Wife quilt.


I use my rotary cutter and ruler to cut them to size....but this is the important part so listen up!...
I use my OLD DULL BLADE that I have saved
just for this reason.
I would suggest that you never use a new rotary blade because it will certainly be an old one by the time you finish!...LOL
I simply measure and cut just like I do with a piece of fabric...but then I turn it over and make a cut on the other side in the same place as well.

After cutting from both sides...it easily snaps apart:)

Continue cutting your board into the sizes desired.

I use my paper scissors to trim off any foam that sticks out from the edge.

This is also a good way to use up small pieces of leftover batting.
I use thin batting made of 100% cotton or a blend of 80% cotton/20% poly.
Either would work for this project.
Lay your foam board down on your batting to use as a guide and cut your batting about 1" bigger than your board all the way around.

Using a hot glue gun, begin on one side and place a line of glue on the board ...
and glue the batting down.
The extra batting should hang over the edge.

Place your glue close to the edge but not right on it so that when you
press the batting down...
 the hot glue doesn't run down the sides:)
Glue all the way to the corners of one side...and then glue the batting down on the opposite side, pulling the batting as you go to make sure it fits smoothly.

It will look like this with 2 sides glued down. Now continue and glue the batting to the remaining edges of the foam board.

I only glue batting on one side of the foam board. The other side remains as is:)


After all four edges are glued down and the glue is completely cool...I use my Gingars and trim the batting even with the edges.
Easy-peasy don't ya think?!...I think a design board is a very useful tool besides being inexpensive and sew simple to make:)....I love them!
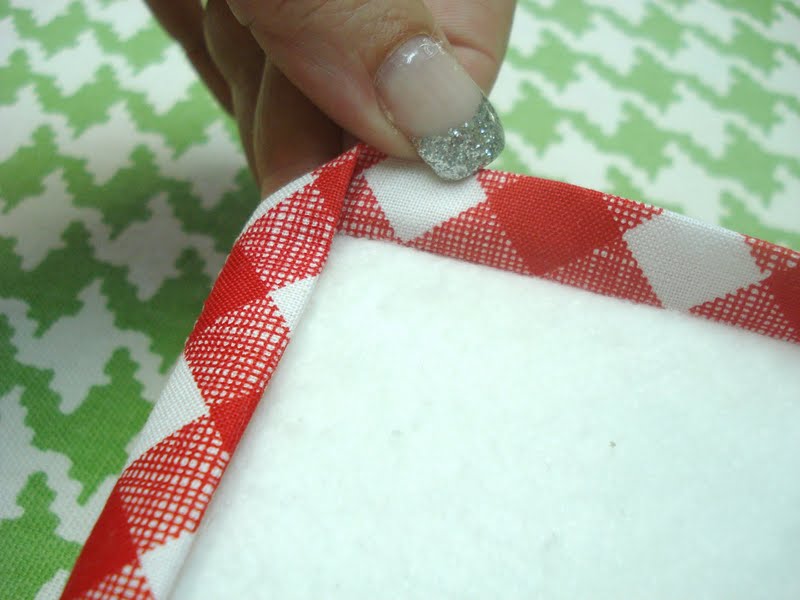
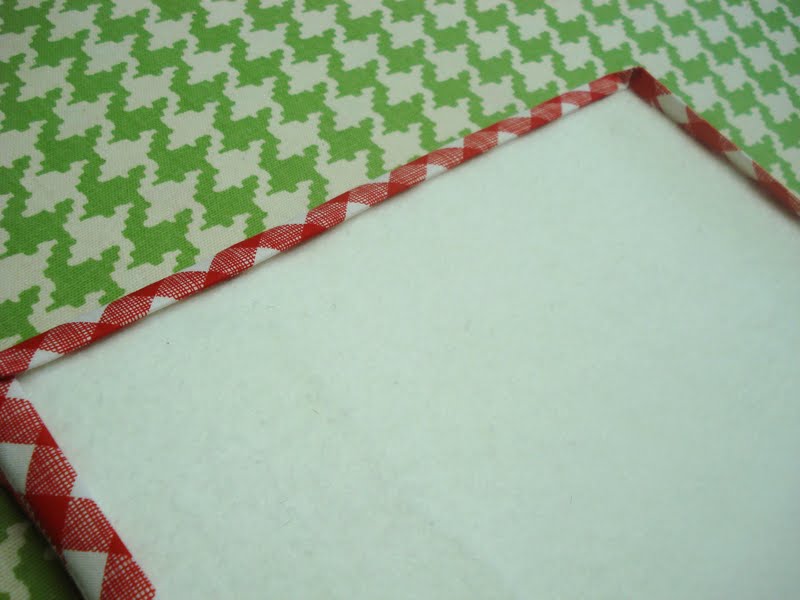
You can use the design boards just like this or you can make them fun and cute by covering the edges with fabric.
My motto is...if it's worth making...it's worth making it cute!!
Tomorrow I will show you how to cover the edges....so get your boards finished today so that you will be ready to roll!
Just so you know...you will need a
2 1/2" x  Width of Fabric strip for each
 10 x 10 mini design board.
You can see how I finish my design board edges with the fabric strip by clicking
So I'll type at ya tomorrow....in the meantime...have fun making your boards and be careful not to burn your fingers!
xx
Lori


Tuesday, July 5, 2011

Easy 6" Churn Dash quilt block Tutorial!!!...


Don't you just love the churn dash block?
It's been around forever and I've seen many made by my great grandma, my grandma and great aunts make them using templates.


But as you know…
I like to rotary cut!


I thought you might be interested to see how I make my churn dash block!
I cut the center square 2 1/2".
(Also cut 4 corner squares and 4 background squares for the half square triangles in the corners at 2 1/2")
The rectangles are cut 1 1/2" x 2 1/2".


After I cut all of the pieces...I lay them out on my mini design board to "audition" them and make sure that I'm happy with each fabric and the placement.

When piecing half square triangles....
I use the same piecing method that I have taught for years and the same method that I use in my pattern instructions...
which is the easy corner triangle method.

I'm sure most of you have heard of this method...
it's been around for years too.
(just like me...ha!)

Basically that means whenever possible...
I cut squares instead of triangles and stitch them from corner to corner and then trim the seam allowance off...
and press the triangles open to
 reveal a half square triangle!


As you know when cutting triangles it's a little more difficult to stitch them accuratly because they are prone to stretching because of the bias cut...
but this way they are stitched across the bias first and then trimmed...
therefore...
no stretching and complete accuracy!

Of course I still cut triangles when I can't use my easy corner triangle method.


I clothesline stitched all of the squares together from corner to corner.
I use the Angler 2 to help keep
my stitching accurate.

 My Bernina is built into the countertop in my studio so it's easy to keep the Angler 2 on it all of the time.


I keep my cut pieces on my design board right next to my machine when I'm piecing...that way...I know exactly how the pieces go together and which piece to sew to what side and all that!
  I came up with the idea to make mini portable design boards in 1999 when I started teaching a series of
8 week beginning pieces classes.
I found that most of the time that my students made a piecing mistake was when the pieces were getting accidentally turned around in between cutting, pressing, sewing, and back over to pressing again.
I thought if they could just put thier cut blocks on a design board...and keep them on there between each step...it would be so much easier and there would be alot less
"un-sewing" going on.
So that's what I did and they worked out very well and I have been making them and using them in my teaching ever since!
By the way...in most of my patterns I have given directions on how to make them.


I clothesline sew everything that I can and then place the pieces back onto my design board.


And pick up the board to take over to my iron all at the same time.
I clip them apart...


and give the half square triangles a quick press to set the seams before I trim off the excess.


When I trim...I don't measure,
 I just eyeball a 1/4" seam allowance.
 No worries...it doesn't have to be accurate because it has already been stitched!


Then I press open my half square triangles ...usually with the seam allowance towards the darkest fabric....and place them back into the proper place on my design board...this is done with a quick glance at the block pattern to make sure all of the pieces are going the right way!


It also helps to have all of the pieces laid out in front of you on the design board so that you can decide the best direction to press your seam allowance's for less bulk within the finished block.


After each segment is pressed...
they go right back onto the design board....


and back over to the machine for more clotheslining...
or chain piecing...
whatever you want to call it:)


And again...from the machine, right back on to the design board....


And back on over to the iron....


And sew on...


and sew on...


And sew on:)


And we have a finished block!....
no pieces turned the wrong direction....
which means no un-sewing...


Which also means no stretching or distorting of pieces....


Which means an accurate block that will fit perfectly into the quilt!...and after all....that's what we all want right?
The mini design boards really do make a difference and I hear from my students all the time about how much they love them and how helpful they are.

So...if you think this looks like fun...and if you are so inclined to try something new in the way that you piece your blocks....and you wanna try it...
And I'll show you how to make your very own
 mini design board:)
xx
Lori

Friday, July 8, 2011

Mini Design Board Tutorial...Part 2

If you have already constructed
your boards from
you are ready to give the edges a
cute finish with fabric!
Okay girls.....plug in your irons and
load up your glue guns!
Lets get started:)

As I said yesterday...
you will need a 2 1/2" x Width of Fabric strip to edge one mini design board.


Press your strip in half with
wrong sides together.


Use this center fold as your guide....

And fold one side into the center and press.

Repeat for the other side.

Stitch over the raw edges
right down the center of the strip using a wide zig-zag stitch.
Don't forget to backstitch at the beginning and the end to secure your stitches.


Now it's time to glue!...Start by placing a line of glue on the very edge...aka the foam in the middle of the board.
Press the center of your fabric strip onto the line of glue....(raw  edges down).
Continue all the way around the board...


When you get to the end...
trim the end of your strip so that it overlaps the other end by about one inch. 
 Glue it down as neatly and smoothly as possible for a nice finish.
You may want to place a small amount of hot glue along the raw ends of your fabric strip to stop it from fraying.

This is how your board should look
at this point.


Now you will glue the edges down
onto the batting side.
Be patient and work around the edges a little at a time to keep control of the glue...
and also...try not to use too much glue...
if you do it will gush out past the folded edge of your strip:(

You will finish the corners just like you do when binding a quilt!...
(except you will glue instead of sew...lol)

Just fold them over and glue them down!


Okay...good job:)
One side finished and one to go!

Turn it over and repeat the process on the smooth side of the mini design board.


Yay!!!...you did it!
You made one cutie-patootie
mini design board:)


Can you stop with just one?....sure.
If you want to.
But I didn't...
and I'll tell you why in my next post!
xx
Lori

Related Posts with Thumbnails