

YaY!
Here we are again and it's week two:)

Let's Bake!!

Last week was all about
baking pies and
cross stitching flowers:)
This week is all about
measuring and mixing!

Let's do the White Measuring Cup first.
You will need the
E-23 E-24 and E-12
Grab your prepared baggie
labeled
White Measuring Cup
and let's get started!

*FYI* - We use the E-23 for
two blocks in the quilt.
One block is the Flour Sifter and
we will be doing that during week 5.
I'm showing you both of those traced interfacing pieces today
so that you can take note that you will need to trace the one for the
White Measuring Cup in reverse.

When you are sewing the E-24 piece
for the handle...
Sew it on the curved line only like this instead of on the straight line.
The raw edge will be tucked underneath
the right side of the cup
and you can use that opening for turning!

The E-23 and the E-12 are sewn...
turned and shaped just like usual:)

In prep for appliqué...
place your pieces 3/4" in from the sides
and 3/4" in from the bottom as well.
Tuck the handle and E-12 circle
for the inside of handle underneath
the right side of the cup like this.
Trace your embroidery lines onto the measuring cup first.
I like to embroider before appliqué...
using a backstitch and all
6 strands of the red Aurifloss.

CUTE!!

Now use the
Cute Cuts 4 1/2" Trim-It Ruler
to trim your block down to 4 1/2" square
so that it's ready to sew into your quilt.
Use the lines on the ruler to
center your appliqué when trimming:)

Okay...let's measure with the
red and pink next!
You will need to use the
E-12 circle again for the
red measuring spoon.
You will need the E-17 E-18 and E-19
for the pink measuring cups.
Run all strips for the handles
through the 1/4" bias tape maker.

Sew around all 3 ovals and
the circle as usual.

Trim...turn...shape and press.

This is where I placed my pieces
onto the background.
First I pressed under the top end
of the handle about 1/4"
and left the other end unturned...
tucking in the raw edge under the spoon.
The spoon is placed 3/4" from the
right side edge of fabric.
Don't forget to trace the ring around
the end of the handle for embroidery:)
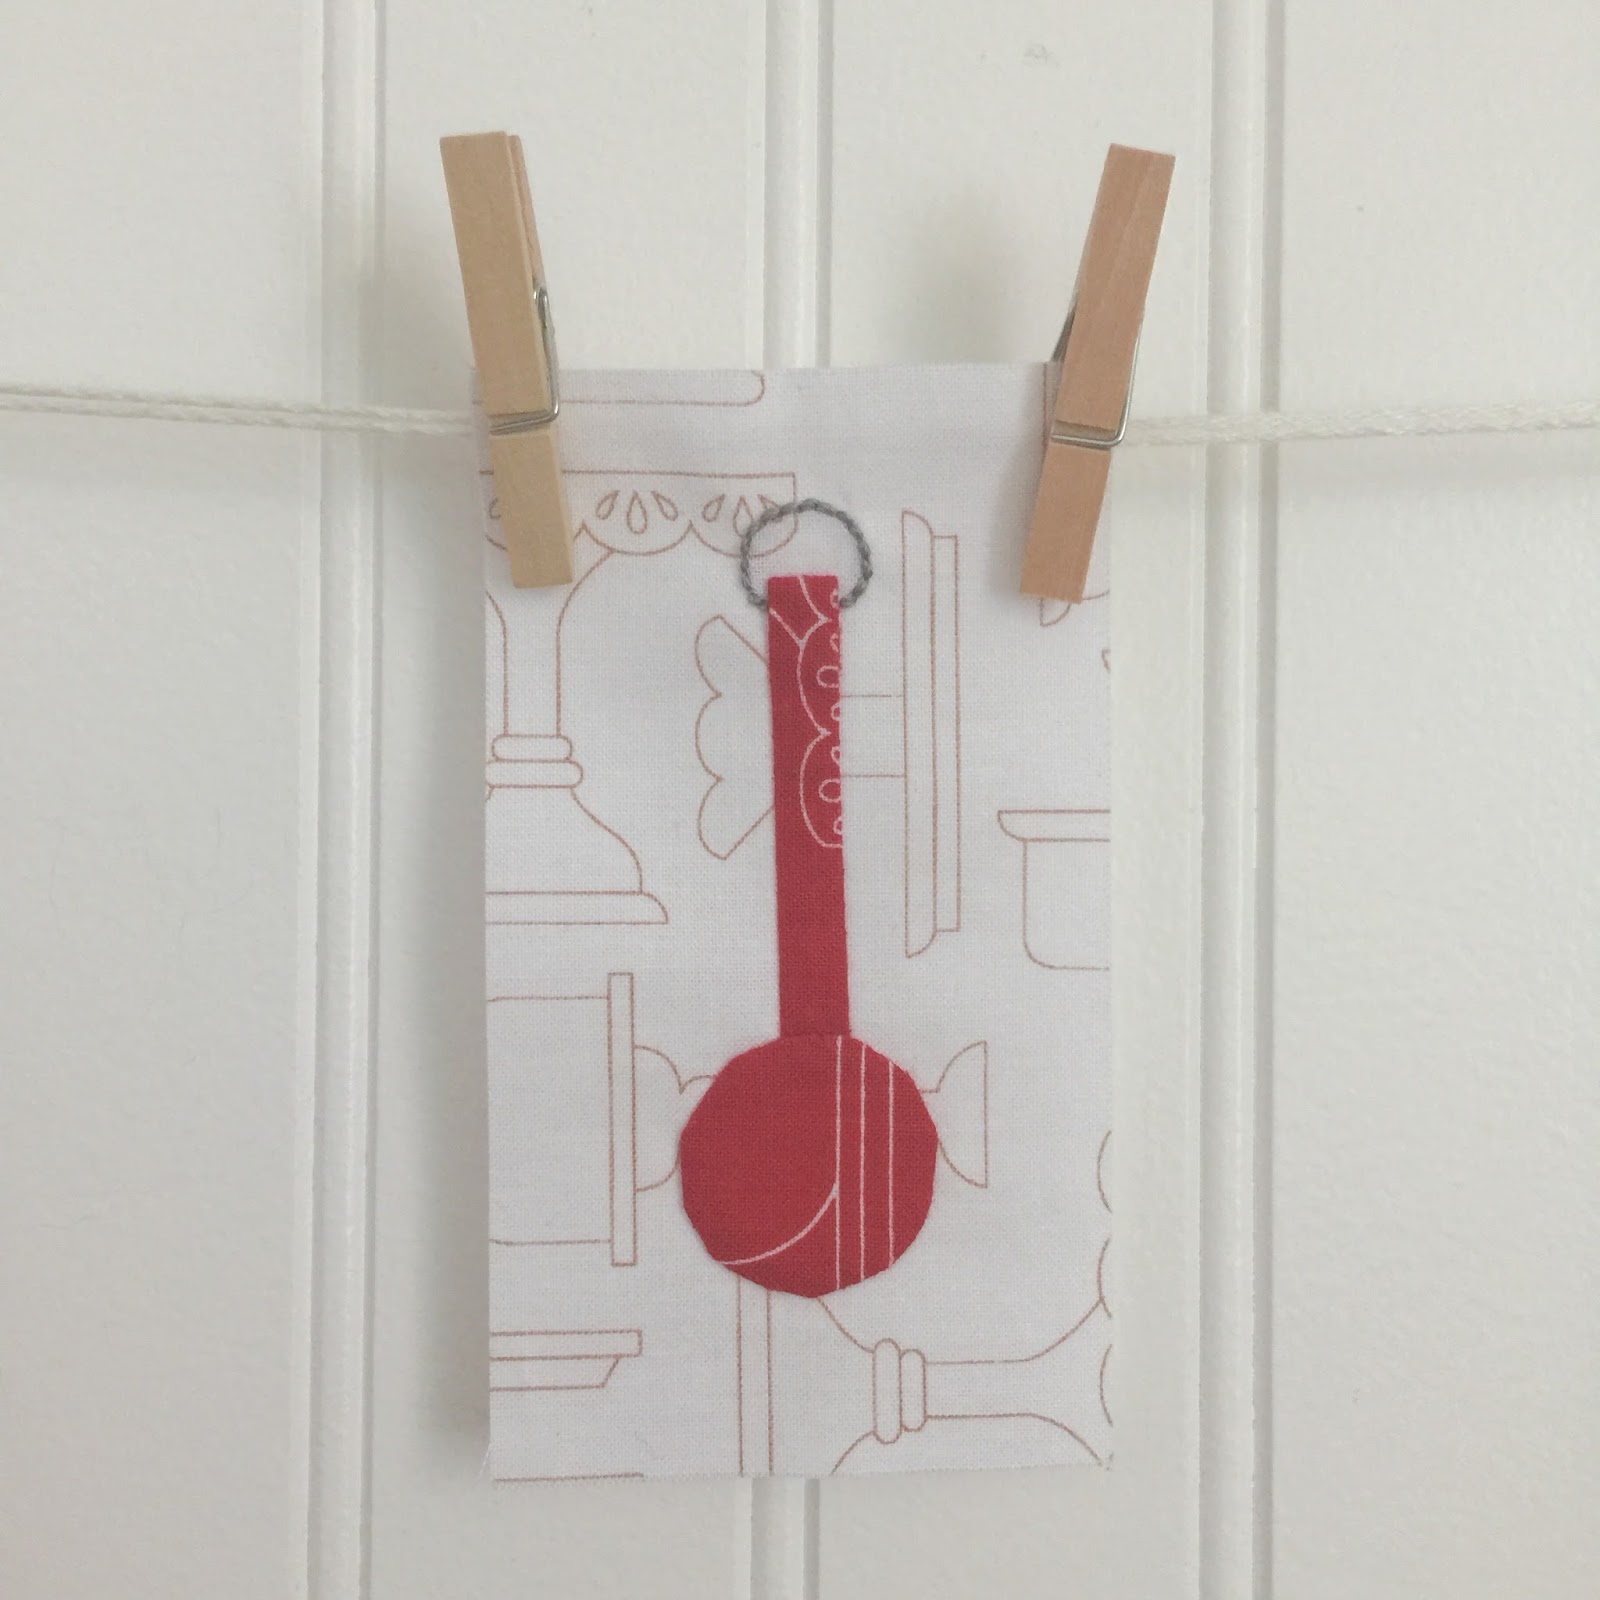
I used a backstitch and all
6 strands of my gray Aurifloss.
The red measuring spoon block should
measure 2 1/2" x 4 1/2" BEFORE
sewing it into the quilt.
That is the size that I had you cut it:)

For the pink strips I turned and
pressed each end under about 1/4".
The top one is 3 1/4" long...
The center strip is 3 3/8" long
and the bottom one is 3 1/2" long.

Take the large oval and measure in
1" in from the end like this.

Trim it off and discard the piece
that is under the ruler.
You will use the one on the right.

Measure in 3/4" in on the
medium oval and trim.
Again...
you will be using the
remaining piece on the right.

Measure in 1/2" on the
smallest oval and trim it off.
You will use the
remaining piece on the right.

Lay your pieces out onto your
5" background square.
The angle of my photo
makes it look rectangle...
but it's a square!
The raw edge of each cup
tuck under the handles:)
The bottom of the
largest measuring cup is 3/4" up
from the bottom edge of the fabric.
The handle is 3/4" from each side edge.
The smallest measuring cup handle
also measures 3/4" down
from the top edge and
centered from side to side.
After you glue baste those two...
you can center the middle one!

Appliqué your pink measuring spoons.
We had pink plastic ones
just like this when I was a girl:)

After applique...
Use the 4 1/2" Trim-It Ruler...
and it should measure 4 1/2" square
before sewing it into your quilt:)

Okay let's do the Mixer Block!
You will need the
E-5 E-6 E-7 E-22 and E-18
Run your 1" strips through the
1/2" bias tape maker.
Cut them into these three lengths:
9" - 8" - 2"

You will sew the 2" x 3" red piece
to the end of the stripe
before sewing it together with the interfacing...
BUT WAIT!.. before you do that...

Glue baste the 8" long strip
onto the center like this first.
Press the rectangle to get
the exact center line.

Now sew it to the left side
using a 1/4" seam allowance.

Press towards the red left piece.

Line up your traced interfacing
like this and sew.

Trim...cut the "X" in the
interfacing ONLY
and then shape and press.

The other pieces are sewn in the usual way.

This is how I cut the
handle interfacing for turning.

I shaped and turned the bottom end first...

And then finished with to rounded end.

I pressed it a section at a time after shaping.

Grab one of the ovals and
we are going to make the plug end.
Measure in 1" from the left end
and draw a line.
This is another sewing line.
Backstitch where you start and stop.

And trim off the excess.
Cut your "X" in the interfacing and turn.

These are all of the pieces
that you should have completed.
Now it's time to baste onto the
background for appliqué!
Press the 9" long bias strip ends
under 1/4" so that it
measures 8 1/2" long.
Do the same with the remaining strip
so that it measures 1 1/2" long.

We will talk about the cord in a minute...
first let's get the pieces onto the background.
*FYI* - The 8 1/2" strip on the bottom
will be glue basted on AFTER
the cord is traced and embroidered.
The bottom of the stand and the bowl are tucked underneath the strip a little...
but baste these two pieces first by placing them 1 1/4" up from
the bottom edge of the background.
The top right corner of the
bowl measures 3/4" in from the
side edge of the background.
There is a 1/4" space between the
left side of bowl and the stand.
The top of the
mixer handle measures
in 3/4" from the top edge
of the background.
Now that you know
all of these measurements...
the rest of the pieces will
go into place easily:)

The oval tucks under like this for the bracket and the 1 1/2" strip where the beaters come out tucks under as well.

The button goes on last but
I'm showing it to you now
so I don't forget!

Trace the cord pattern
onto your background...
along with the two plug ends
and the top of the beater lines.
The plug will be basted after
the cord is stitched down.

Begin by placing the end if the
vintage trim like this so that
the end will be tucked underneath
the bottom strip after it's basted on.
Use all 6 strands of Aurifloss
and stitch over the trim
on the diagonal...
while stitching down the
cord as you go.
I did not glue baste the trim...
just placed it onto my
traced line as I went along.

Continue stitching...

Until you reach the end and
then you can clip the vintage trim.
Save the rest for the other blocks
that it goes into.
Now baste the plug.

Finish up preparing for the appliqué
by glue basting the
bottom strip into place.
It should measure 3/4" up
from the bottom edge
of the background fabric.

Time to appliqué and do
the rest of the embroidery:)

I used a backstitch and all
6 strands of the gray Aurifloss.
I used the red Aurifloss to
sew the button on.
Your block should measure
10 1/2" tall and 12 1/2" wide
BEFORE it is sewn into the quilt...
which is the size I had you cut it.
YaY!
That is it for this weeks tutorials...
I'll see you here
next Monday for week three!
xx
Lori

1 comment:
I’m just so addicted to all of your quilts, your fabric designs and color choices, the buttons and lace and EVERYTHING! I cannot get enough of it all. Right now, I am sitting here planning out several smaller quilts to be framed. The first one will use the gorgeous and very charming red mixer shown above.
Post a Comment